photo sharing and upload picture albums photo forums search pictures popular photos photography help login
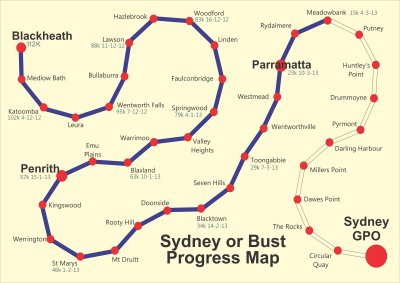
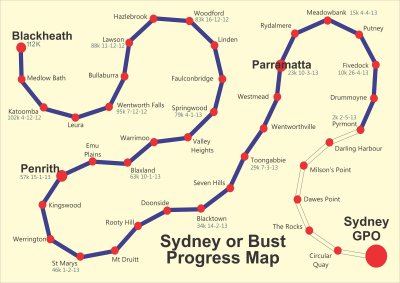
David Hobbs | profile | all galleries >> Sydney Tours >> SydneyorBust 3 tree view | thumbnails | slideshow

SydneyorBust 3

Well I am finally off on another adventure. I live in Blackheath, a Blue Mountains town some 112 kilometres west from the
Sydney GPO. Over the years I have driven into Sydney or taken the train but I have grown tired of travelling by such means.
This time I AM GOING TO WALK IN.

And so at 2:30 pm on Tuesday 4th December 2012, I left my home in Blackheath, basically turned east toward the sea
and began my trek. I have to be realistic of course and so I am actually going to tackle the task in bite sized stages.
Along some of stages I shall be joined by friends but most of the sessions I shall do by myself. In any event I am scheduling time
for this each and every week until I'm done ... depending, of course, on the weather and other things.

Theoretically I will do the trip from my front door to the Sydney GPO in approximately 18-20 sessions. This should get me there by
sometime in April or May. The best part is that much of the trip will be downhill. All pictures include commentary.

The journey so far was documented in the SydneyorBust and SydneyorBust2 galleries. We now take up the task from Toongabblie.


Greater Map 3.jpg SB Stages 11.jpg SB1101w.jpg SB1102w.jpg SB1103w.jpg SB1104w.jpg
SB1105w.jpg SB1106w.jpg SB1107w.jpg SB1108w.jpg SB1109w.jpg SB1110w.jpg
SB1111w.jpg SB1112w.jpg SB1113w.jpg SB1114w.jpg SB1115w.jpg SB1116w.jpg
SB1117w.jpg SB1118w.jpg SB1119w.jpg SB1120w.jpg SB1121w.jpg SB1122w.jpg
SB1123w.jpg SB1124w.jpg SB1125w.jpg SB1126w.jpg Sydney or Bust Map 11.jpg SB Stages 12.jpg
SB1201w.jpg SB1202W.jpg SB1203W.jpg SB1204W.jpg SB1205W.jpg SB1206W.jpg
SB1207W.jpg SB1207aW.jpg SB1208W.jpg SB1209W.jpg SB1211W.jpg SB1212B.jpg
SB1213W.jpg SB1214W.jpg SB1216W.jpg SB1217W.jpg SB1218W.jpg SB1219W.jpg
SB1220W.jpg SB1221W.jpg SB1222W.jpg SB1223W.jpg SB1224W.jpg SB1227W.jpg
SB1228W.jpg SB1229W.jpg SB1230W.jpg SB1230aW.jpg SB1231W.jpg SB1232W.jpg
SB1233W.jpg SB1234W.jpg SB1235W.jpg SB1236W.jpg Sydney or Bust Map 12.jpg Sydney or Bust stages.jpg
SB1301 w.jpg SB1302 w.jpg SB1303 w.jpg SB1304 w.jpg SB1305 w.jpg SB1306 w.jpg
SB1306a w.jpg SB1307 w.jpg SB1308 w.jpg SB1309 w.jpg SB1310 w.jpg SB1311 w.jpg
SB1312 w.jpg SB1313 w.jpg SB1314 w.jpg SB1315 w.jpg SB1316 w.jpg SB1317 w.jpg
SB1318 w.jpg SB1319 w.jpg SB1320 w.jpg SB1321 w.jpg SB1322 w.jpg SB1323 w.jpg
SB1324 w.jpg SB1325 w.jpg SB1326 w.jpg SB1327 w.jpg SB1328 w.jpg SB1329 w.jpg
SB1329a w.jpg SB1330 w.jpg SB1331 w.jpg SB1332 w.jpg SB1333 w.jpg SB1334 w.jpg
Sydney or Bust Map 13.jpg SB Stages 14.jpg SB1401w.jpg SB1402w.jpg SB1403w.jpg SB1405w.jpg
SB1406w.jpg SB1407w.jpg SB1408w.jpg SB1409w.jpg SB1410w.jpg SB1411w.jpg
SB1412w.jpg SB1413w.jpg SB1414w.jpg SB1415w.jpg SB1416w.jpg SB1417w.jpg
SB1418w.jpg SB1419w.jpg SB1421w.jpg SB1422w.jpg SB1422aw.jpg SB1423w.jpg
SB1424w.jpg SB1425w.jpg SB1426w.jpg SB1427w.jpg SB1428w.jpg SB1429w.jpg
SB1430w.jpg SB1431w.jpg SB1432w.jpg SB1433w.jpg SB1434w.jpg SB1435w.jpg
SB1436w.jpg SB1437w.jpg SB1438w.jpg SB1439w.jpg SB1440w.jpg SB1441w.jpg
SB1442w.jpg SB1443w.jpg Sydney or Bust Map 14.jpg Sydney or Bust stages 15.jpg SB1501 w.jpg SB1502 w.jpg
SB1503 w.jpg SB1504 w.jpg SB1505 w.jpg SB1507 w.jpg SB1508 w.jpg SB1509w.jpg
SB1510w.jpg SB1511w.jpg SB1512w.jpg SB1513w.jpg SB1514w.jpg SB1515w.jpg
SB1516w.jpg SB1517w.jpg SB1518w.jpg SB1519w.jpg SB1520w.jpg SB1521w.jpg
SB1522w.jpg SB1523w.jpg SB1524w.jpg SB1525w.jpg SB1526w.jpg SB1527w.jpg
SB1528w.jpg SB1529w.jpg SB1531w.jpg SB1532w.jpg SB1533w.jpg Sydney or Bust Map 15.jpg