|
How do I disable direct linking?
The steps below show how to disable direct linking at the account level.
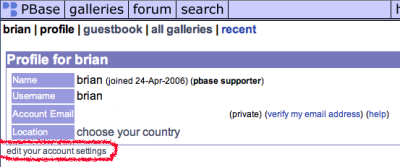
From your profile page, click the "edit your account settings" link.
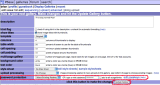
Scrolling down, you will see the "Account Settings" section. Here, you can disable direct linking to your images by unchecking the checkbox by "Allow direct linking from other sites, such as forums and blogs".
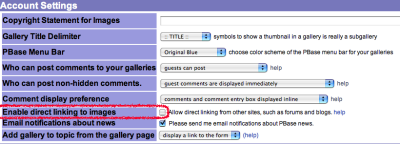
Don't forget to click the "Update" button when done making changes.

Disabling Direct Linking at the Gallery Level.
The steps below describe how to disable direct linking at the gallery level.
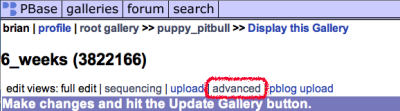
Begin by clicking the "advanced" link located towards the top of the page.
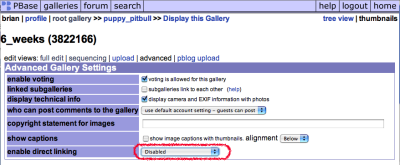
Here you are able to disable direct linking or set it to your preference. These settings will only affect this gallery.
 |
|
|
Account Settings
-
- Directions below show how to get to the Update Account page. To update your account visit your profile page. Click the "edit your account settings" link. This link will take you to the Update Account page. You will be able to change your account information (password and account email), update public information (name, url, location, and email for the public) and configure your account settings. Don't forget to click the update button when done making changes.... (more)
-
- Instructions below show how to change the account password.
From your profile page, click the "edit your account settings" link.
Here you are able make a new password for your account. You will be required to enter the current password once for verification and the new password twice.
After making changes click the update button found towards the bottom of the page.
-
- Instructions below tell how to change the email address for your account.
Go to your home / dashboard page.
Click the Account Settings link on the upper left side.
Here, you may update email information for your account.
You will be prompted for your current password in order to change your email address.
After making changes click the Update button found towards the bottom of the page.
-
- Instructions below tell how to verify the email address for your account. Go to your home / dashboard page. Click the Account Settings link on the upper left side. Find your Account Email. To the right of your email address, you will either see a status of "verified" or a link to "verify my email address". To continue with verification: Click the "verify my email address" link. You will see a message at the top of the page: An email has been sent to you. Please follow the directions in the... (more)
-
- The directions below describe how to set your country. From your profile page, click the "edit your account settings" link. Scroll down to the Public Information section. Here is where you select your country. You can specify a more detailed location using the location field. This text is displayed below the country flag on profile page Don't forget to click the update button when done making changes. ... (more)
-
- Steps below show how to add a copyright statement for your images.
From your profile page, click the "edit your account settings" link.
Scroll down to the Account Settings section. Here is where you put your copyright statement for images.
Don't forget to click the update button when done making changes.
-
- The directions below describe how to change comment options. From your profile page, click the "edit your account settings" link. Scroll down to the Account Settings section. Here is where you change your comment settings. Who can post comments? There are four options to specify who can post comments. This can be set as an account-wide setting or differently for each gallery. "nobody can post" - no comments at all "PBase subscriber" - only people with a paid PBase account "must be... (more)
-
- The steps below show how to disable direct linking at the account level. From your profile page, click the "edit your account settings" link. Scrolling down, you will see the "Account Settings" section. Here, you can disable direct linking to your images by unchecking the checkbox by "Allow direct linking from other sites, such as forums and blogs". Don't forget to click the "Update" button when done making changes.
Disabling Direct Linking at the Gallery Level. The steps... (more)
-
- Instructions describe how to change the format for displaying your gallery titles .
From your profile page, click the "edit your account settings" link.
Here you select the format you prefer to display your gallery titles.
After making changes click the update button found towards the bottom of the page.
-
- The directions below describe how to disable email notifications about news. From your profile page, click the "edit your account settings" link. Next, scroll down to the "Account Settings" section. Here, you can choose to not have email notifications sent to you by unchecking the checkbox by "Please send me email notifications about PBase news". After making changes click the update button found towards the bottom of the page. ... (more)
-
- The directions below describe how to change your PBase Menu Bar. From your profile page, click the "edit your account settings" link. Here you choose the color scheme of the PBase menu bar for your galleries. You can choose from three different styles of PBase menu bars. 1 - Original Blue 2 - Black on Light Gray 3 - Gray on Black After making changes click the update button found towards the bottom of the page. ... (more)
-
- The directions below describe how to set your public email address. From your profile page, click the "edit your account settings" link. Here is where you put your email address the public will have a chance to see. Once you enter an email address, you have three choices about who can see it. 1 - Anybody, including guests, can view your public email address. 2 - People must be logged in to view your public email address. 3 - Only PBase subscribers may view your public email address. After... (more)
-
- The directions below describe where to post your personal url.
From your profile page, click the "edit your account settings" link.
Here you can specify a personal URL. Your personal URL can be seen by anybody looking at your profile page.
After making changes click the update button found towards the bottom of the page.
-
- The directions below describe how to edit the Nametag feature. From your profile page, click the "edit your account settings" link. Here you can specify a name for people to see when looking at your galleries. If these fields are left blank, your username will be displayed in its place. Many people use their first and last name or just their first name. After making changes click the update button found towards the bottom of the page. Now, people will see your nametag when they view your... (more)
-
- The steps below describes how to set your profile page portrait.
Begin by clicking on the image you want as your portrait. Then click the "edit image" link found towards the top of the page.
Next, click the "Click here to make this image your profile page portrait" link.
When setting your portrait image is successful, you will see a similar green message at the top of the browser.
|
|
|
Search Results for 'create link'
-
- Instructions below describe the process of creating a passkey for a gallery
Begin by clicking the "edit this gallery" link found towards the top of the page.

Next, in the Password Protection section, type the password you want to put on the gallery.
Click the Update Gallery button.
When successful you should see a message towards the top of your screen similar to this below:

-
- You can create a new gallery from your profile page.
To create a new gallery, first give it a name.
If you want this gallery to be created at the root level, leave the box checked; if you want this new gallery to appear in the existing gallery, uncheck the box.
After you click the "New Gallery" button, you can upload photos into your new gallery.
-
- Go to your usergroups management page.
Enter the name of the new usergroup.
Click the Add Group button.
Your unpublished usergroups are only accessible by you.
You can easily change whether a group is published or unpublished using the link at the top right of the list of members.
-
- To create your own stylesheet:
Go to www.pbase.com/css
Enter a name for your new stylesheet.
Click the "Create Stylesheet" button.
You are now editing your new stylesheet. When you are done making changes, click the "Update Stylesheet" button.
To apply the new stylesheet to a gallery:
Edit the gallery.
Select your new stylesheet name from the list of existing stylesheets.
Click the "Update Gallery" button.
-
- When editing a gallery, you have the option to Create a New Gallery. After naming the new gallery, you have an option to Create the Gallery at Root level. This is the default, but by unchecking that box, your new gallery will appear within your current gallery. For example: Let's say you want to create a "flowers" gallery in your root gallery and have galleries for "daisies", "roses", and "marigolds" inside of the "flowers" gallery. Edit your root gallery. Scroll down to the "Create a new gallery...... (more)
-
- Instructions below describe how to create a new gallery.
Beginning from the Profile Page, scroll down to the "Create a New Gallery" section.
Here you type in the name for your new gallery and click the "New Gallery" button. Your new gallery will be created in your root gallery.

When successful you will see this message:

-
- There is no cost to create an account and try PBase out for a 30 day trial period, but please read the pricing information if you would like to become a PBase subscriber. You will need to provide the following information in the registration process: Email Address Your email address is used to send your password to you if you should forget it. Your address will not be displayed to other users unless you choose to later by editing your account and adding a public email address. You can also login using your email address instead of your username. Username Your username is a unique identifier that you will use... (more)
-
- You can choose your current Photo-a-Day (PaD) gallery by clicking the link at the bottom of your edit gallery page.
You must be a paying customer for your PaD gallery to appear in the PaD meta-gallery.
-
- Paying PBase customers can direct link to their own public images as long as they have direct linking enabled on the image's parent gallery. If you try to direct link to images that are non-public or password-protected, it will fail.
-
- A hyperlink is an item of text or an image that when clicked, starts a given response. Often, hyperlinks are used to link to another webpage.
For example, these two hyperlinks both lead to the PBase help home when clicked.
www.pbase.com/help and PBase Help
-
- The steps below show how to disable direct linking at the account level. From your profile page, click the "edit your account settings" link. Scrolling down, you will see the "Account Settings" section. Here, you can disable direct linking to your images by unchecking the checkbox by "Allow direct linking from other sites, such as forums and blogs". Don't forget to click the "Update" button when done making changes.
Disabling Direct Linking at the Gallery Level. The steps... (more)
-
- Link to your root gallery (all of your galleries) example: http://www.pbase.com/username Link to one of your galleries example: www.pbase.com/username/gallery name Link to a single image using default size example: www.pbase.com/image/image number Specify the size of an image example: www.pbase.com/image/image number/size Direct linking to an image for use on another website, forums, or message boards: Due to bandwidth costs, you can only use this feature if you... (more)
-
- To get the direct linking URL for an image, view the image and add .jpg or size.jpg to the end of the URL. This works just like linking to an image page but append .jpg to the end of the URL. example: www.pbase.com/image/image number.jpg example: www.pbase.com/image/image number/size.jpg Note: to direct link to a .gif, use the .jpg extension also. It will still send the gif file. You can also easily get the direct linking URL by viewing the edit image page and looking... (more)
-
- In order to link subgalleries, go to the Advanced Settings page in the gallery which you want to link from. Select the check box to use Linked Subgalleries Click Update For example: Say you have an Italy gallery. Within the Italy gallery, you have subgalleries for various Italian cities. It would be nice if people could jump directly from the Venice subgallery to the Bologna subgallery without having to go back through the main Italy gallery to get there. The solution is to use linked subgalleries.... (more)
|
|
|
contribute to the help pages
|


