


|
|
|
|
|
|
| Pawel Lancucki | profile | all galleries >> Pawel Lancucki - Amateur Astronomy >> ATM corner >> My balcony observatory >> Stage 1 - Installation of the pier | tree view | thumbnails | slideshow |
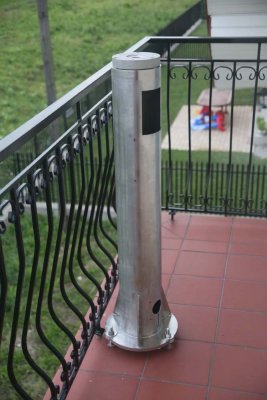
Stage 1 was to anchor the pier to my balcony floor.
The pier itself is made from stainless steel tubing, 1000mm high, 160mm dia, 4mm wall thickness, and has traditional design - tube is welded to 15mm thick base and is stiffened with 3 triangular fins. On top of the pier, there is an aluminum adapter fitting Takahashi EM-xx and my modified bases of AP mounts.
There is an access hole close to to top of the tube, which is necessary as my mount need to be bolted from underneath. There is a second small access hole at the bottom of the tube - in theory it would be possible to route some cables inside the tube, but I have finally decided to use a separate wire conduit. There are also few holes threaded M6 placed on various heights - these will be used to attach to the pier some accessories, cable conduits etc. I plan to make a small shelf which will be installed inside the pier, just below top access hole - so I could use the space inside for storing e.g. eyepieces when opted for visual use. Also, I plan to place inside few bags filled with sand - this will help reduce any possible vibrations and ringing, inherent to typical metal structures.
First, I have checked for an optimal placement of the pier on my balcony - needed space to maneuver, access from both sides, space to place the shelter on the later stages, required cable length etc. This was done by placing the pier on the balcony, mount head on the pier and a "dummy scope" from a section of lightweight cardboard tubing. Once decided where, I have carefully marked location for 3 anchoring bolts.
While not very complex task, it took me the whole evening to drill in the concrete a set of 3 20mm dia holes for pier mounting bolts. The holes had to be drilled through hard tiles and underlying layer of concrete. Stainless steel M16 metal rod was cut into 20cm pieces, sanded round on one end and cleaned in solvent from oil residues. The holes were than half-filled with special "chemical anchor" of construction grade (pulling out force for M16 in 0,5 ton range). Once the bond settled, the bases of the rods were thoroughly sealed with "roofing sealant" construction grade - this should prevent moisture from leaking into the balcony base.
Once this settled again, the pier was attached to the rods and leveled using large M16 nuts and washers.
 Anchored bolts |
 Pier installed 1 |
 Pier installed 2 |
 Pier base |
 Anchoring bolt detail |
| comment | share |