photo sharing and upload picture albums photo forums search pictures popular photos photography help login
Compass Marine How To | all galleries >> Welcome To MarineHowTo.com >> Re-Packing A Traditional Stuffing Box > All Done!
previous | next
April-15-2005

All Done!

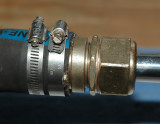
Here's the finished product after installing three new rings of GTU packing.


When initially installing the rings of packing LIGHTLY tighten the nut just until you start to feel some resistance then stop! DO NOT OVER TIGHTEN THE NUT EVER!! the final adjustment will be made after running the motor and shaft for a while.


Proper adjustment for GFO, GTU or Ultra-X is up to a few drops per minute when the shaft is spinning. You'll want it adjusted for nothing more than slightly different from the sea water temp, about a 15 - 20 degree differential, or slightly warmer to the touch. Measure these temps after the shaft has spun for a while.


Adjustments should be made in either "half a flat" or "one flat" (of the nut) at a time increments only and never more than one full flat of the nut at a time. W.L. Gore recommends not adjusting the stuffing box until you have run the boat in gear for about two hours of time. This allows the packing to take a set and break in.


When adjusting other types of flax the stuffing box should be relatively cool/warmish to luke warm, at most. With traditional flax packing it should drip and must drip while the shaft is spinning.

The cooler your stuffing box runs, the longer shaft life you'll have. With GFO they claim temps up to the 125-130F range are technically safe for the packing. In my opinion this generally means there is not enough cooling flow through the box. Any entrapped air, with normal temps this high, can cause a big spike in box temp. Aim for 15-20 degrees warmer than the ocean or lake temp but a little higher, with GFO, GTU or Ultra-X, should not "kill the deal".


Some boxes will even drip when the shaft is not spinning and this can be entirely normal depending on the condition of your shaft. Do not get stressed if you can not make it drip free at rest as not all shafts are in good enough condition for this to always be the case.


Please do not get in the habit of tightening the stuffing box when "leaving the boat". Natural flax packings are not elastic and do have a memory, in a sense, and they will not necessarily return to their uncompressed state. Doing this will severely shorten the life of your packing and it will start leaking continuously in short order.


I generally don't like rules-of-thumb for drip rates and really hesitated to even put one on here. My reason for this is that every shaft has differing levels of wear and thus the drip rates are usually different in every installation.


The best rule of thumb I've found over the years is the least amount of drips when the shaft is spinning but before the box develops any heat. Again, it's a drip to heat ratio and little to no heat is the most desirable. Traditional flax packing can drip as little as about 5-10 drops a minute if adjusted correctly, while running, and this drip rate allows lubrication of the shaft.


Do not make adjustments to the packing nut, with traditional flax, for at least 24 to 48 hours as the plant based flax packing will absorb moisture and swell. This swelling can cause overheating of the stuffing box, if it is adjusted to quickly after launch and the swelling has not been accounted for.


Premature tightening of traditional flax can result in potential problems. A good and safe practice is to adjust the packing by "half a flat" turns after two hours of use or until you have your drip to heat ration correct. You can actually use an infrared thermometer, often called a pyrometer, to make this adjustment process easier but usually your hand will suffice as a good gauge.


If you want a totally dry bilge then a dripless type gland such as a PSS or Las-Drop is the way to go. I've provided full installation instructions for that type of seal too in the gallery preceding this one.


Good luck!

Nikon D70s
1/60s f/4.0 at 50.0mm full exif

other sizes: small medium large auto
share
Guest 30-Nov-2016 22:36
Great write up and read and I don't even have a stuffing box!
Compass Marine How To13-Dec-2013 03:04
The first photo of the article explains the hose clamps.
Leo 04-Dec-2013 21:22
Wonder why you are using the inferior perforated hose clamps in this photo?
Leo 04-Dec-2013 21:21
Wonderful descriptions and pictures. Regarding the "drip-free" blue clay, I have used it with great success for many years on many different boats and applications (stabiliser shafts, pump shafts - both for oil and water). I however do not use it to stop drips (which are necessary), but rather to reduce maintenance and temperature, when compared to flax packing. This results in less wear on the shaft. I have found that a quicker 'seat' can be achieved by initially over-tightening the nut, then loosening it before running the shaft and checking the temperature which should be cool. The specific tool for removing flax packing is a small cork-screw on a flexible shaft with a T-handle.
DWHowell 03-Jun-2013 11:44
'73 Sea Crest, 1 1/4 shafts, similar boxes. Thank you for a very informative article. I'll make my "Compass Packing Tool" and get with it today.
Thierry 12-Oct-2012 16:38
Thanks for this excellent tutorial. Before I read this I was more than a little concerned that the shaft would leak or spray water all over but your article gave me (some) confidence that I could do this with the boat in the water. Fortunately on my Cabo Rico 42 the stuffing box is very accessible and there is plenty of space between the box and the transmission coupling. The water flow was much less than I expected, but after I wrapped the shaft and the box with Rescue Tape the flow stopped completely and I could work on the repacking job at leasure. Thanks again.
Thierry
Stephan 18-Jun-2012 16:02
Thank you very much for your instructions, I am new to owning a boat and without it I don't think I would have even tried to do it myself.

I have a 1" shaft and put in 100% Gore GFO 1/4" (same size as what was already there). It was really hard to push the material inside, even with the tool you described. I am struggling with adjusting it. I just tightened it till I felt some resistance and then closed it. I tested it on the water, and had no drop and temp up to 130F. So I untightened it till the moment I had water coming out, and tightened it back just barely till the moment there was not water coming out in the slip. When I tested that, I saw just one drop coming out, and temp up to 130F again. Any suggestion what I should do differently?

I don't want to have water coming in while at rest.

Thanks,
Stephan.
Shawn 29-Mar-2012 18:39
Great write up. Thank you.
Rich Benedict 07-Jul-2011 20:59
I'm a professional technical writer and I have to say you did a great job explaining this whole process and getting great pictures. I'd be proud of work like this. Thanks very much!
John Switzer 11-May-2011 20:15
Absolutely the most informative and well illustrated instructions I've seen. Used some of you're methods on mu 1990 Hunter 35.5 with success. Having the knowledge to do it right and seeing the photos of the individual pieces apart allowed me to have the confidence to complete the task. I had little understanding of what was inside the stuffing box to start. Thank You
sv dare 02-Mar-2010 17:09
thanks a bunch, very clear and incredibly helpful. beautiful pics, too.
Mike Thoele 30-Apr-2009 22:22
When the famed maintenance author Don Casey goes off to Boat Repair Heaven, you should step into his career niche. This is great stuff. And absolutely inspired to think of doing it with pieces from your shop rather than with the kind of mystifying pictures that often result from photography in the bowels of the boat. Thank you.
Walter 13-Mar-2009 15:41
Great info. Does anyone know what size packing is used for a 1983 Catalina 30 with a 1" shaft? My engine was rebuilt about five years ago, and a professional machanic repacked the box, but I'm sure it needs it again and I'd like to attempt it myself while the boats' on the hard. I can't find any specs in the maintenance manual that came with the boat. Thanks.
Joe 07-Jul-2008 21:01
Please clarify the instructions regarding the 24 hour period and the after 2 hours period. Once the packing nut is installed for the first time do I have to wait 24 hours and then run the engine for 2 hours and then wait 2 more hours BEFORE adjusting ? Explain the differences between the 2 hours wait and the 24 hours wait. Using Graphtex Ultra.
Dedek 28-May-2008 18:37
WELL DONE!!!!!!!!!!!
these steps worked great on my 2 inch shaft only diference 8 yes eight rings of packing.
Thankyou
derek
Guest 27-Mar-2008 17:06
Having replaced a number of packings on various sailboats (all of which required more patience due to awkward positioning of the gland), I can offer one or two comments. First, the adjustable wrench shown in your picture proved to be totally unsuitalbe in every case that I was involved with. A better approach is a curved jaw "visegrip" plier and some water pump pliers. Another hint is to use a large fishhook to fashion a pick for the installed packing removal. Lastly, rather than use a stainless (or any other metal) mandrel to size the new rings of packing material, I found that a short length of appropriately sized dowel worked very well. Additionally, the dowel cannot be mistaken for anything but what it is and can be left in the tool box, rust free. Be sure to inspect the hose at every haul out. If in ANY doubt, replace.

Tanner - Bay St Louis
Guest 14-Nov-2007 18:24
Outstanding presentation on this subject!!! Excellent illustration and very informative.
Thank you.
Guest 13-Nov-2007 13:48
I'm in the process of outfitting my Flicka 20 for a solo circumnavigation. She's 9 years old and the stuffing box was in need of preventative maintenance. Your site is informative, attractively laid out, and has been a great help. I'm going to try your PVC tool to reinsert the new stuffing. Thanks!

Heather Neill
s/v Flight of Years
www.Solo-Sailor.com
Jeff 28-Jun-2007 02:21
Great site and description. I just purchased a ski boat and the stuffing box drips contantly with the shaft stopped. I did not have the first clue on what the stuffing box looked like or how to replace the packing. You are my hero. Save me hours of reasearch and I feel very confident that I can fix the leaks.
Fran Toolan 08-Jun-2007 19:43
Thank you, thank you, thank you for taking the time to do this, and explaining to a novice how to approach this project.
John Sheahan 09-May-2007 15:38
I am about to re-pack a stuffing box for the first time and was looking for some pictoral instructions. Your description is perfect for my purposes and I will let you know how it turns out.
John S.
Dick Bracken 26-Apr-2007 17:33
What a great service to DIY boaters!
Guest 19-Apr-2007 17:26
Beautifully done.

To do this in my boat, you must be upside down, reaching forward at a 45 degree angle, and use shortened wrenches to clear the exhaust pipe above, but otherwise just the same.
Guest 16-Apr-2007 12:38
Excellent! You should send this to a sailing magazine. It just needs a bit of tweaking and your photos are super. As a past associate editor for a sailing rag, I can almost assure you that you'll be published.

Dave Corbett
River Dance, CS 36T
AngusTaylor 16-Apr-2007 04:05
Fantastic and very helpful! Great job.This is a keeper.I have this job to do this spring. Haven't done it yet.
When you install the new rings, would it not be just as easy to poke and slide them carefully in the packing nut with the pick tool? This seems to be the trickiest part.