Click on where the “eye-ball” used to be next to your Faery but not the eye-ball next to the background. On the miniature layer of the Faery, left click and hold it down while pushing it all the way to the top of the stack above the two sets of wings. By doing this, the wings will now appear behind the Faery.
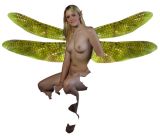
One at a time, highlight each set of wings, right click on the image of it and choose the option “Free Transform” by left clicking on it. This will frame the image of the wing with the same box as before. By left clicking inside this box and holding the mouse button down, you will then be able to move the wing to where you need it to be placed behind the image of the Faery. When you are satisfied with the placement of the wings behind the Faery, click on the “Eraser Tool” and then click on “Apply”. When you are done each set of wings will be behind the Faery and it will look similar to this.