


|
|
|
|
|
|
| Bill Huber | profile | all galleries >> Galleries >> 100% Crop | tree view | thumbnails | slideshow |
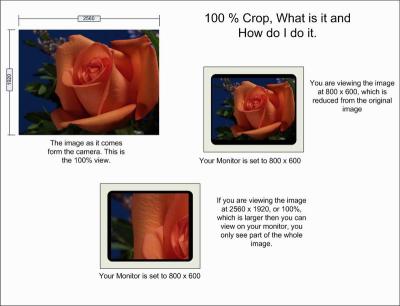 Slide 1 | The term 100% crop is somewhat of a misnomer, in that if you were to do a 100% crop on an image you would have the complete image.
What is really meant by a 100% crop is, a part of an image that is viewed at the original resolution. On your computer you may not be able to see the complete image unless you reduce the size. If you want to show someone the original size image, there are 2 things you can do. One is show the full size image and scroll around the screen or you can do a 100% crop and just show a small part of the image at its original size. |
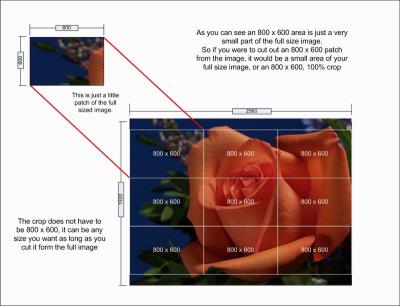 Slide 2 | When you look at the full size image, you can imagine that it is made up of a whole lot of little 800 x 600 pieces. Think of it like a picture puzzle, after you have it all together it makes a nice big picture. The puzzle is made up of a whole lot of small pieces.
Now if you take one of those little pieces out and look at it on it's own, that is the same thing you are doing with a 100% crop. If you look at the image at the left, which is our picture puzzle, you will see all the pieces and each piece is 800 x 600. Now if you were to pick up one piece you would see just a small part of the large image. So this is an 800 x 600, 100% crop. |
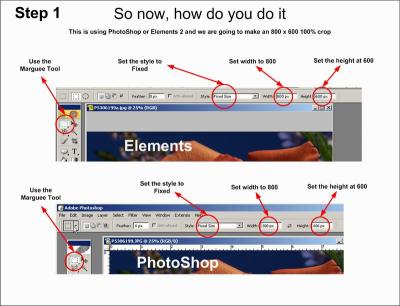 Slide 3 | I am sorry that I do not have other editing software or know how to use a Mac, so this is all done in Adobe Photoshop and or Elements for a PC.
Open your image from the camera, select the Marquee tool. Make sure the settings at the top are set the way they need to be. The Style should be set to "Fixed Size", width at "800 px" and height at "600 px". Remember we are doing an 800 x 600 crop, the size can be anything you want. |
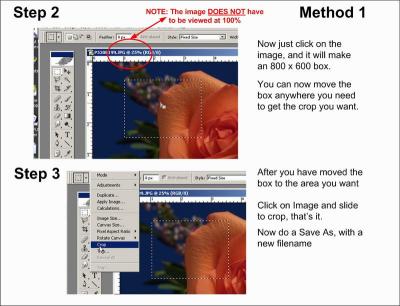 Slide 4 | After you have made the settings at the top, all you have to do is click on your image. You will now see a 'Bounding box', move the box to the position where you want the crop to be, or the patch cut from. After it is at the correct position click on "Image" on the tool-bar and then slide down and click "Crop", thats it, you have your 100% crop and the image is now only 800 x 600. At this point all you have to do is save it to a new image, click on "File" on the tool-bar and slide to "Save As", give it a new file name and you are done.
Remember you can view the image at any size you like, but if you have the setting right on the top for the Marquee tool you will get the correct size image. |
| comment | share |
| Best Annabelle Dollhouse From Kidkraft for Little Ones | 25-Dec-2017 16:32 | |
| John R Marshall | 09-Oct-2011 23:17 | |
| Oz | 14-Feb-2009 18:29 | |
| Guest | 28-Sep-2007 21:54 | |
| Marinjo | 05-Sep-2007 07:50 | |
| Dalvin | 20-Aug-2007 16:10 | |
| Guest | 20-Aug-2007 01:47 | |