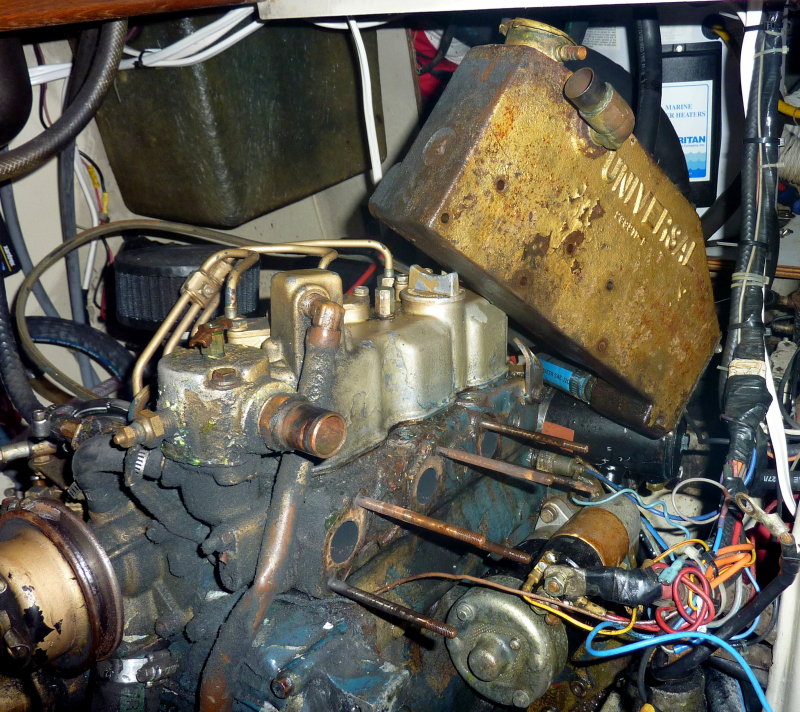
The original Universal M-25 diesel engines from Westerbeke / Universal had an obscenely poor alternator bracket design as they shipped from the factory. As long as the bracket did not fracture you could run them for a period of time without too much issue. Boats normally tied to a dock with constantly charged batteries seem to fair better. Boats that are cruised and the batteries deeply cycled seem to break these brackets more often.
The problems arise when, not if, they do fracture. When these brackets break they often puncture the oil filter and can often take out the entire timing gear case in the process.
The original bracket is also made of cast aluminum which is simply a very poor choice for driving the needed HP of an alternator. The new bracket is welded steel.
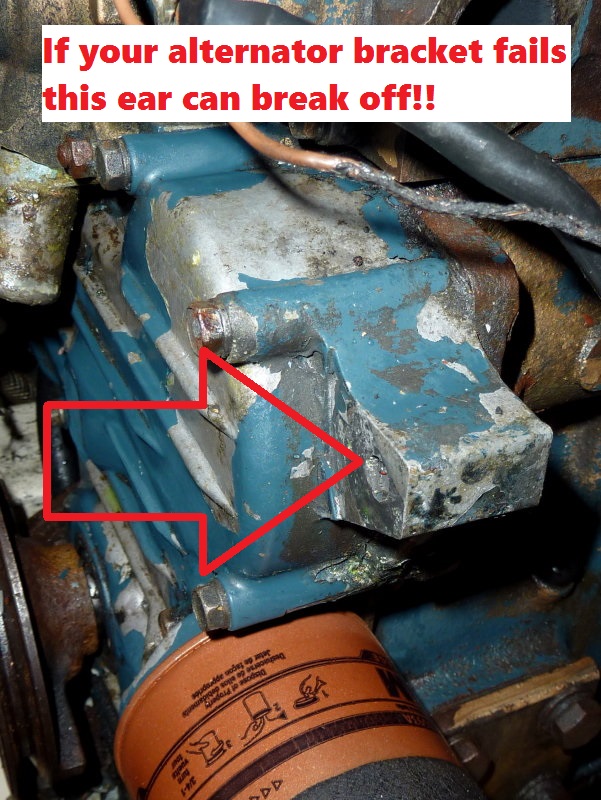
The old style bracket mounted to an ear on the timing gear case which is easy to break when an alternator bracket fails. If the timing gear cover breaks you are into a HUGE project! This engine already had the timing gear cover replaced once!! Sadly the techs who fixed it had no clue the old style bracket should have never been re-used.
Keep in mind that when, not if, this bracket fails you will be dead in the water with no engine. The belt on these engines drives your fresh water cooling pump and this is required to run the engine. No alternator not cooling....
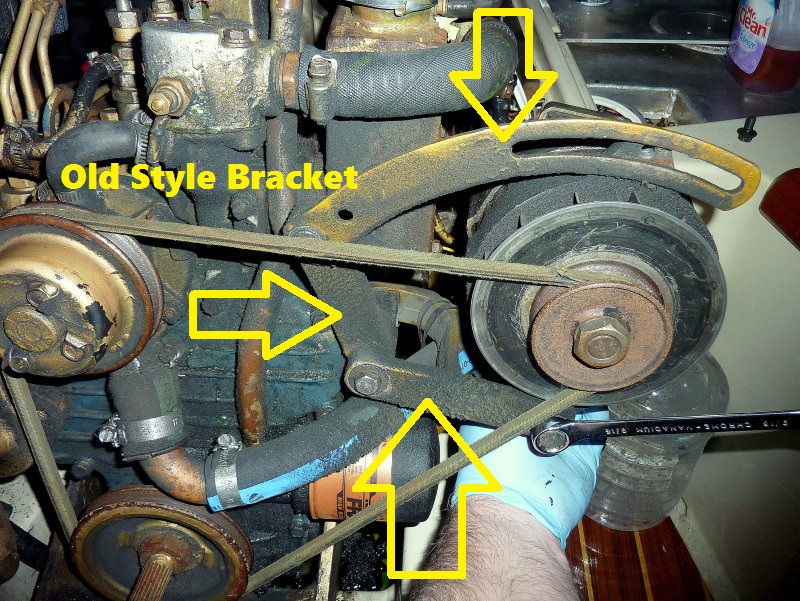
If you have an M-18, M-25 or early M-25XP, and your alternator bracket looks like this, REPLACE IT ASAP !!!!!!
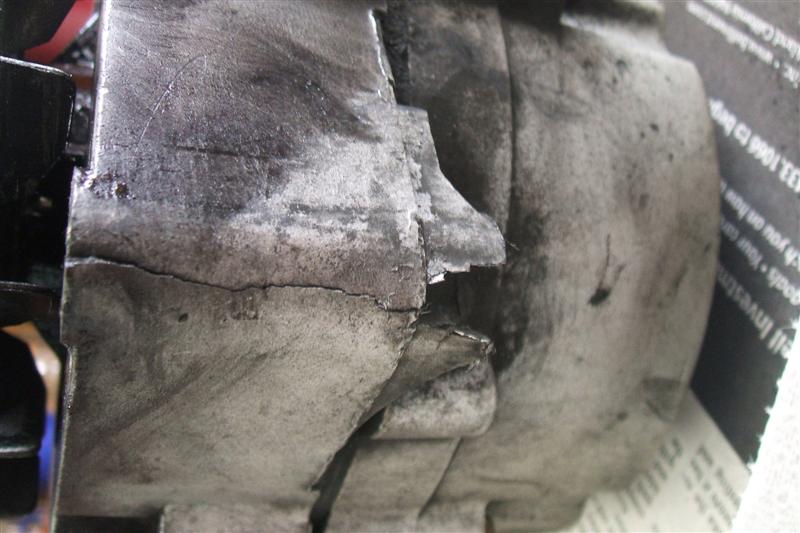
This image shows the old alternator bracket design and LOTS of belt dust....
11-JAN-2012
Timing Gear Case
RANT ON: If you own an M-18, M-25 or an M-25XP with the old style bracket, and have NOT done the alternator bracket upgrade, DO IT NOW!
This information has been out as common knowledge now since the early 90's, June of 1991 to be exact. It may even affect some early M-25XP engines not just the M-25. There is NO EXCUSE!
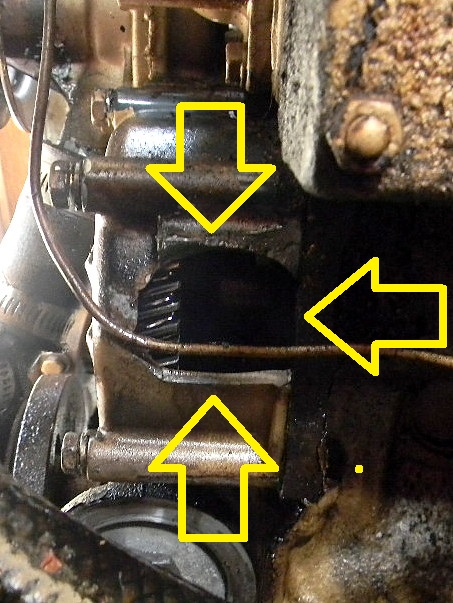
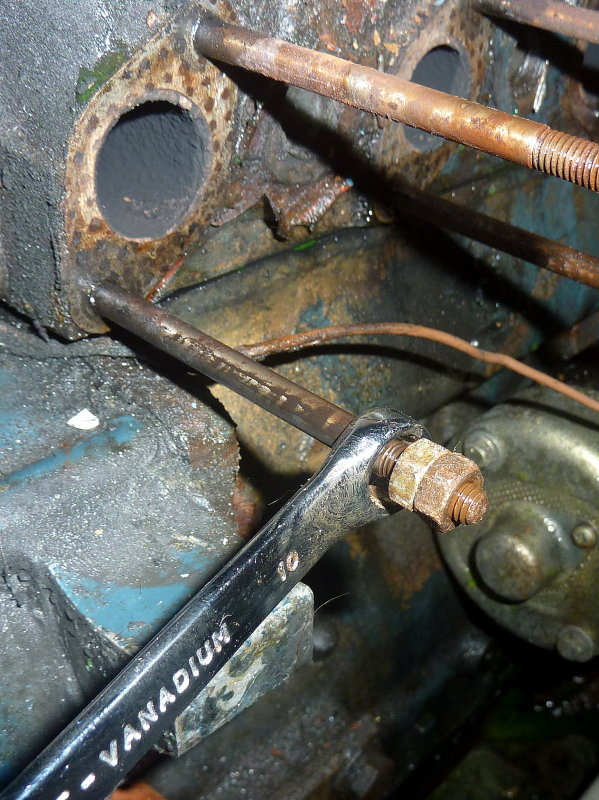
Why is this so important you ask? Take a look at this photo. This blue peeling painted item is the timing gear case. It is a MAJOR job to replace it.
This engine had already experienced ONE failure of the timing gear case. Sadly the people who put it back together still did not upgrade the alt bracket. A 3K bill for a job done incorrectly, and then had to be redone, is really sad, but it happens...
Beyond that this timing gear case is NO LONGER AVAILABLE! You break this gear case cover and your engine is now SCRAP METAL. According to Westerbeke Kubota discontinued it & Westerbeke can not get them. Even if they could get them the last pricing for that timing gear case, which is part #300140, was $1261.40.
Parts You will need if you break the timing gear case:
Timing Gear Case Part# 300140 - $1261.40 (Will need a used one. Part is now DISCONTINUED!!)
Is the severity & critical nature of this upgrade sinking in yet....?
Did I mention this part is NO LONGER AVAILABLE !!!!!!
Don't heed this warning and it may be the death of your M-25!!!!!!!!!!!!!!!
Really, I simply can't make it any clearer than that...
05-MAR-2014
The Alt Bracket & Timing Gear Ear
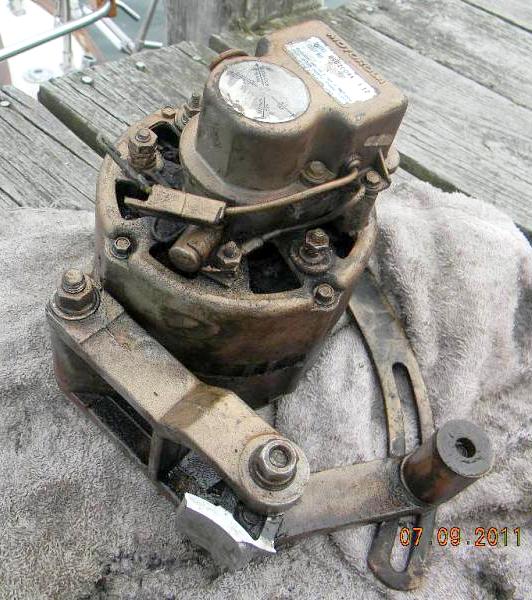
This piece of $hit alternator bracket design got really hungry, so hungry, it ate the timing gear cover.
As can be seen here the evidence is still in its teeth...
I have hears many experts on the M-25 espouse that this fracture only occurs if you put a larger alternator than stock on these engines. This is completely and utterly FALSE...
This is the STOCK alternator and the bracket lasted about 20 years before the timing gear case broke. You may get lucky for a while but the clock is ticking!!!!!!!!!!!
31-DEC-2011
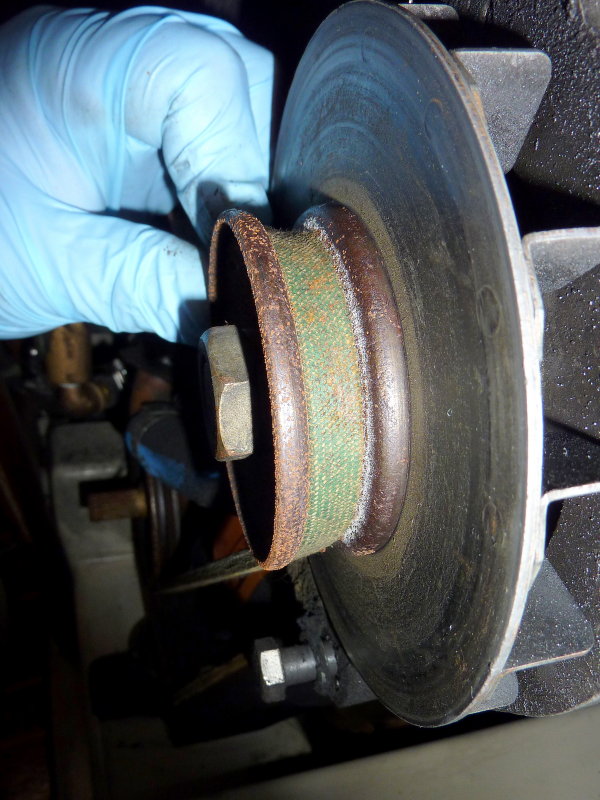
WRONG PULLEY!!!!
This is one I come across far too frequently. This alternator was replaced and the replacement alternator shipped with a 1/2" pulley. Why is that bad? These engines use a 3/8" belt!!!!
No matter how much you tighten this belt it is going to slip and create belt dust, because the belt is too small for the pulley!
Multiple attempts were made to fix this issue, at a decent cost to the owner, and not a single technician noticed the wrong sized pulley OR THE ALTERNATOR BRACKET....
31-DEC-2011
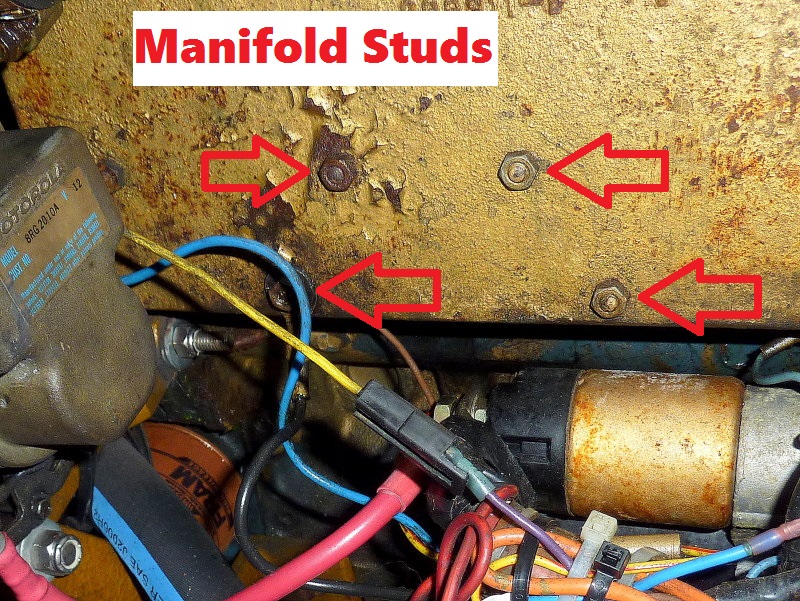
The Manifold Studs Are Too Short
Occasionally you will have an M-25 with longer manifold studs as it shipped from the factory. Unfortunately this engine was not one of them. In order to install the new alternator bracket it utilizes the manifold studs to hold the new bracket to the engine. If these studs are too short as they are here, they need to be replaced.
NOTE: If you have any room at all to get a second nut on the stud they can be pulled without removing the manifold! Unfortunately, as can be seen, this engine had zero clearance beyond the nut necessitating removing the entire manifold to do this job. Not all engines came with studs this short. If your are long enough to get two nuts on USE THAT METHOD.....
19-JAN-2012
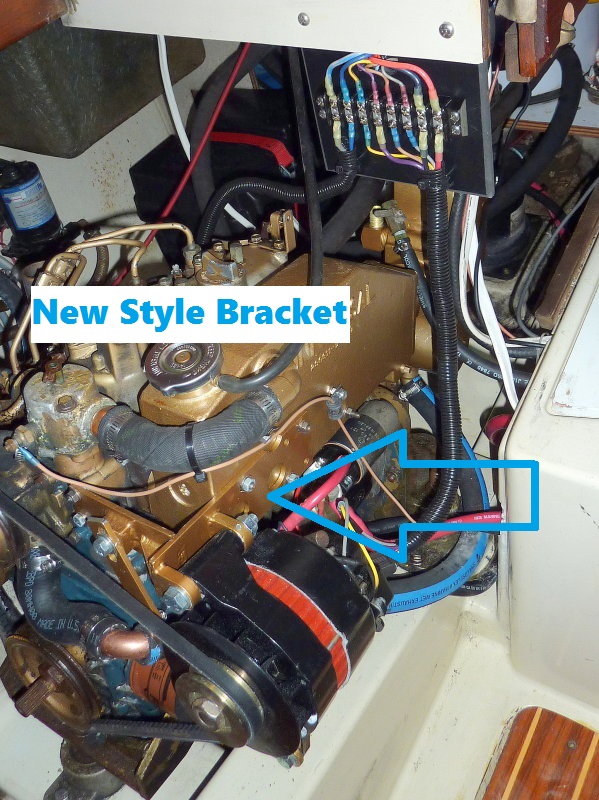
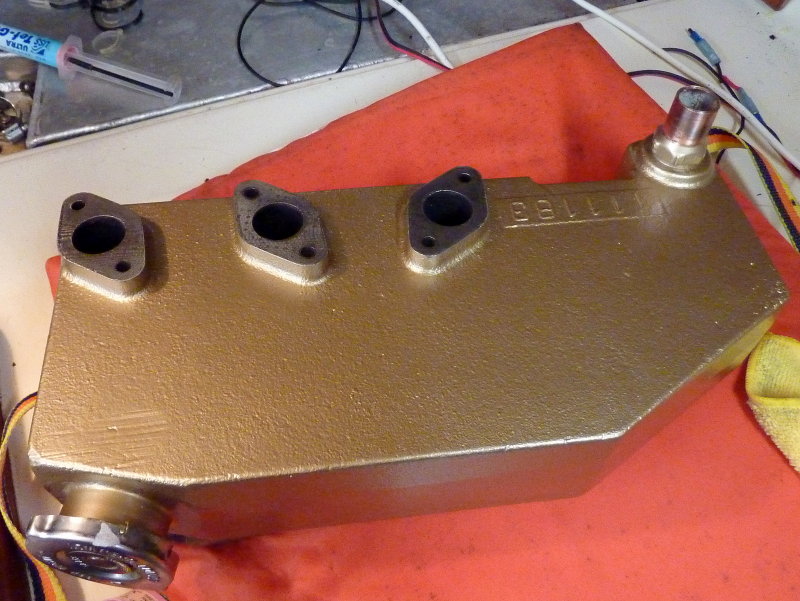
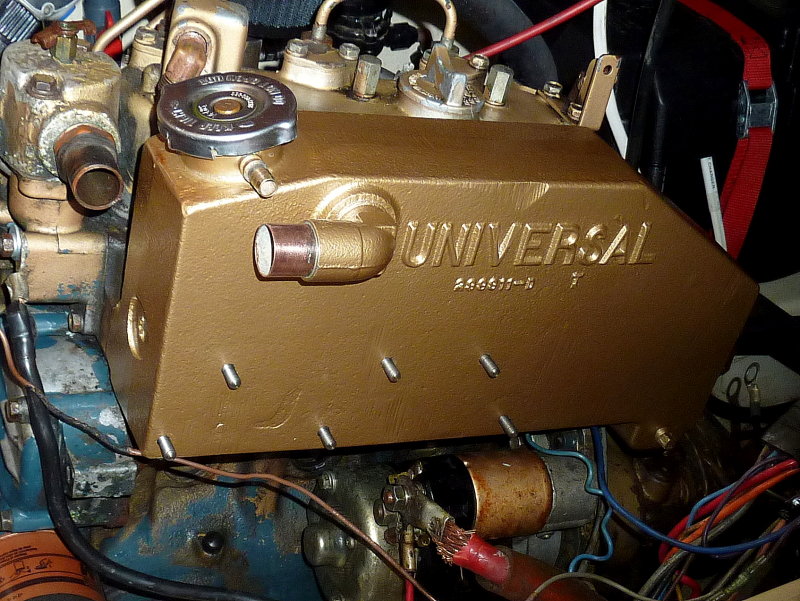
The New Bracket
In this photo we can see the newly installed upgraded alternator bracket. If you click the photo to make it larger you will see how it is held onto the engine using the manifold studs. This is why the old studs must be replaced if they are too short..
06-JAN-2012
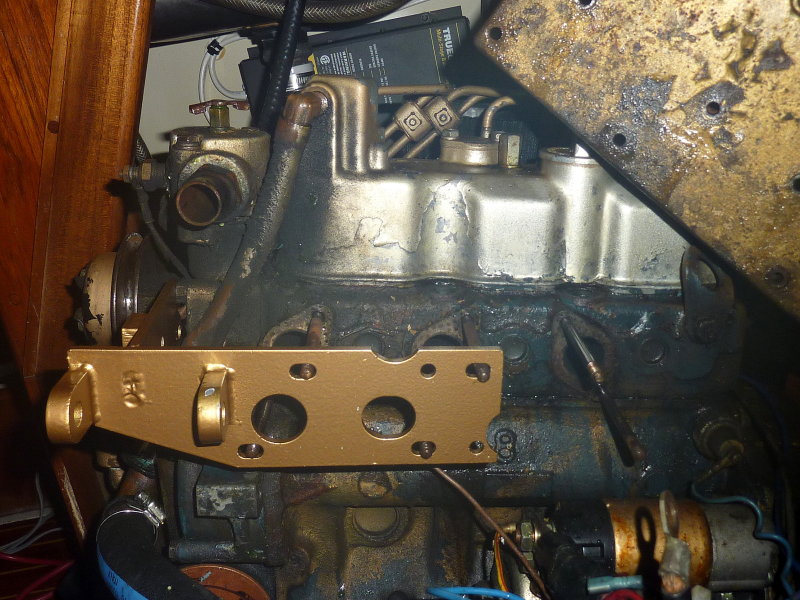
New Alternator Bracket
This is the upgraded alternator bracket for these engines. For grins I just slid it onto the old studs so you can see where it mounts to.
28-JUL-2011
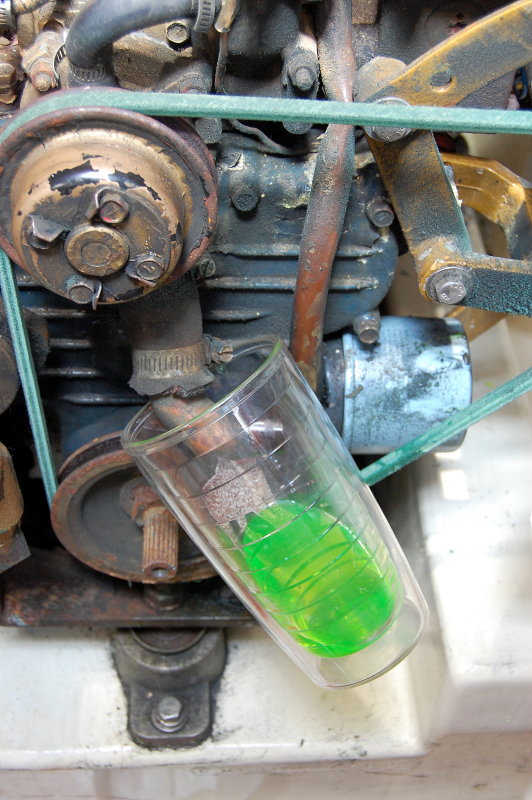
Drain The Coolant
Yes this job is a PITA but is better than the consequences of having to replace the timing gear cover when, not if, the alternator bracket finally fails..
This is a good low spot to begin draining the coolant from the manifold and engine.
If your original bracket has not failed, YET, consider yourself very, very lucky.....
31-DEC-2011
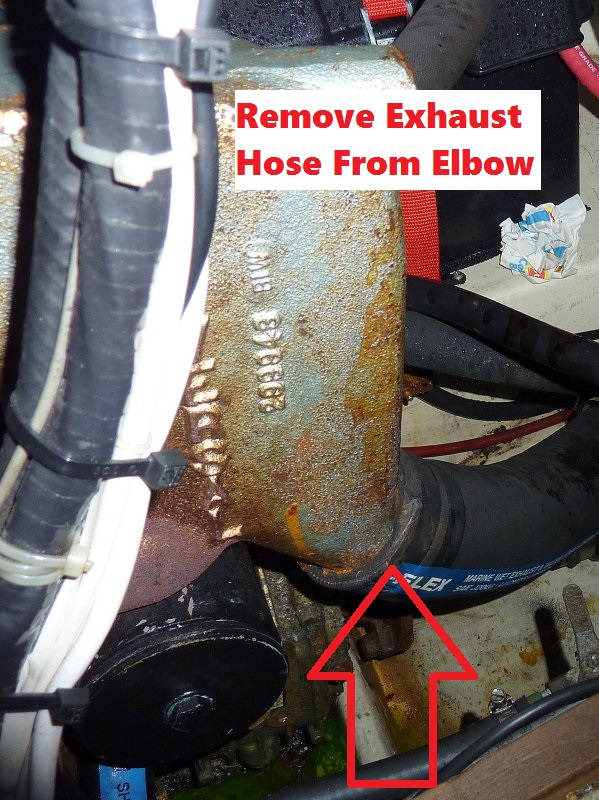
Remove Exhaust Hose
In order to get the exhaust manifold off the engine you will need to disconnect the exhaust hose and remove the exhaust elbow. Here the hose clamps have been removed from the exhaust hose to exhaust elbow connections in order to slide the exhaust hose off..
31-DEC-2011
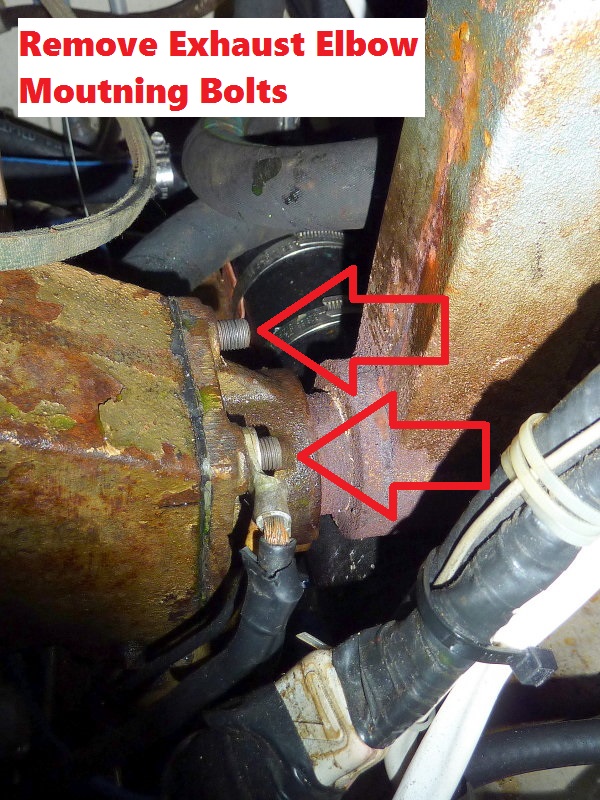
Remove Three Bolts Holding Exhaust Elbow
There are only two arrows here but there are three nuts in total. Two nuts on top and one on the bottom. Remove these nuts then break the exhaust elbow free from the aft end exhaust manifold.
06-JAN-2012
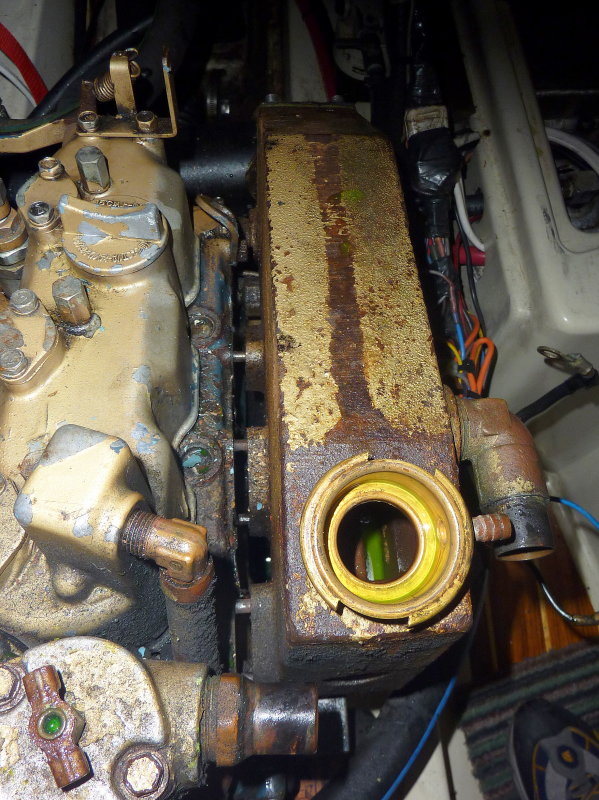
Remove The Six Nuts Holding The Exhaust Manifold
There are six nuts holding the exhaust manifold to the engine block. Remove those nuts and break the manifold free from the engine.
In this picture the manifold is separated from the block and sliding out off the studs.
In this picture the manifold has been removed. You will now need to disconnect the last hose and take it off completely.
Apply to the base of each stud, where it enters the block,some PB Blaster, Kroil or another quality penetrating oil. Before someone asks, WD-40 is NOT a good quality penetrating oil....
06-JAN-2012
Remove The Old Manifold Studs
In order to remove the old studs I coated them with PB Blaster and waited. I then double-nutted them and they came out quite easily. If they give you fits with double nutting place a flat washer between the two nuts before you back-tighten them onto each other.
TIP: Double-nuts is a good trick for removing studs. Spin one nut onto the stud and then another. Now tighten them hard against each other, not to the stud. You may now use the inner nut to beck the stud out. If you have room, placing a flat washer between the two nuts minimizes any slipping....
Once all the studs are removed you will then need to remove the old manifold gaskets and clean the three exhaust port flanges. I used some acetone and a 3M Roloc disc by hand, not a drill. Alternatively some burgundy Stotch-Brite will work too. These gaskets come off pretty clean..
11-JAN-2012
Install New Studs
This is the reverse of removing them. In this photo I have placed a flat washer between the two nuts. Tighten them by using the outside nut...
It should be noted that the four new longer studs go in the front two exhaust ports closest to the crank pulley. The aft exhaust port can still use the old studs or you can purchase new replacements and do it right, while you're in there.
11-JAN-2012
Manifold Cleaned, Painted & Ready
While you have the manifold off it may be a good time to have it boiled out, sand blasted and then you can paint it and get it ready to re-install. I also purchased a new radiator cap and removed and re-installed all tappings with fresh pipe dope..
11-JAN-2012
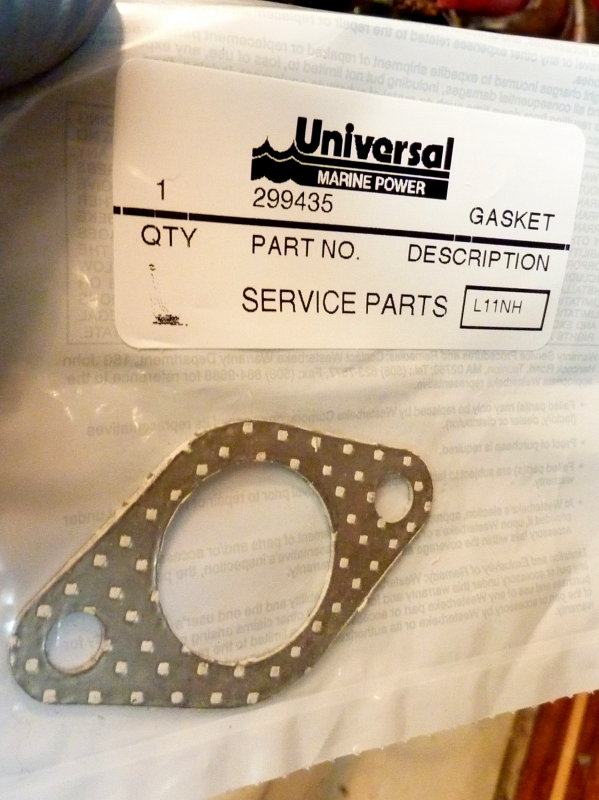
Manifold Gaskets
You will need three of these gaskets, part# 299435, and they run about $9.57 each.
11-JAN-2012
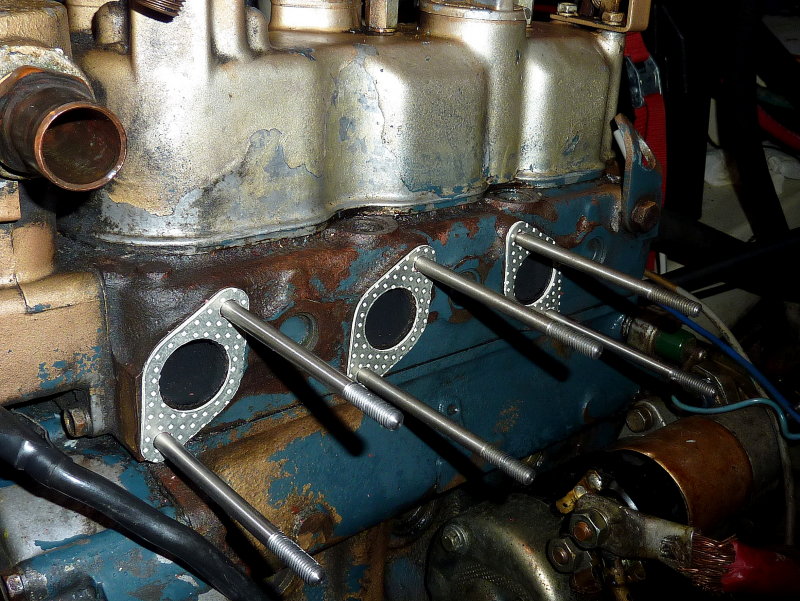
Studs & Gaskets Installed
Once the studs are installed and have been torqued slide the gaskets over the studs. You are now ready to re-install the exhaust manifold.
11-JAN-2012
Exhaust Manifold Back In Place
With the manifold back in position you can see the added length of the new studs.
11-JAN-2012
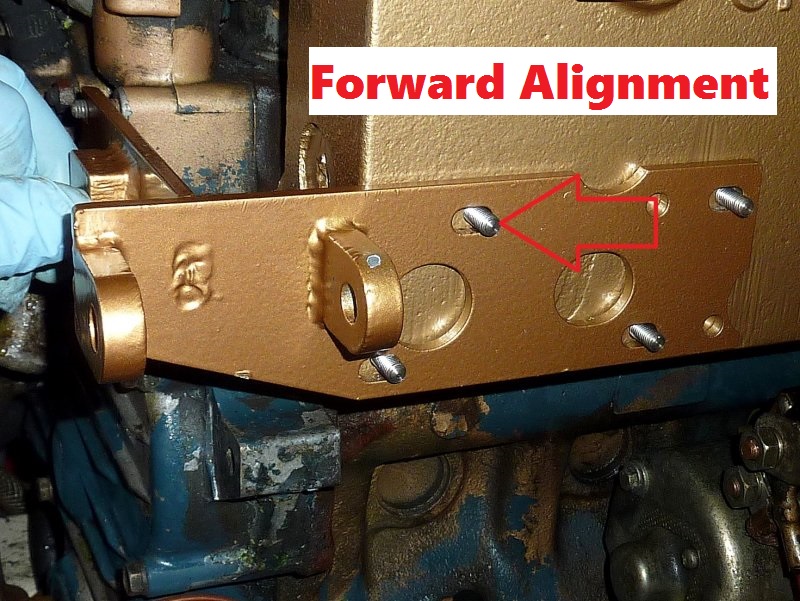
Forward Alignment
I have seen a lot of M-25's and M-25XP series engines with very poor alternator belt alignment. This leads to chronic belt dust, premature belt wear and slipping belts. Any slippage can also increase alternator heat.
These brackets have oval mounting holes in them for a reason! In this photo the bracket is slid all the way forward.
Be sure to align your alternator with the other two pulleys!
11-JAN-2012
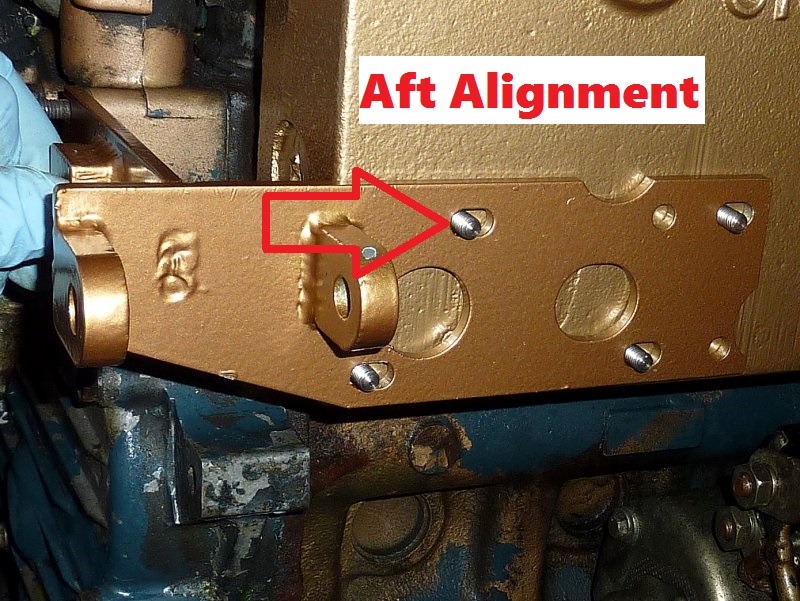
Aft Alignment
This image shows the bracket in aft alignment. No two engine/alternator combos are perfectly identical so please take the time to ensure your belt is well aligned.
Boats with deeply cycled banks of batteries drive a lot more current through these small belts, for a lot longer duration, than cars do. Proper alignment is critical.
11-JAN-2012
Forward Alignment 2
When you forward align the bracket you will need the proper thickness washers or shims to fit here. If the washers are too thick you can sand them to the correct thickness with some sand paper. This takes time so be patient.
12-AUG-2012
A Good Example of A Bad Alignment
Here is a very good example of a very bad alignment. As we can see the alternator needs to come forward in the forward align position. This belt will do nothing but wear prematurely if left like this.
Like many installers do, this installer simply bolted the bracket on and slammed it all the way to aft alignment, never considering there were slots in the bracket for a reason..
Sight your eye and the belt to the edge of the teak board...!! You can also see the curvature where it comes off the water pump pulley.
Image courtesy: S. Jackson
11-MAY-2012
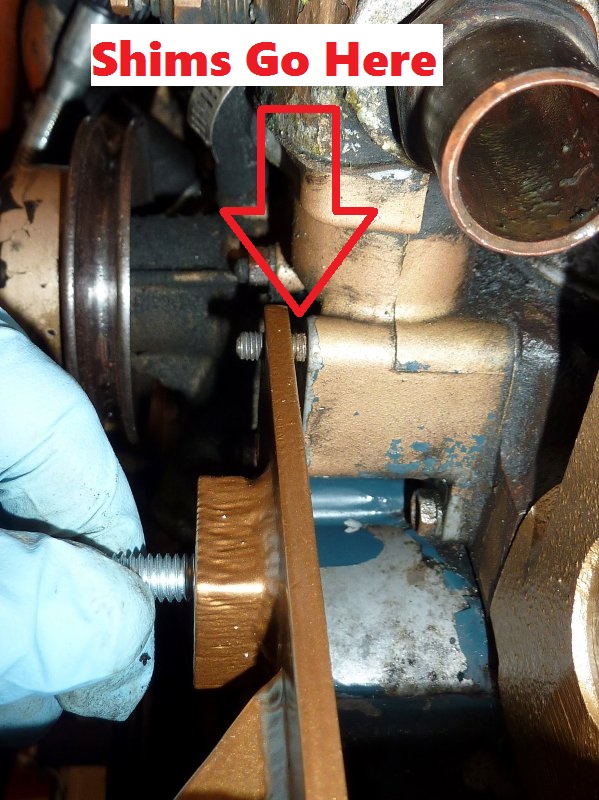
Alternator Aligned
In this image we can see the alternator in-place and aligned. It needed shimming as referenced by the red arrow. On this engine it took two metric washers with one of them partially sanded thinner.
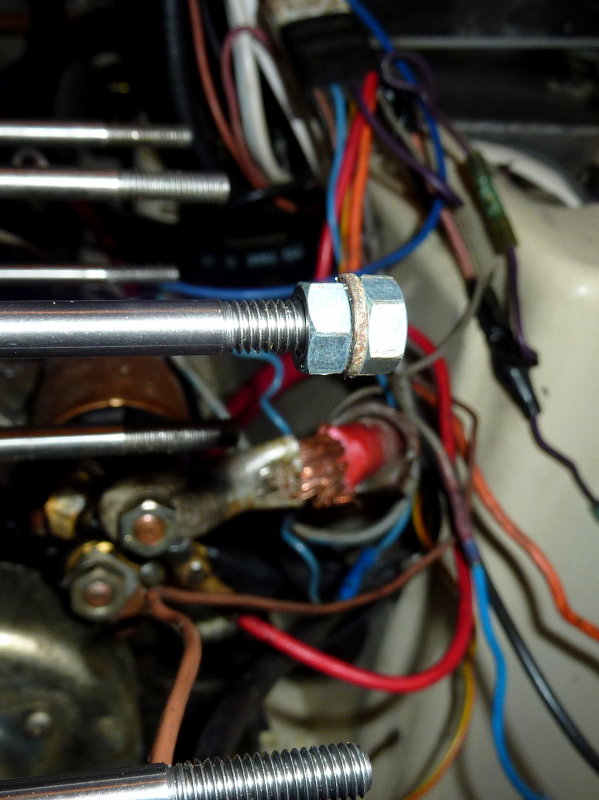
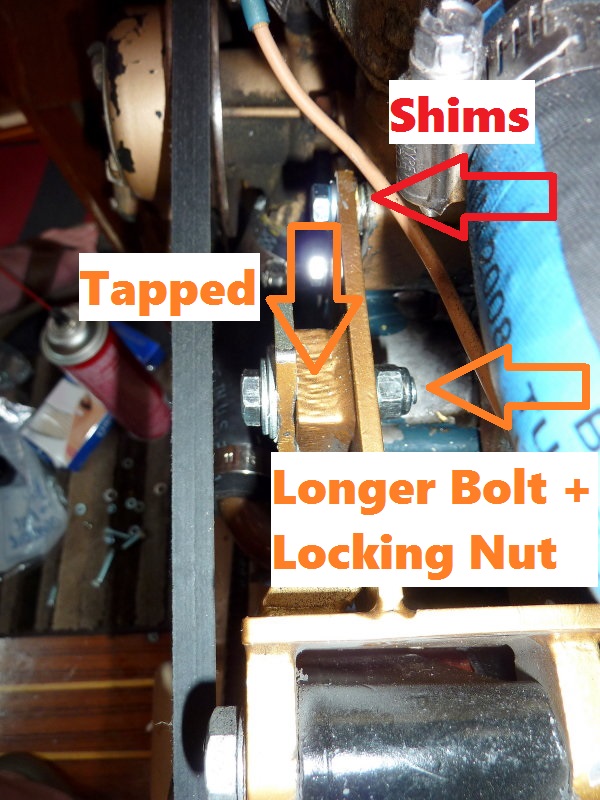
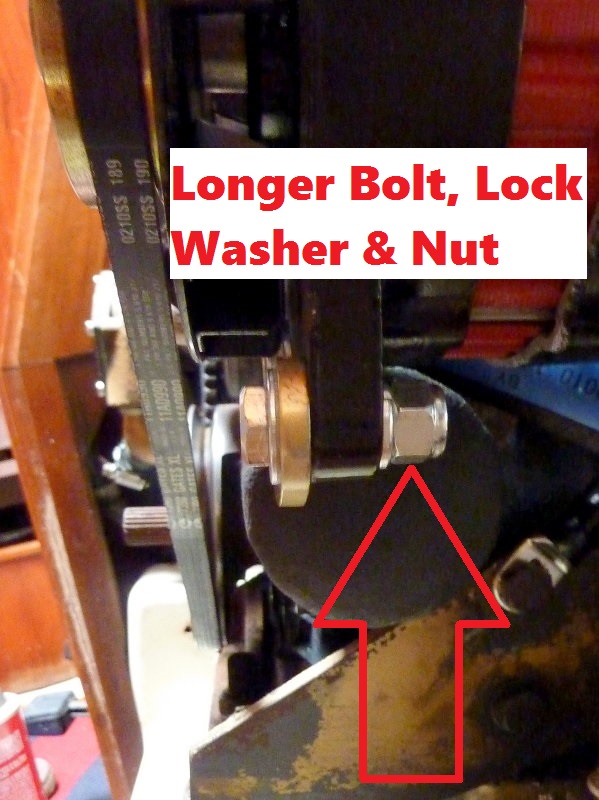
TIP: One thing I see over and over is adjustment arm bolts and alternator ear bolts coming loose and slipping thus reducing tension on the alternator belt and causing it to slip and create belt dust.. On these Universal engines the bracket itself is drilled and tapped to accept a bolt, as is the alternator ear. (ORANGE ARROWS)
I go one step further than the factory and purchase a longer bolt that sticks all the way through the bracket so I can add a locking nut to the back side. In doing this extra step I have never once had an adjustment arm come loose!
I would recommend you use at least blue Loc-Tite on the studs that go into the water pump housing to hold the alternator bracket.
Just like the image above do not trust the alternator ear, soft aluminum, to hold the adjustment arm tight. Buy a longer bolt so you can put a backing lock nut on it.. Here I am using both a split washer and a nyloc nut.
10-MAR-2002
Machined Pulley
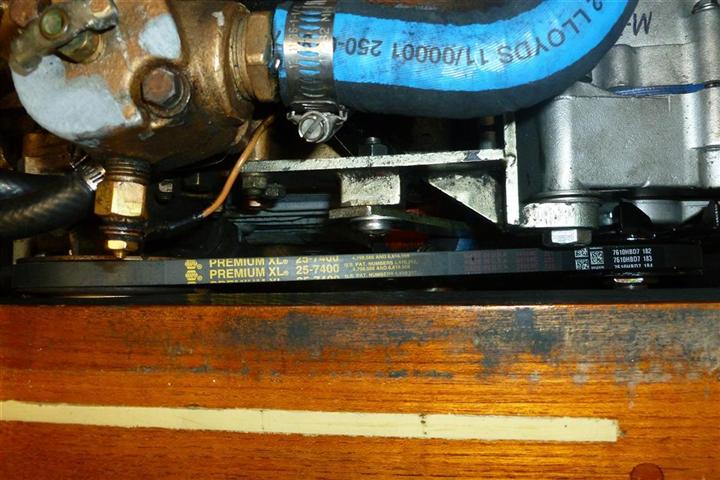
Over the years I have really come to despise stamped steel pulleys when trying to drive serious current. Whenever I can source a billet machined pulley I do. These pulleys seem to work best under high loads.
The belt pictured here is also one of my favorites, it is a Dayco Top Cog. When I can't source a Dayco Top Cog I usually use a Gates XL. These Gates belts are sold nation wide by NAPA as the NAPA Premium XL Belt.
11-JAN-2012
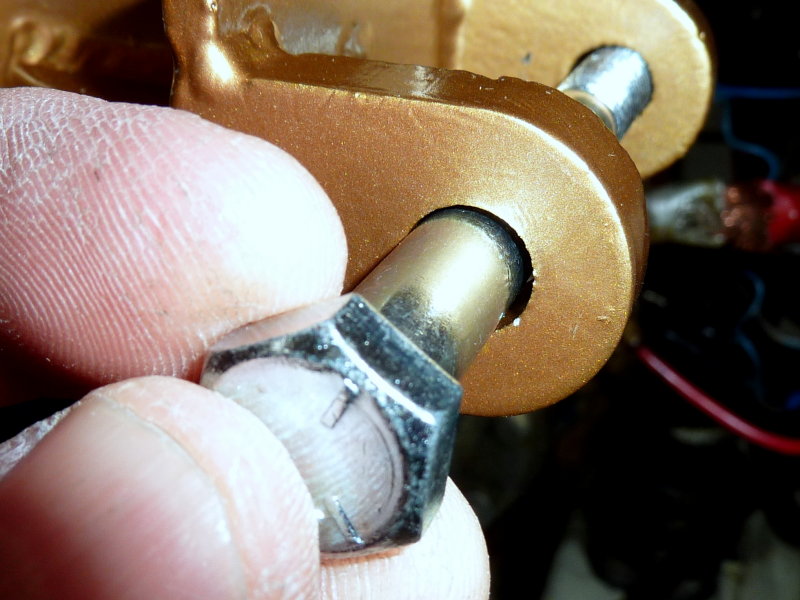
Sloppy Factory Bolt Fit
Oh no trouble in Paradise! Caveat emptor or DO NOT always trust that the manufacturer has taken the time to do things right. This is an utter embarrassment to the folks at Westerbeke and is plain and simply SLOPPY, especially when this "upgrade" is supposed to address deficiencies in design and installation.
I spoke with Bob B. at Westerbeke about this at the 2013 Annapolis Sailboat Show and HOPEFULLY they have now addressed this issue. Still be on the look out for sloppy fitting pivot bolts. The Devil is always in the details.
Many owners of the M-25's have alternators as large as 100A or more on these engines. Install an alternator with a sloppy fitting pivot bolt like this and you are asking for trouble. The alternator will have chronic alignment issues and will eventually oblong the pivot hole in the alternator thus potentially ruining the case.. SHAME ON Westerbeke!
The bolt passing through the alternator ear AND the bracket MUST be a proper fit. This is NOT a proper fit..
11-JAN-2012
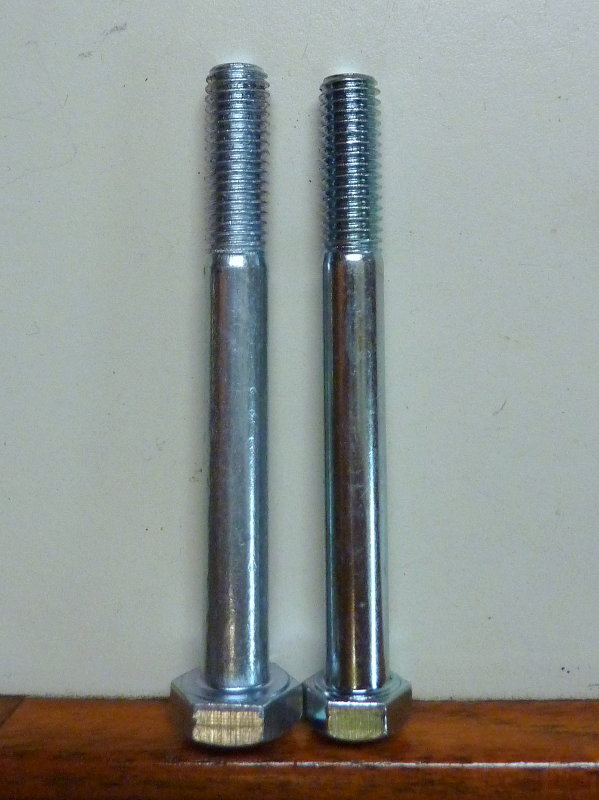
Factory Bolt & Replacement Metric Bolt
The factory sloppy fitting bolt on the right and the proper fitting bolt on the left. Oh and no Westerbeke did not reimburse me for the 1 hours time it took to go to the hardware store and do their job for them!! Such is life......
11-JAN-2012
Proper Bolt Fit
This is how the pivot bolt should fit.... I think I wound up with an M10 X 100mm metric sized bolt, but please don't take that to the bank. I am only human and with my aging memory can't remember every little detail and I did not write that one down.
If the alternator pivot ear and bracket holes are not the same size or do not match, over drill them until you can get a proper matching fit. For the alternator it may be best to drop it at a machine shop so you know the hole is straight.
30-JUL-2009
Why Does Proper Bolt Size Matter?
I think this image sums it up. This owner had the wrong size pivot bolt and this was the result!
Image courtesy: S. Jackson
06-JAN-2012
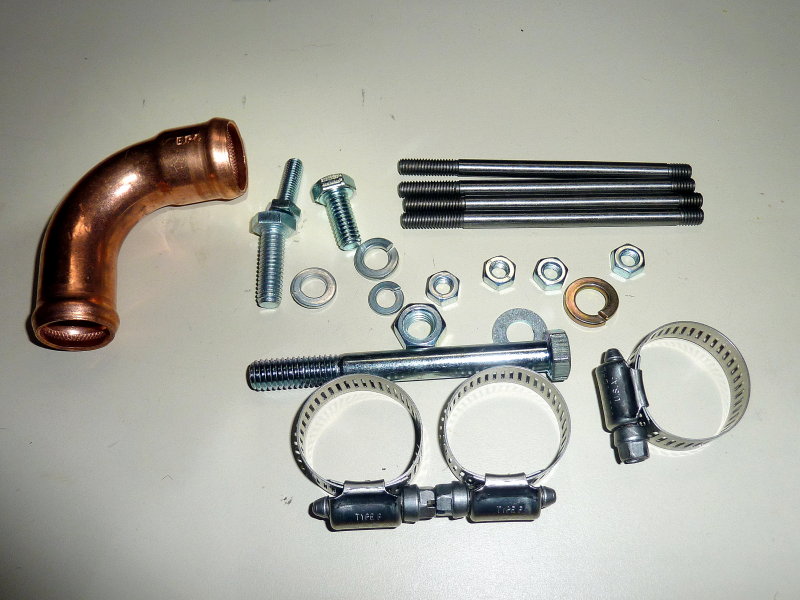
Kit Contents
Other than the bracket, adjustment arm and a short piece of curved radiator hose this is what comes in the upgrade kit. You will need to re-route the cooling hose but this can be very boat/engine room specific as to how you do it.. The copper elbow is used for that purpose.
You need four longer manifold studs and they send you four... I would advise ordering two standard ones when you do this as it is one of those Murphy's Law things; "While you're in there" might as well replace them.". If you don't one of the old ones will certainly fail on you next week... (wink)
11-JAN-2012
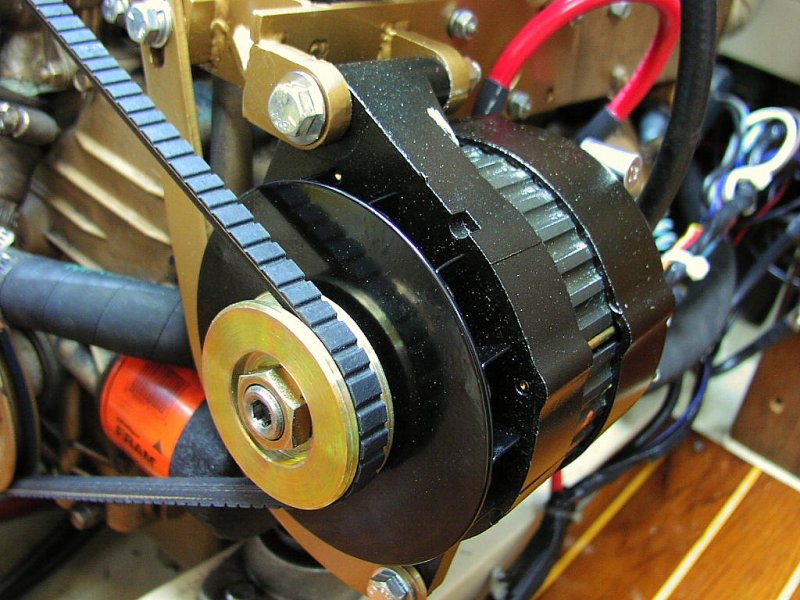
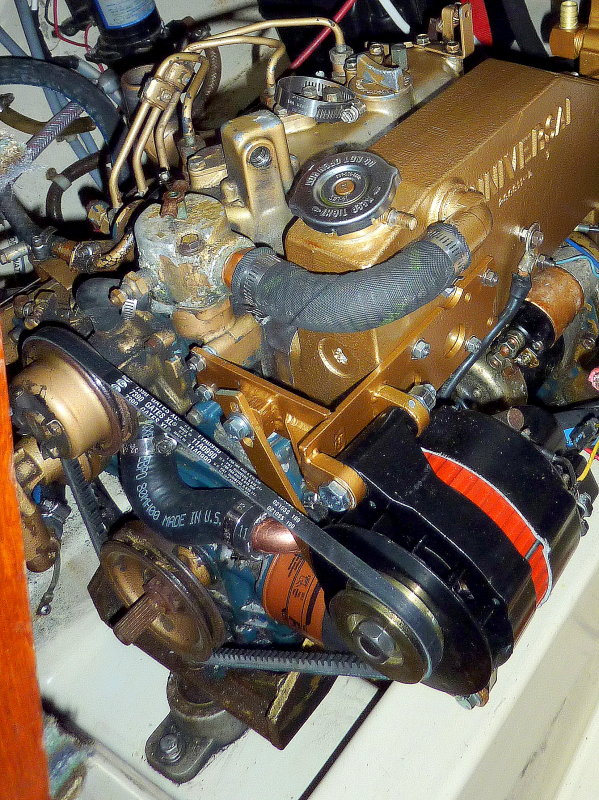
Alternator Bracket Installed
Here is the finished installation. All you will need to do is re-fill the engine with antifreeze and purge the air from the system.
This engine uses a Gates XL 7390 belt and yours may too depending upon your alternator pulley. The 7390 is a good place to start.
MAY-2006
Help Support This Site
Like what you saw or read in this article? Was it helpful? Could the information save you some money? Would you like to see more articles like this?
If so feel free to donate, support the site, and keep it growing. Please DO NOT feel obligated at all. If you like it and want to make a donation, please do. Your donations help keep the content coming and also help keep it FREE.
Click the DONATE button below if you would like to make a donation via PayPal.