photo sharing and upload picture albums photo forums search pictures popular photos photography help login
Compass Marine How To | all galleries >> Welcome To MarineHowTo.com >> Replacing Thru-Hulls and Seacocks > Removing The Old Thru-Hulls
previous | next
20-NOV-2007

Removing The Old Thru-Hulls

This is the easy part of the project but you will need a few tools first. The must have tool for this project is called a step wrench. The step wrench can be inserted into the thru-hull and then used to tighten it into a seacock, remove it from a seacock or to break the marine sealant free from the hull. Most step wrenches have a nice flat spot for a pipe wrench or adjustable wrench for added leverage.


I purchased my step wrench from Hamilton Marine in Portland, ME and over the years it has certainly been paid for over and over.


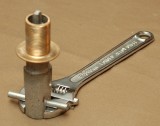
The photo shows the step wrench inserted into the female side of the thru-hull ready to tighten or loosen.


Removal of the old thru-hull is easy:


1- First remove any hose clamps attached to the hose.


2- Next remove the hose from the valve.


3- Using pipe wrenches remove the valve from the thru-hull.


4- Using pipe wrenches or in some locations a chisel remove the locking nut from the thru-hull.


5- Apply heat in the form of a heat gun to the exterior of the mushroom head part of the thru-hull.


6- While it's still hot use the step wrench to break the thru-hull free from the hull and remove it.


7- If it was put in with a product like 3M's 5200, & does not want to break free, sliding a three foot pipe over the wrenches handle will give you the leverage needed. You can also use a pipe wrench on the threads to break it free but this will ensure total destruction of the thru-hull.


8- If all of the above methods fail to break it free from the hull use a 4 1/2 inch angle grinder and grind it out being very careful not to get it too hot from the grinding so you burn the hull.

Nikon D70s
1/60s f/4.0 at 48.0mm full exif

other sizes: small medium large auto
share
Graham 04-Jun-2017 22:41
It's been a while, but I seem to recall using a handsaw from underneath to saw the thruhull in two (verticallY). These days, I have a small Sawzall type saw with metal cutting blades that would make it a lot easier.
Russell 04-Feb-2017 16:32
Ive found that the buck algonquin wrench is for all intents and purposes a rebranded residential radiator valve internal wrench. On most through hulls Ive noticed the fit to be sloppy. On more than one occasion the use of the buck algonquin wrench has sheared the tangs from the through hull passsage way. If the vessel has suffered from any electrolysis the better bet would be to replace the through hull, in which case using a sawzall to cut two slits 180 degrees apart through its length and collapsing the through hull in to remove it. If the through hull is in fine condition and doesnt budge, an internal spud wrench works like a charm. These internal spud wrenches are for removing closet spuds (threaded down drains). They come with square jaws as well as rounded and getting a nice purchase on the through hull tangs is easy.
alexvjennings08-May-2015 12:36
Have you had much luck with your wrench? Whenever I was doing projects in my garage, I struggled using the manual ones—I would always strip the bolts. Have you tried using an automatic wrench?

Alex Jennings |http://www.knagifts.com/default.asp?dept_id=100010&nopopup=1
Steve 14-Jun-2013 01:31
I had a very difficult time removing my old thru-hulls with the step wrench. I had to move up to a breaker bar (hollow pipe over the wrench) to get more leverage and all that did was strip the ears out of the thru-hull. The bronze gets kind of soft after 30 years underwater. I ended up using a grinder and cutting a triangle into the mushroom on the outside of the boat and banging the whole assembly loose from the inside. Worked a treat and was quick and painless.