


|
|
|
|
|
|
| |
| 07-JUN-2007 | ©Hale Kai Inc. |
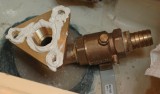
At this point I have applied some Sikaflex 291 marine sealant and am ready to install the flange. If you look very closely you'll see that the flange has been slightly countersunk so it's ready. First apply the sealant to the flange, in the fashion shown, then generously circle the machine screw heads with sealant and feed the bolts up through and into the boat from the outside.
Now carefully set the flange onto the bolts. Thread the nuts and washers onto the bolts, finger tight, and then climb back outside the boat. Slather the thru-hull/mushroom-head's threads with sealant and apply a generous amount to the head or mating surface & thread it into the flange and climb back into the boat.
To tighten the nuts, with only one person, I find it much easier to use an impact driver. I use an 18V rechargeable Ryobi that was cheap and works well for the purpose. Be careful with the impact driver as you don't want to over torque them!
The impact driver is a great tool that will tighten the nuts without having to have a second person outside the boat with a screw driver. Once the nuts are tight grab the step wrench, and a large adjustable wrench, and tighten the thru-hull into the flange from outside the boat.
Once everything is tight clean up the ooze from the sealant, including any that oozed out up inside the through hull and around the exterior. Be sure to clean excess sealant from the counter sunk bolt heads so you're ready to fill and fair the exterior with a vinyl ester filler such as 3M Marine Premium Filler.
Marine Premium Filler is a unique vinyl ester formulation designed for marine filling and fairing applications above or below the waterline. I would avoid the use products or fillers like Bondo or Evercoat below the waterline as they can absorb moisture. Make sure you're using either an epoxy based fairing compound or a vinyl ester fairing compound to minimize moisture intrusion.
So why do I use Sikaflex sealants or bedding compounds rather than 3M products? That's an easy one for me to answer. In my experience I've found it less aggressive in it's adhering properties than 5200, something I really like for future repairs. I've had vast amounts of experience, over 30+ years, with many marine sealants and have really grown to like the Sikaflex products.
If there is one thing I've learned, in 30+ years of boating, it's that NOTHING on a boat is permanent, not even a keel joint, so there is absolutely NO need for a sealant as permanent as 5200. In my opinion 3M 5200 was invented to ensure future boatyard revenue but remember what my opinion is worth.
I've seen 5200 destroy gelcoat, port lights, hatches and teak among other things. There is only one product not allowed on my boat and it's 3M 5200. 3M 4200 was a move in the right direction, being less adhesive than 5200, but for many projects it's highly adhesive properties are still not necessary and it's still overly tenacious in it's grip.
Now don't get me wrong I'm not saying, in any way, that Sikaflex comes apart like butter, it does not, but it comes apart easier 5200. Try Sikaflex 291 & you'll like it's adhesion, flexibility and long life.
© All Images property of Compass Marine Inc.