


|
|
|
|
|
|
| |
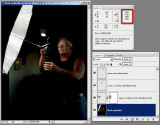
1. Make basic adjustments to exposure and skin color using Adobe Camera Raw
2. Open in Photoshop as a Smart Object to double check the skin tones. (Info: cyan ~1/2 of magenta and Yellow ~10% higher than magenta) Return to ACR for tweaking.
3. Rasterize the smart object layer
4. Roughly select an upper portion of the umbrella.
5. Copy the selection to a new layer.(Layer 1)
6. Use the Free Transform and Transform Warp tools to flip vertically and roughly position the new layer over the visible sync cord.
7. I scrolled through the layer blending modes to find one that closely blended with the underlying layer umbrella. "Lighter Color" suited me best. Then add a layer mask and reveal much of the original underlying umbrella without showing the cord.
8. Make another new blank layer (Layer 2) and paint over the bothersome flash with a soft black brush.
9. Try different layer blending modes to get the desired amount of flare reduction. I used "Overlay". Further adjustment can be made with the Opacity slider. I also darkened the metal reflections on the umbrella stand on this layer.
10. Add another new layer and clone out distractions.
forum discussion: http://forums.dpreview.com/forums/read.asp?forum=1006&message=39772936&changemode=1
original image by Alan Mitchell:
© Joseph E. Filer