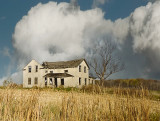
Straightened with the ruler tool. Cropped to desired composition. Select > color range > choose a point of blue sky. Clicked on INVERSE to select non-blue sky. Copied layer (now blue background is deleted). Opened another photo with a dramatic sky and made a selection of a size similar to my Mitchell House photo. Copied to clipboard (CMD C or CTRL C). Back to Mitchell House photo and clicked to make a new blank layer. Pasted in sky layer. Used Edit > Transform to size the sky to match the Mitchell House photo. Moved the blank layer down below the house- without-sky layer. Clicked on sky-only layer. Add a layer mask. With black in my foreground and opacity of my brush at 20%, I painted in tree branches that had not made it to this layer. I then flattened down to one layer, duplicated it and did a decrease in saturation, some light sharpening and a little dodging on the house to bring up the detail.