These images and text were created to share info with my fellow members of the Escambia Amateur
Astronomers' Association in Pensacola, Florida. I claim no copyright on any of the text and could
care less about copyright on the images. I mention Jerry Lodriguss - I do not know him personally
and did not ask for permission to use his name. I don't think he'll mind.
These two techniques are for prettification of single images, since most of us get started with
astrophotography by taking single time exposures. Stacking, the combination of multiple images of
the same object, is a more advanced method of taking images that is not in itself particularly
difficult but is far more time consuming. In heavily light polluted areas it is unfortunately the
only way to get satisfactory images. An image produced by stacking could also be processed using
the techniques here.
Much of what I've learned about astrophotography came from browsing the internet on rainy nights.
I'm a firm believer in learning from others, no need to reinvent the wheel. The two methods below
are pretty much learned from other people, a gestalt of techniques found on the web. F'rinstance,
the little box technique for light pollution removal came from a French man's website several years
ago, I don't even know if I could find the site again. I used to use a ridiculously convoluted
method for removing gradients. The 'Dust&Scratches' method came about when I was using it for
another purpose - to separate the stars and the nebula in an image. At some point it hit me that
using a large radius gave me what looked like a copy of the background gradient.
Although these techniques could also be done with GIMP or IRIS, I'm used to working with
Photoshop. GIMP and IRIS are free and I hope to duplicate these techniques with those programs
soon. It's kinda like learning a stick shift when you've driven automatics for 30 years, gonna
take a bit of time. I'll concentrate on GIMP first.
I am assuming that you have at least some familiarity with PhotoShop. I'll try to be consistent
showing Photoshop menu selections in this format - {MenuSelection - SubmenuSelection}, where
MenuSelection is the word from the menu across the top of the screen in Photoshop and
SubmenuSelection is from the list that appears when you click on the menu word. 'Click' means left
mouse button (unless you've set your mouse for left handed operation).
All the steps below are broken down under the rest of the images in this gallery.
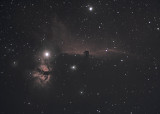
Start with an image that has a noticeable background gradient, or a lot of light pollution......or both.
Rename the opened image (so that the original is still on the computer). {File - Save As}
Duplicate the image. {Image - Duplicate}
Method 1 - when there is a brightness gradient with or without light pollution
NOTE: This method can be difficult to use when the object is bright and prominent - M42, for example.
Use {Filter - Noise - Dust&Scratches} on the duplicate image.
Leave threshold at zero, move the radius slider to the right until all detail disappears, all the way to 100 pixels if you want.
Now you're left with a copy of the background gradient/light pollution.
Click on your original image to make it active, then select {Image - Apply image} and apply that
background image of the gradient/light pollution - effectively you're subtracting that from the
initial image. "Source" is the gradient image, "Layer" is Background, "Channel" is RGB, "Blending"
is Subract, "Opacity" is 100%, "Scale" 1, "Offset" 0.
Play with Opacity, Scale and Offset to taste (mainly opacity and offset).
You should see a dramatic reduction in light pollution and any gradient. This method is especially
effective in removing a gradient.
***************************************
Method 2 - light pollution only, not so effective with a gradient
You've opened, renamed and duplicated an image. Click on the duplicate image to make it active,
{Select - All} {Edit - Cut} to erase all of it to the background color.
Click on the original image to make it active. Look around for a an area well clear of the object
of interest (galaxy, nebula, cluster, UFO, whatever). What you want is a patch of light pollution
with as little else as possible. A dim star or two is okay, but definitely not any part of the
galaxy or nebula you're imaging. If you're taking wide field images of the Milky Way for example,
pick an area well away from the star clouds of the Milky Way.
Using the box selection tool, select a small box in the area described above and copy it. Paste it
into the duplicate image. {Edit - Copy - Paste}, it will paste in the very center, regardless of
where it was located in the original image.
Apply a Gaussian blur to the duplicate image, it will blur that box and blend all the pixels
together. {Filter - Blur - Gaussian blur} Use a setting of 8-12 pixels for the blur.
You're going to make that box the background color. Click on the box in the toolbar that
represents the background color. The picker tool will be active, place it on the blurred box and
click, then click the 'OK' button. That blurred box color is now the background color. Can't find
the toolbar? Click on {Window}, if there's a checkmark next to 'Tools', then the toolbar is
somewhere underneath an open image. If there's no checkmark, then just click on {Window - Toobar}
and the toolbar will appear. I frequently have half a dozen images open and no clue where the
Toolbar is, so I click on the (checkmarked) {Window - Tools} to uncheck it, then click it again to
open the toolbar and it will appear on top of an image.
Now fill that second image with the background color by selecting
{Edit - Fill} Use Background color, Mode Normal, Opacity 100%, click ok.
Click on the original image again. Click on {Select - Deselect} (to deselect that small box in the
original image).
Select {Image - Apply image} to apply the image of the light pollution - effectively you're
subtracting that from the initial image. "Source" is the light pollution image, "Layer" is
Background, "Channel" is RGB, "Blending" is Subract, "Opacity" is 100%, "Scale" 1, "Offset" 0.
Again, play with Opacity, Scale and Offset to taste (mainly opacity and offset). You should see a
dramatic reduction in light pollution.
***************************************
Both methods
MOST digital camera images benefit from judicious sharpening. Select {Filter - unsharp mask} and
play with it, see if you like the effect.
This is NOT a REAL unsharp mask, more of an edge enhancement. There is a VERY effective unsharp
mask technique for Photoshop which can have an enourmous effect on images - particularly nebulae -
which emulates the real unsharp mask method used with film and glass plates. Go to
http://www.astropix.com/HTML/J_DIGIT/USM.HTM
for a good description. While you're at that site, I recommend considering either or both of
Jerry Lodriguss' books on DSLR Astrophotography.
Enjoy your image. In the days of film, you might get one or two shots like that from a roll of film.