Start with an image that has a noticeable background gradient, or a lot of light pollution......or both.
Rename the opened image (so that the original is still on the computer). {File - Save As}
Duplicate the image. {Image - Duplicate}
Method 2 - light pollution only, not so effective with a gradient
You've opened, renamed and duplicated an image. Click on the duplicate image to make it active,
{Select - All} {Edit - Cut} to erase all of it to the background color.
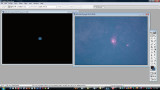
Click on the original image to make it active. Look around for a an area well clear of the object
of interest (galaxy, nebula, cluster, UFO, whatever). What you want is a patch of light pollution
with as little else as possible. A dim star or two is okay, but definitely not any part of the
galaxy or nebula you're imaging. If you're taking wide field images of the Milky Way for example,
pick an area well away from the star clouds of the Milky Way.
Using the box selection tool, select a small box in the area described above and copy it. Paste it
into the duplicate image. {Edit - Copy - Paste}, it will paste in the very center, regardless of
where it was located in the original image.
Apply a Gaussian blur to the duplicate image, it will blur that box and blend all the pixels
together. {Filter - Blur - Gaussian blur} Use a setting of 8-12 pixels for the blur.