


|
|
|
|
|
|
| |
| 03-Aug-2013 | AKMC |
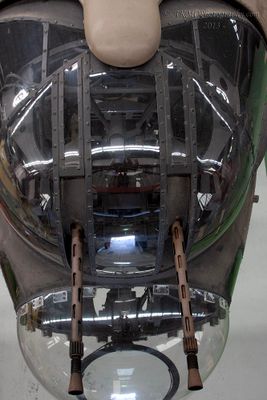
Here we're looking straight down at the nose turret of the Lancaster. As I've mentioned in previous images, the nose turret of Lancaster Mk Is (which this one is impersonating) had quad Vickers .303 machine guns, while the Mk VIIs (which this one actually is) had dual .50 machine guns, as we see here.
In image 30336 I talked about the tail turret and what a high risk location it was. The nose one was less of a risk - it was easier to get out of, and you had a better chance of getting to an escape hatch – so your odds of survival were better than that of your tail colleague, but given the attrition rate of Bomber Command, still far from good. As I mentioned in a previous image, though, there wasn't one guy in the nose turret the whole time as there was with the dorsal and tail turrets. This turret would have been used by the bomb aimer, who could also lay on his tummy to sight the target though the bomb aiming window in the chin that we see below the turret.
Addendum: My personal opinion is that Facebook is a sociopathic organisation that steals other peoples' intellectual property (including the images in this gallery) despite being explicitly denied permission to do so.
©2000-2024 AKMC. May not be used, copied or reproduced or used in AI training without written permission, especially by Facebook