photo sharing and upload picture albums photo forums search pictures popular photos photography help login
Type your message and click Add Comment
It is best to login or register first but you may post as a guest.
Enter an optional name and contact email address. Name
Name Email
help private comment
914-6 GT | profile | all galleries >> NP - The 914-6 GT Project >> NP - 3.0 RSR Twin-Plug Race Engine #2 >> 906 or 911 RSR Cam Housings? 47mm i.d. / 3 or 4-Journal Bearing Support / Spraybar installed? - Set #4 tree view | thumbnails | slideshow

906 or 911 RSR Cam Housings? 47mm i.d. / 3 or 4-Journal Bearing Support / Spraybar installed? - Set #4

Casting Part Number: 901.105.111.OR ~ 901-105-111-OR ~ 901 105 111 OR ~ 901105111OR

I'm not 100% sure these camshaft housings are 3 or 4-journal-bearing support, the photos below don't show the detail. They do have the smaller 47mm diameter journal i.d. as well as a "spraybar" which suggest they are the 4-journal type, correct for a 2.8 or 3.0 RSR, but not correct for a 906/Carrera 6 motor since the spraybar technology was not available during the period the Porsche 906 were raced.
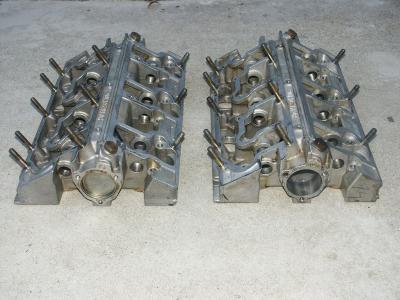
906 or 911 RSR Cam-Housings 47mm i.d. 4-Journal Bearing Support w/Spraybar - Set #4 Photo 2
906 or 911 RSR Cam-Housings 47mm i.d. 4-Journal Bearing Support w/Spraybar - Set #4 Photo 3
906 or 911 RSR Cam-Housings 47mm i.d. 4-Journal Bearing Support w/Spraybar - Set #4 Photo 4
906 or 911 RSR Cam-Housings 47mm i.d. 4-Journal Bearing Support w/Spraybar - Set #4 Photo 5
906 or 911 RSR Cam-Housings 47mm i.d. 4-Journal Bearing Support w/Spraybar - Set #4 Photo 6