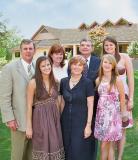
Photo was taken at ISO 1600 by mistake causing the background sky and building to blow out white.
To fix the sky, I used a selective color adjustment layer targeting white and changed the sliders to get a nice blue color for the sky. On the layer's mask, I painted out any unwanted blue (everything white turns blue...just wanted the sky to be blue).
Special cloud brushes were used on this layer to add some clouds.
The dress on the girl in the back row on the right should be a light pink color. Again, a new selective color adjustment layer was applied targeting white. The sliders were adjusted to get a light pink color on the dress. On this layer's mask, I painted out everything except the pink on the dress. Remember, everything white turns pink in this adjustment so you have to use the layer mask to adjust.
The roof is a replacement roof from another photograph. I selectied portions of this roof and copied and pasted it into this image. These roof sections go in as new layers. The Transform tool was then used to position it correctly onto this building. Layer masks were applied to these roof layers which enabled me to paint out any overlapping areas and to blend the roof sections better.