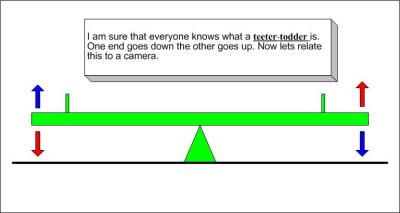
The Teeter-Todder | What in the world could a teeter-totter have to do with a camera?
This will give you a little understanding of the relationship of the Shutter Speed to the Aperture.
|
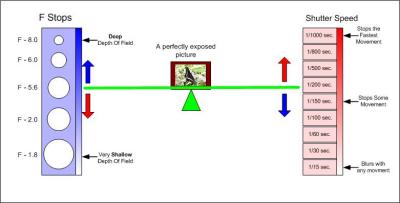
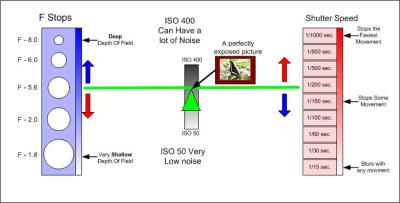
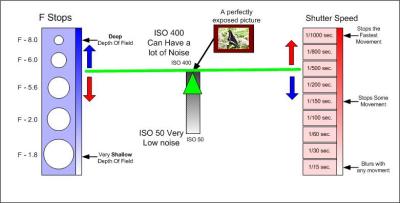
Relationship Between Aperture and Shutter Speed | Now, let’s look for a moment at the relationship between aperture and shutter speed. In this diagram, various apertures are listed on the left and shutter speeds on the right. |

Proper Exposure | This is where the Teeter-Totter comes into play. For each unique photo opportunity, there is an exact amount of light required for a proper exposure. In this example, a higher F stop number lets in very little light, so the shutter must remain open longer to allow the proper amount of light for a good exposure. But these are not the only settings that will achieve a proper exposure. |

Proper Exposure | Shooting the exact same scene as before, we can set the shutter speed to its highest setting. This will permit very little time for light to enter the camera. So, in order to get a proper exposure, the aperture must be much larger than before to allow additional light to enter the camera. For a given exposure, shutter speed and aperture work together like the ends of the teeter-totter. |
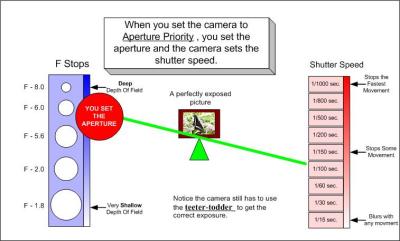
Aperture Priority | One of these modes is call Aperture Priority. With aperture priority YOU set the aperture and the camera will automatically select a shutter speed to get the correct exposure. Note that the camera still uses the Teeter-Totter concept to do this. |
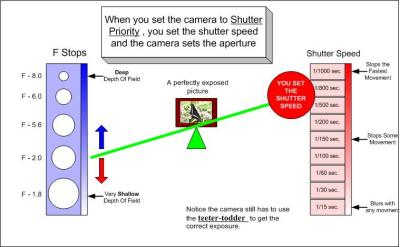
Shutter Priority | Another mode you will find on your camera is the Shutter Priority setting. This works very much like the aperture priority in the last example. With Shutter Priority YOU set the shutter speed and the camera automatically selects the proper aperture. Again the Teeter-Totter concept comes into play; the camera has to adjust the aperture to get the correct amount of light for a correct expose. |
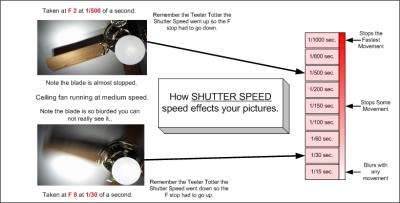
Shutter Speed | The shutter opens and closes to permit light to enter the camera. Obviously, the longer the shutter is open, the more light is permitted to enter. The classic shutter speeds are 1 second, ˝ second, Ľ second, 1/8 second, 1/15 second, 1/30 second, 1/60 second, and 1/125 second. Modern cameras offer even more shutter speeds, with speeds of 1/4000 second! |
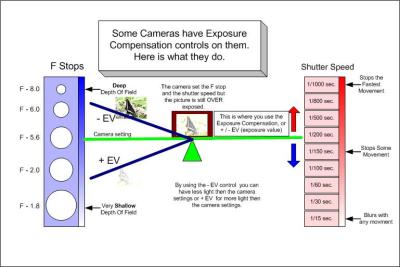
Exposure Compensation | If your camera has an Exposure Compensation control, it will help you to get the picture exposed the way you want it. When the camera has picked the setting it wants but you see that the picture is over exposed, you can use the Exposure Compensation control to fix this. Change the EV to a minus number to make the picture darker, and to a plus number to make it lighter. |
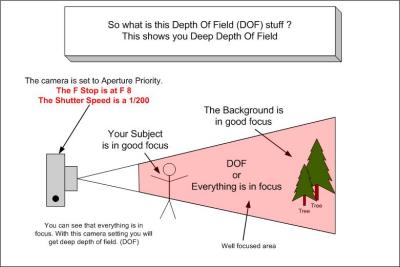
Depth Of Field | The Depth Of Field (DOF) is controlled by the Aperture setting. The smaller the aperture number the less DOF you will have. The larger the aperture number the greater the DOF. This example shows a very high aperture number, (small amount of light coming into the camera) which results in a greater DOF. |
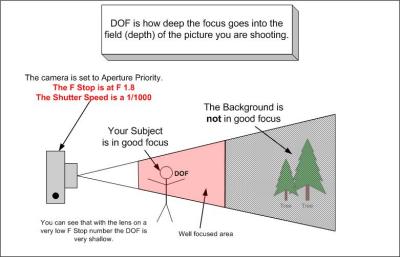
DOF | In general when you are taking portraits you want a small amount of DOF (small F stop number). You want your subject to be in good focus and the background to be blurred. When you are taking landscape pictures you want a larger amount of DOF (Large F stop number). Whenever you want to control the depth-of-field, Aperture Priority mode should be your first choice! |
ISO films and higher ISOs with digital | With film cameras, remember the decision as to which film to use? Films are rated in ISO numbers, where ISO 100 is for bright outdoors, ISO 400 for indoor and outdoor use, and ISO 800 and 1600 for low-light conditions. Some digital cameras have the ability to adjust the ISO setting in the same way. With digital, ISO is the sensitivity of the CCD to light, the higher the ISO setting the more sensitive to light the CCD is. The lower the ISO the less sensitive to light the CCD is.
The Teeter Totter relationship still stays the same, it is just the range that changes. |
Problem with higher ISO | The problem with higher ISO films and higher ISOs with digital is an increase in grain or noise in the image. So typically we use the lowest ISO possible to get a good exposure. So when is it useful to use a higher ISO? Use a higher ISO in low light situations when your shutter speeds get so slow that camera shake will ruin your image. Or use higher ISOs to permit the use of a smaller aperture to get some additional depth-of-field. |
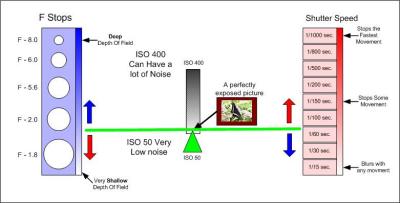
Good News | Here we have lowered the ISO, but the relationship is still the same with the teeter-totter. The only difference is the CCD needs more light to get the picture exposed correctly.
The good news, is we get less noise at the lower ISO setting. |
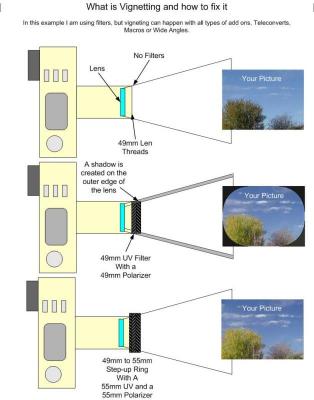
Vignetting | Vignetting is when a filter, lens or editing software makes a dark boarder in the corners of the image. This is bad when you are using filters or an add on lens. It can be cropped out to improve the image.
In the example I have shown the camera which has a 49mm thread on the lens. To the camera we have add a UV filter and a Polarizer lens. You can see that there is vignetting on the output image.
In this case if we add a 49mm to 55mm setup ring and then use 55mm filter we can eliminate the problem. |
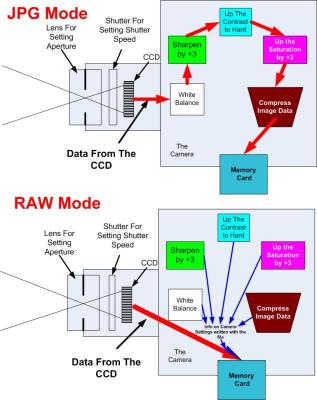
RAW | This is NOT exactly the way it happens but the idea of what happens
If you look at the drawing you will see that when you take a picture in JPG mode the data will go though a lot of different steps before it is written to the memory card. The camera does the same thing to each picture.
Think of going to the doctor and he give the same medicine to everyone, no mater what is wrong with them they get the same thing. Well that will work in a lot of cases but not all of them.
In RAW mode the camera takes the data right from the CCD and then sends it to the memory card, it adds with the file the information about how the camera was set, but it does not change the image data.
You are the doctor now, with editing software you can adjust each different image in a different way. This will get the best image you can from the raw data.
Raw file are much bigger then jpg files, they have not been compressed at all.
You can not look at a RAW file without converting it first with software.
|
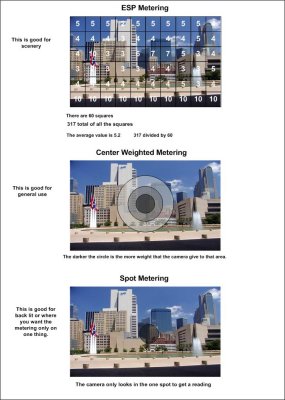
metering.jpg |


