photo sharing and upload picture albums photo forums search pictures popular photos photography help login
Steve Davis | profile | all galleries >> Projects >> Storm Drainage Control, Sep 2019 tree view | thumbnails | slideshow

Storm Drainage Control, Sep 2019

After failing to get any assistance from the city, I chose to build a wooden dam between the storm drainage ditch and our backyard (Mary did not want a permanent structure built (i.e., my planned concrete dam) before we learned more about city code requirements). Alas, as far as I can tell at this point, my dam has merely allowed the water level in the drainage ditch to rise higher and saturate the ground into our yard even more. And when it rains, perhaps less, but still a lot of water runs along the channel that was eroded by the overflowing ditch before my work, and still stands in our yard.
I didn't think to take any photos till I got to this stage.
IMG_20190912_180113b.jpg

I didn't think to take any photos till I got to this stage.

Lowe's staff cut 3-4'x 8'x 3/4 sheets of plywood into 16 strips and I cut 2-3 treated 2x 4 x 10' boards in thirds and made points on them for support stakes (I knew 9 sections would not reach across the full width of the backyard, but I wanted to test my design). Using an old 2x 8 board as a straight edge and a sharpshooter shovel, I dug a narrow trench about 6 deep along the north edge of the drainage ditch.
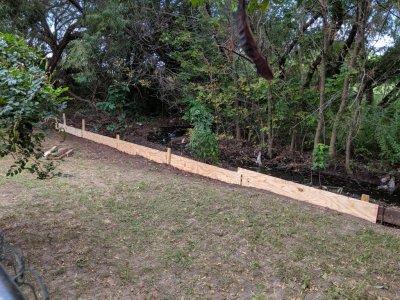
IMG_20190912_180141b.jpg

Lowe's staff cut 3-4'x 8'x 3/4" sheets of plywood into 16" strips and I cut 2-3 treated 2"x 4" x 10' boards in thirds and made points on them for support stakes (I knew 9 sections would not reach across the full width of the backyard, but I wanted to test my design). Using an old 2"x 8" board as a straight edge and a "sharpshooter" shovel, I dug a narrow trench about 6" deep along the north edge of the drainage ditch.

I started by screwing 3 pieces of plywood together lengthwise, then placed the sections of plywood into the ditch, using the straight-edge to align them. Then I used a sledge hammer to put the stakes in place and screwed the plywood to them. Then I added additional sections of plywood. I started running into tree roots at the west end of my trench, so used some metal stakes and placed the straight-edge board at the west end of my dam, expecting it would not be sufficient to hold back water. The next day, after a nighttime rain, water was still running down the 3' wide trench earlier dug into the yard by water overflowing from the drainage ditch, but I hadn't gotten out in the dark to know from whence the water was originating now. Next step is to chop out roots and continue the trench to the west end of our property and install more sections of the dam to see if that holds the water at bay.
IMG_20190912_180155b.jpg

I started by screwing 3 pieces of plywood together lengthwise, then placed the sections of plywood into the ditch, using the straight-edge to align them. Then I used a sledge hammer to put the stakes in place and screwed the plywood to them. Then I added additional sections of plywood. I started running into tree roots at the west end of my trench, so used some metal stakes and placed the straight-edge board at the west end of my dam, expecting it would not be sufficient to hold back water. The next day, after a nighttime rain, water was still running down the 3' wide trench earlier dug into the yard by water overflowing from the drainage ditch, but I hadn't gotten out in the dark to know from whence the water was originating now. Next step is to chop out roots and continue the trench to the west end of our property and install more sections of the dam to see if that holds the water at bay.