Link to inverted Ha and OIII images
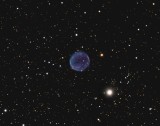
Abell 6 (PN G136.1+04.9, PK 136+04 1) was discovered by George Abell in 1955. It’s 3.2 arcminutes in diameter. I haven’t found any magnitude estimates for it, but this article in ApJ calculated a distance of 3154 light years. The central star appears to be the very faint blue star at dead center. The nebula is located about 30’ southwest of the huge, faint planetary nebula HFG 1, and is usually imaged in a widefield view with that object.
Exposure: Total exposure time 22.4 hours, 35:28 x 20 minutes Ha:OIII, 25:22:26 x 2 minutes R:G:B. All bin 1x1. Data collected in December 2020 and from September to November 2021.
Light pollution: SQM ~18.38 (Bortle 7-8, NELM at zenith about 4.5, Red/white zone border.)
Seeing: FWHM of integrated Ha and OIII both around 2.1 arcsecs
Image scale at capture: 0.6 arcsecs/pixel = f/5.7
Scale of presentation: 1.2 arcsecs/pixel (50% scale).
Equipment:
Scope: C11 (standard, not Edge) with Celestron 0.63 reducer
Mount: Paramount MX+, connected via ASCOM Telescope Driver 6.1 for TheSkyX, with MKS 5000 driver 6.0.0.0
Camera: SXVR-H694, connected via SX ASCOM driver 6.2.1.17140 (SX 1.2.2 also installed)
Filter wheel: Atik EFW2 with 7x1.25 carousel and Artemis 2.4.3.0 driver
Filters: Astrodon Type IIi LRGB
Rotator: Optec Pyxis 2", connected via Andy Galasso's 0.4 driver (Optec Pyxis Rotator AG)
Focuser: Rigel Systems GCUSB nStep motor with driver version 6.0.7 on stock Celestron focuser
OAG: Orion Thin OAG
Guide cam: Lodestar (first generation). 4 second exposures
Automation SW: Sequence Generator Pro 3.1.0.457
Guide SW: PHD 2.6.7, connected to guide cam via native SXV driver
ASCOM: ASCOM 6.3.0.2831
Platesolving: PlateSolve 2, failover to local Astrometry.net 0.19 server
Collimation: Metaguide 3, using ASI120MM connected via ZWO Direct Show driver 3.0.0.2
Processing Software: Pixinisight, Affinity Photo, Photoshop CS2
Processing Workflow by Workspace in PixInsight 1.8.8:
1. Calibration
Calibration with WeightedBatchPreProcessing with flats and bias, using Cosmetic Correction with a master dark
Blink to preview and reject a few frames
Weighting and registration with WBPP
2. Stack and Mure Denoise
Image Integration on each channel
Mure Denoise on each channel
RGB Combination for RGB frames
Dynamic Background Extraction
Image Integration on Ha, OIII and one copy of each, noise weighted and without pixel rejection, to create Superluminance narrowband image
No deconvolution was applied to these images
3. Narrowband Stretching
On Superluminance, OIII and Ha images:
Histo Trans x 3
Curves Trans
TGVDenoise
Curves Trans
Aggressive Multiscale Median Transform (with an inverted luminance mask, so that the effect was not applied to the nebula) to smooth out background.
4. RGB Linear Processing
Background Neutralization and Color Calibration (Photometric Color Calibration wouldn’t work for some reason)
5. RGB Stretching
Histo Trans x 2
Curves for color saturation, using a luminance mask so that color in background wasn’t also boosted
Curves Trans to brighten
TGVDenoise
Aggressive Multiscale Median Transform (with an inverted luminance mask, so that the effect was not applied to the nebula) to smooth out background
Histo Trans to darken the background
5. Color Combination
Color for Nebula:
PixelMath to blend stretched Ha and OIII images (R:G:B = Ha:OIII:OIII * 0.85 + Ha * 0.15)
Curves to brighten and saturate
Using a mask from the stretched OIII image (Range Mask>Binarize), use Curves Trans to pull up blue and pull down green in OIII areas. This shifts teal green to blue.
TGVDenoise
Curves Trans to brighten to roughly match stretched Superluminance
LRBG Combine, using Color for Nebula as color and stretched Superluminance as lum
In Photoshop, layer Nebula image onto RGB starfield using a mask
6. Background Subtraction
a. Create an image of the background:
1. StarNet++ to create a starless image. I used the spot healing brush in Photoshop to remove the nebula and a couple leftover star halos.
2. In PS, apply a dust & scratches filter at very low strength (5 pixels) to smooth image so that noise is not removed during the subtraction process
b. Subtract the background image from the original image in Photoshop to remove remaining gradients and any messy clumps in the background, applying an offset so that the background is not pure black
7. Final
Final Histogram Transformation to darken background
ICC Profile Transform to sRGB
Resample at 50% scale
Save as JPG