Link to annotated image
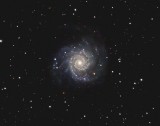
M74 is a grand design spiral galaxy located 32 million light years away in Pisces. It’s pretty large but has the second-lowest surface brightness of any Messier object. It’s the brightest member of the M74 Group, a group of 5 to 7 galaxies that also includes the polar ring galaxy NGC 660. It was discovered by Pierre Méchain in 1780.
Exposure: Total exposure time 26.7 hours, 475:35:42:30 x 2 minutes LRGB. All bin 1x1. Data collected from September to November of 2020.
Light pollution: SQM ~18.38 (Bortle 7-8, NELM at zenith about 4.5, Red/white zone border.)
Seeing: FWHM of integrated luminance around 2.6 arcsecs
Image scale at capture: 0.6 arcsecs/pixel = f/5.7
Scale of presentation: 1.2 arcsecs/pixel (50% scale)
Equipment:
Scope: C11 (standard, not Edge) with Celestron 0.63 reducer
Mount: Paramount MX+, connected via ASCOM Telescope Driver 6.1 for TheSkyX, with MKS 5000 driver 6.0.0.0
Camera: SXVR-H694, connected via SX ASCOM driver 6.2.1.17140 (SX 1.2.2 also installed)
Filter wheel: Atik EFW2 with 7x1.25 carousel and Artemis 2.4.3.0 driver
Filters: Astrodon Type IIe LRGB
Rotator: Optec Pyxis 2", connected via Andy Galasso's 0.4 driver (Optec Pyxis Rotator AG)
Focuser: Rigel Systems GCUSB nStep motor with driver version 6.0.7 on stock Celestron focuser
OAG: Orion Thin OAG
Guide cam: Lodestar (first generation). 4 second exposures
Automation SW: Sequence Generator Pro 3.1.0.457
Guide SW: PHD 2.6.7, connected to guide cam via native SXV driver
ASCOM: ASCOM 6.3.0.2831
Platesolving: PlateSolve 2, failover to local Astrometry.net 0.19 server
Collimation: Metaguide 3, using ASI120MM connected via ZWO Direct Show driver 3.0.0.2
Processing Software: Pixinisight, Affinity Photo, Photoshop CS2
Processing Workflow by Workspace in PixInsight 1.8.8:
1. Calibration
Calibration with WeightedBatchPreProcessing with flats and bias, using Cosmetic Correction with a master dark
Blink to preview and reject a few frames
Weighting and registration with WBPP
2. Stack and Mure Denoise
Image Integration on each channel
Mure Denoise on each channel
RGB Combination for RGB frames
Dynamic Crop
Dynamic Background Extraction
3. Luminance Linear Processing
Deconvolution to Sharpen:
Dynamic PSF to create PSF image
Deconvolution, using a mask created in Photoshop to sharpen selected areas only
4. Luminance Stretching
Histo Trans x 3
Curves Trans
HDR Multiscale (5 layers, Lightness Mask on, Gaussian 7) applied with a range mask to limit effect to the galaxy so as to prevent the background from darkening.
TGV Denoise
Aggressive Multiscale Median Transform (with an inverted luminance mask) to remove background lumpiness
5. RGB Linear Processing
Photometric Color Calibration, using Average Spiral Galaxy white reference
6. RGB Stretching
Histo Trans x 2
Boost color saturation with Curves
Histo Trans
Curves Trans
7. Color Combination
LRGB Combination of Luminance and RGB images
8. Background Subtraction
a. Create an image of the background:
1. StarNet++ to create a starless image
2. Modify the starless image in Affinity Photo and Photoshop:
a. Use the Healing Brush and CloneStamp tools to remove halos, leaving only the background
b. Select the galaxy with the Magic Wand tool and expand the selection so that the whole galaxy is selected. Then delete it, and use the Smudge tool to “push in” color and patterns from the edges into the hole left by the galaxy. Then blur that area with Gaussian Blur to avoid sharp transitions.
c. Apply a heavy Noise Reduction filter so that noise is not removed during the subtraction process.
b. Subtract the background image from the original image (using Image>Apply Image) to remove remaining messy clumps in the background (and apply an offset so that the background is pure black)
c. Layer Galaxy, Background Galaxies and Dust Lane Images together with masks, save as TIFF and move back into PI
9. Final Adjustments
Histo Trans to darken background
10. Star Reduction
I used a modified version of Adam Block’s star reduction technique:
StarNet to create a new “Starless Image”
Extract two copies of luminance from the Galaxy Image, then apply a 7-layer MLT, unchecking the residual layer, to one to create a rough star mask.
Binarize to select only the stars
MorphTrans using erosion to eliminate the smallest stars
MorphTrans using dilation to enlarge the remaining stars
Edit the mask with CloneStamp to exclude any background galaxies
Convolution to blur star edges
Pixel Math: subtract luminance image from blurred star mask so that cores are excluded from mask, and on ly halos are represented in the mask = “Halo Mask”
Apply Halo Mask to Galaxy image, then run PixelMath to use Starless Image where halos otherwise would be
11. Final
Final Histogram Transformation
ICC Profile Transform to sRGB
Resample at 50% scale
Save as JPG
ImageSolve
ImageAnnotation (using custom catalogs for UGC/PGC galaxies, clusters and quasars)