Step Three
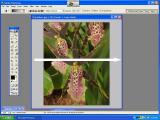
Now simply click and drag, following the course of the arrow. When you release your mouse, you should notice that the image lighting is getting much more even! There are a number of things you can do at this point to fine-tune your adjustment. First, if you are not happy at all, you can undo your last action (CTRL-Z). Second, if you want to apply more gradient, you can simply repeat the click & drag step, laying down a second "coat" of the mask. Third, you can open the layers floating pallet and double click on the "level" icon on your adjustment layer. This will bring up your familiar levels dialogue box and you can tweak the settings here. Finally, you can use the levels slider at the top of the adjustment layer to dial up or down the overall effect!
Once you are pleased with your work, flatten the two layers into one: LAYERS---> FLATTEN LAYERS.
Now, if you like, you can again bring up the levels and do a levels adjustment on the entire image, just like opening a new image! Comments and questions to sandman3@charter.net