08-OCT-2007
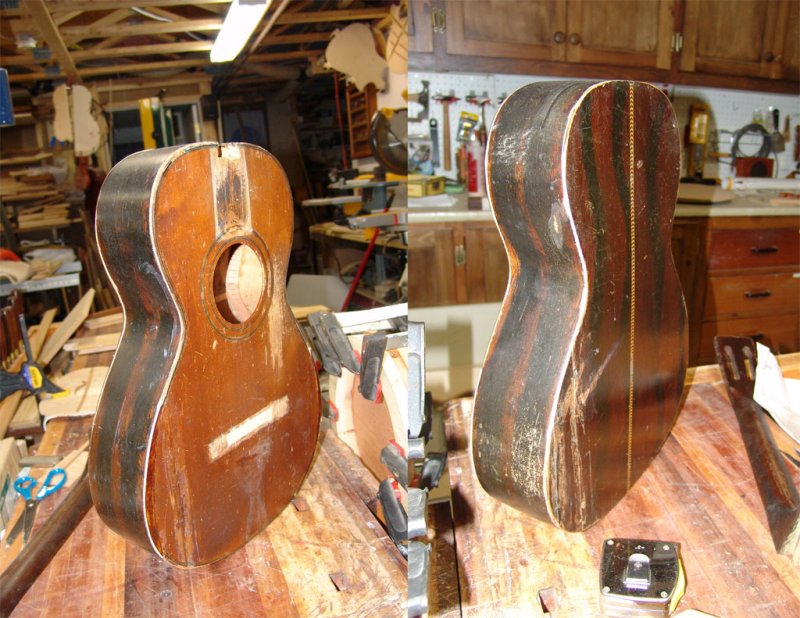
Original Condition Front of Guitar in case
This is a front view of the guitar as it arrived in my possession. While I was prepared by my Dad for a guitar in rough shape - this one is pretty bad. The top is split and delaminated from the body. The original pin bridge is gone, and has been replaced by a tin tailpiece - this will have to go. The neck is badly raised, although appears quite straight, with the fingerboard broken, but all parts present. Tuning machines intact, although the strings look like ones that were put on maybe 30+ years ago. The case is in very bad shape, not sure how much of this can be salvaged. For a guitar that has been stored in a basement for 30+ years, the wood is sound and likely can be restored with minimal wood replacement.
08-OCT-2007
Original Condition Back of Guitar in case
Very interesting finish treatment on the back, this brazilian rosewood "look" is painted on. The back has delaminated and is split in a few places, but all there. Half of the back is completely intact, which will give me the exact shape to build a mold for the body. The neck is a strong-V shape with lots of wear along the ridge; I can only imagine this instrument being laid against the chair in the old kitchen many times after playing.
24-OCT-2007
Body disassembled into mold
Here's a view from the back, with the body inserted in the mold to re-establish its original shape. The neck has been removed, which was a major challenge, however, the dovetail remained intact which will make re-assembly much easier. The fingerboard however did not fare as well, it was pretty much destroyed in the removal process, and cannot be salvaged, this can easily be made from scratch. In this shot you can see the kerfing being removed, some of it is glued okay, while other bits just fall off. it will all need to be removed and replaced.The top is missing a section as you can see daylight in the top left part of the body. I was trying to avoid removing the top but this is likely necssary to replace the missing sections and flatten it again. the bracing will be replaced, as well as the bridge plate. So far so good - no major surpises yet.
24-OCT-2007
Neck Pocket view in mold
While this view is interesting, I wanted to highlight the interesting colour of the original purfling around the top of the guitar. This is the coloured lines inside the white plastic binding around the outside of the top. The colours look like white/black/red & turqoise. This guitar must have looked pretty cool in its day. You can see where the wood was not covered with the fingerboard, how it has faded. The binding must be replaced, as it is broken & missing in large sections, and my thinking would be to replace it with neutral colours, to avoid it looking like a new guitar. Even though it should play like a new guitar when I am done, it is important that it remain looking like a 100 year old.
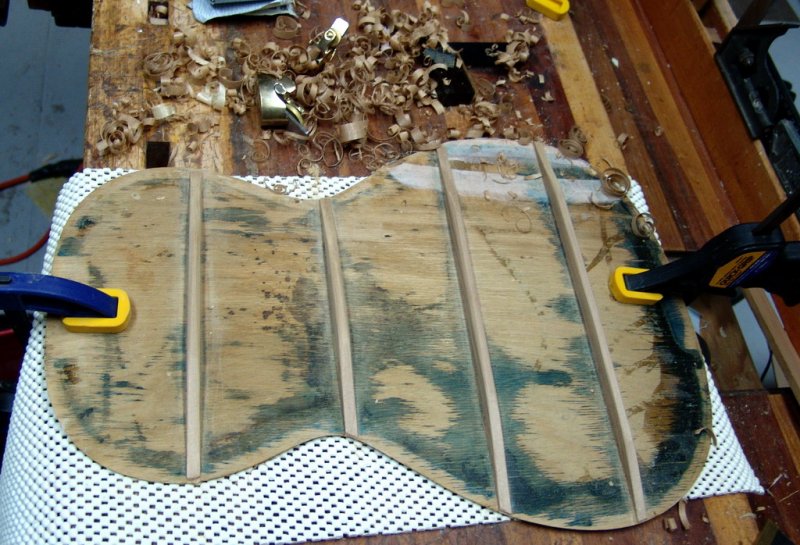
Top Repair
The top came to me heavily damaged, missing about a quarter of an inch around the bottom of the lower bout (the wide part of the guitar). It was in three pieces, and heavily warped. Once it was removed from the body, I cleaned the excess glue and kerfing off the inside and prepared to re-assemble and re-build it. In this shot you can see the walnut patches which hold together the cracks from the inside, I made the walnut as thin as I dared to keep the top as flexible as possible. The clamps are holding the last of the braces I put on the top to replace the originals, which were mostly gone. The originla braces were likely spruce, but I prefer to work with cedar, which also matches better on colour. Also being a little lighter they produce a nicer sound. The original spruce bridge plate was scraped off and replaced with an ash one, which is flexible, yet strong.
On to the Back.
06-NOV-2007
Re-assembled Back
As with the top, the back was in pretty hard shape. In at least three pieces and heavily warped, all the bracing de-laminated. The pieces were re-glued on one at a time, with a guaze "band-aid" on the inside to help with support. I also wetted the entire back and placed it under some weights for a few days to re-train it to shape. With the replacement of the braces, the back should be more or less usable. You can see in the lower portion, there will be a fair bit of finish touchup once it gets back together.
This shot also gives you a good look at the faux brazilian finish, as near as I can tell this back is made from birch, but finished to look like an expensive $25 guitar from its time!
06-NOV-2007
Body Geometry re-training
You can see, this is starting to look like a guitar again, the neck is just placed on and the entire assembly is clamped to a flat surface. I will leave it like this for a few days in an attempt to re-aquaint it with its original shape. The guitar has spent much of the last decades in a collapsed V-shape from the string pressure. This is a very important step, as the neck and top must be in the same plane in order for the strings to lay properly over the fretboard; otherwise it would be unplayable.
The neck itself was still quite flat, which is excellent news because trying to straighten a twisted neck is very difficult. The tuning machines were broken, and when I removed them, I realized they were two different types, neither of which was likely the original. I have purchased some nice new ones, which I will have to distress a bit to blend in with the rest of the guitar.
In this shot, you can also see the inside of the back, with its guaze "band-aids" and new cedar bracing, the bracing has to be shaped and it will be ready to be reunited with the body. I am not sure what the black is on the back and inside the body, it was everywhere, don't know if is was the paint from building. I can imagine maybe one of the kids 60 years ago dumped ink or something into the soundhole and it got sloshed around before it dried - whatever it was made quite a mess.
Good progress with no major setbacks. YET!
06-NOV-2007
Back of Guitar
This is a closeup of the inside of the back after the repairs are complete and the bracing shaped. These braces are cedar and made from scratch, you can see the fabric bandages holding the various sections of the back together; the braces play a role here as well. The back orignally was not bound, but I will likely bind it to provide some additional reinforcement to the repaired structures.
15-NOV-2007
Body Reassembly Complete
This is looking more like a guitar all the time. One big challenge here has been that the guitar was not really square or a perfect shape to begin with. For example if you look at the top, the rosette around the soundhole is 1/4" closer to one side than the other. One of the sides is higher than the other by 3/16", which makes it impossible to put back together square, without changing the original guitar. So now that it is together, when I sight down the body it has a small twist. I will take this into account when I re-install the neck, and shape the saddle, trying to shave a bit from each to split the difference. The next step is to mount the bridge to the body, reset the nect and make a fingerboard from scratch. The old fingerboard disintegrated upon removal; I may also have to adjust the scale length to make everything work out so the guitar plays properly. This body will have to be re-bound; originally the top had purfling and plastic binding and the back was not bound. Because of the rapairs to the top and back, I will likely bind them both to give some strength to the body.
As you see there is considerable finish repair required, the objective here will be to clean up the paintwork on the back and to re-seal the top so it is protected - not to make the guitar look new.
30-Nov-2007
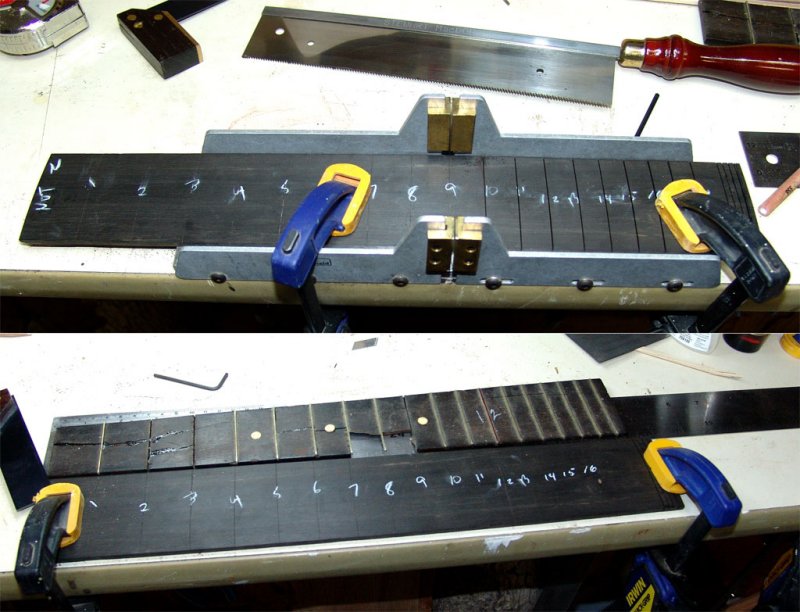
Making a New Fretboard
When I removed the fretboard from the guitar, it pretty much disintegrated; I managed to reassemble it for measurement but it could never be re-used. You can see the remnants in the bottom half of this shot. I had never made a fretboard before, I had always used pre-cut ones - now I know why. The cutting of the frets requires a precision to the thousandth of an inch, one mistake and the guitar will not play in tune. I took a piece of ebony I had for this purpose and planed it down to 1/4" thick. Now most modern fretboards are radiused or rounded on the top for more comfortable playing; the original one for this guitar was not - it was dead flat. I decided if I was replacing it I should make whatever improvements I could for playability - so I chose to radius it. The original frets were quite narrow; for the replacements I will use a more modern medium size wire which sounds nicer and is easier to play.
The bottom shot is the layout with the frets numbered, although I used the old board as a guide I chose to go with a 24" scale (the original was just over 24") which meant adjusting things slightly, including the bridge location which I changed by 1/16".
The top shot is the board partially cut in the jig, the ebony is very hard, so the cutting goes quite slow. This will look awesome when it gets glued on.
30-NOV-2007
New Bridge Installed
The original bridge had been removed or fell off long ago, and someone had installed a tin tailpiece tacked into the body of the guitar. This was one of the many apparent repairs done to this instrument over the years; it is interesting that a guitar which likely cost around $5 when it was new, received such loving attention over the years - a testament to the frugality of the times.
This new diamond-style bridge is commonly used to replace these vintage ones; in fact it fit exactly over the imprint of the original, so this is likely very true to the original instrument.
You can also get a look at the binding I installed to replace the original; I have already started the ageing process so it does not look too new. The neck is not glued on, it is just placed into the slot for scale measurement.
03-DEC-2007
Guitar with Bridge & Fretboard
Now this is really starting to look like a guitar. The finished fretboard and bridge have been installed, and is ready for some of the small bits to be installed. The frets are cut, ready to be installed, you can see them in the wooden layout block behind the guitar. The tuning machines are in the foreground, right now my plan is to not distress them, as everyone knows they are new, so let them look that way. I have also decided to go with gold fretwire as I think it will add a cool look to this guitar.
Next step is to fret the board andmakes a nut & saddle, so it can be strung up for the first time in several decades. The original nut looks like it is wooden and is falling apart - I will make the new nut & saddle from some bone I have.
Stay tuned!