


|
|
|
|
|
|
| Olympus Talk | profile | all galleries >> Resources ... >> Change Backgrounds with PS Background Eraser | tree view | thumbnails | slideshow |
| All images and text are © 2003 by AutumnSky Photography
Select thumbnail image to open a larger version. |
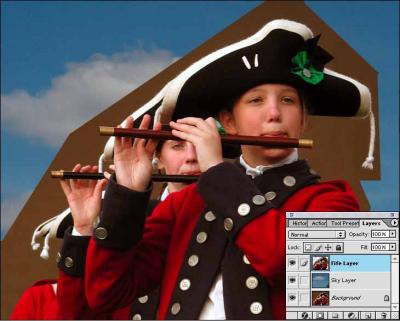
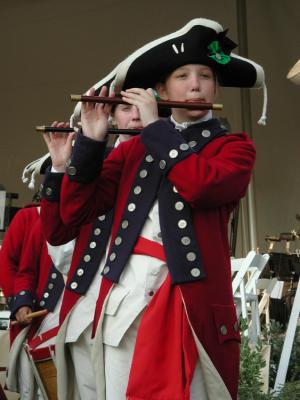 Original Image | This was taken in Yorktown,Virginia, USA. The fife and drum corps was an opening act to a summer concert held under the stars. Unfortunately the Corps performed in front of a large tent that would later be used by Virginia symphony. A good image to try a background change on. I was also intrigued with how the face of the second fifer showed through the arms of the first. The image had an interesting balance. |
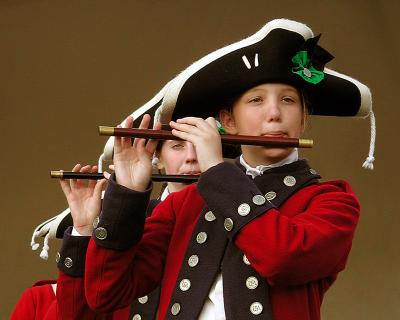 Fife Image | A little fiddling, cloning and cropping produced this which was ok but the background was a bit blah. |
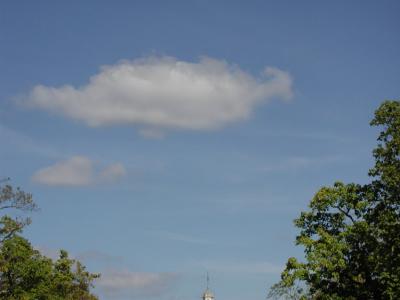 Sky Image | In a seperate window, open a "sky" image, and drag it over your first image so it will create a new layer. Duplicate the "fife" background layer so that you will be working with a copy of your original layer. Then drag the new layer so that it is above the sky layer. You can then close out the "sky" image. (see "After Lasso" to see how the different layers are arranged.) |
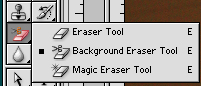
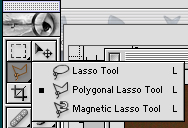 Select Poly Lasso Tool | Select the polygonal lasso tool and select an area around the fife players. Delete the area and deselect.
|
 After Lasso.jpg |
|
 Select Background Eraser | You will now use the background eraser to totally eliminate the sky. If you set the sampling (in the toolbar above) to "Continuous" any foreground color in the crosshair will be deleted because you have designated it as the target color. The "Once" sampling option allows you to choose a color to erase when you first begin dragging instead of continuously choosing colors in the path. This allows you to be more careful and detailed. It is particularly useful when you have a background that is mostly one color.
|
 Start Erasing | With the background eraser tool selected, on this image, I selected the 75 pixels soft round brush, Limits were set to "contiguous"; Tolerance set to "65%"; and Sampling set to "Once". Beginning with the crosshair in the brown background, hold your mouse button down to get a sample and then, drag back and forth including across the fine details. The brown color is selected as the target color as long as you hold down the mouse button, so you can drag over other colors without erasing them. When using the "Once" option for sampling it is a good idea to release the mouse button and paint frequently. The background colors may be slightly different throughout the image and the target image is selected each time you begin dragging. Continue dragging and erasing until all traces of the bland brown area is gone and the blue sky shows.
Note how the Background Eraser kept the fuzz detail on the top of the hat in tack. It did mess up some other areas, particuarly were the background had tones similar to the foreground. |
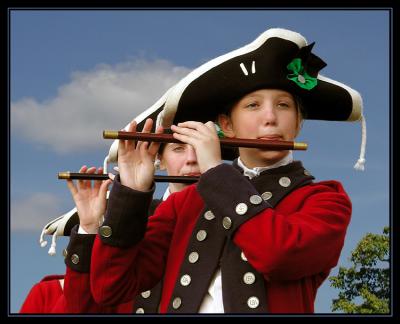 Ta-da! | To complete the image, we will now add an adjustment layer so that we can make the foreground layer match the new brighter sky we added. Create New Fill or Adjustment Layer and from drop-down list in the layers palette, choose "Levels".
I also used the "blurr" tool to soften the hard edges, particularly around the coat area. A change of background transformed this image quite dramatically. Save to save as a .psd or flatten the image to save as a other file type. Other resources you might wish to consult: Guru's Network: http://www.gurusnetwork.com/tutorials/photoshop/replacebg.html |
| comment | share |
| alex | 10-Jul-2008 02:06 | |