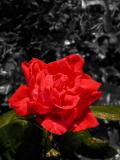
The hard part of this is the selection, and this one was not easy. I first selected a rectangle at the top with the marquis selection tool, then inverted. I then went to "Quick Mask." It is the two little dots under the background switcher in Photoshop. Click on the right one, and you have an instant mask. Click back on the left, and it changes to a selection. You "paint" mask with the paint brush, and erase it with the eraser. Once I had everything but the flower and leaves selected, I inverted, copied, and pasted. Then I desaturated the entire bottom layer, selected the top layer and loaded the selection, inverted it, switched to the bottom layer, and applied gausian blurr. The last step was to use the clone brush on the bottom layer to darken the edges of the flower and leaves. Finally, I flattened.