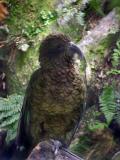
Just a real quick rework done in Photoshop CS. There are better ways, better results, but this is good practice/training, I think. I'll just give quick run down of how I got here.
Image > Adjustments > Selective Color - I used Method: Relative for all.
Greens: moved all sliders to 100%. (All the way to the right)
Neutrals: Black: +21% (the rest were left at a default of 0)
Yellow: Cyan: +25%; Magenta: -40%; Black: +26% (the rest were left at default of 0)
Then I used the Burn tool (Shift+O on a PC, not sure if the same on a Mac). That is the letter not zero. Toggle until you see a hand come up, this is the Burn tool. Brush was set to size 44 with hardness at 0 (zero), Exposure: 7-10% (I varied it).
I used both shadows and midtones, alternating between the two, using very light strokes over the over-bright fern leaves. (How much you do will be up to individuals preference.) Once I got the leaf area not quit so bright, I used a light stroke of Shadow over entire image. Then rehitting the log that the Kea is perched upon, as well as some other areas (the sun flare), and around the eye and feathers. Again, this will be individual preference.
I still wasn't thrilled with the fern leaves on that one section, so I added a new layer, then grabbed the Paint-Brush tool (Shift+B, toggle to the paintbrush):
Size: 6; Hardness: 0; Opacity: 20%; Flow: 31%. Used eye dropper to grab a darker green from the image for my foreground color, with a blending green for background color. I set the paint-brush mode to overlay at first, wasn't happy, changed it to darken. The actual layer mode was also set to dark, opacity: 100%.
Then, using very light strokes, I went over the fern leaves, making them blend more with the image.
Then I combined and flattened layers, and saved it.
This is just one way of bringing back depth of color while correcting bright spots. There are other ways that take less time, but this way has never failed me. :-) Hope this helps someone.
-Christine