22-JUN-2012
Remove the left side fairing
Remove the left side fairing to make room to remove the front sprocket cover.
22-JUN-2012
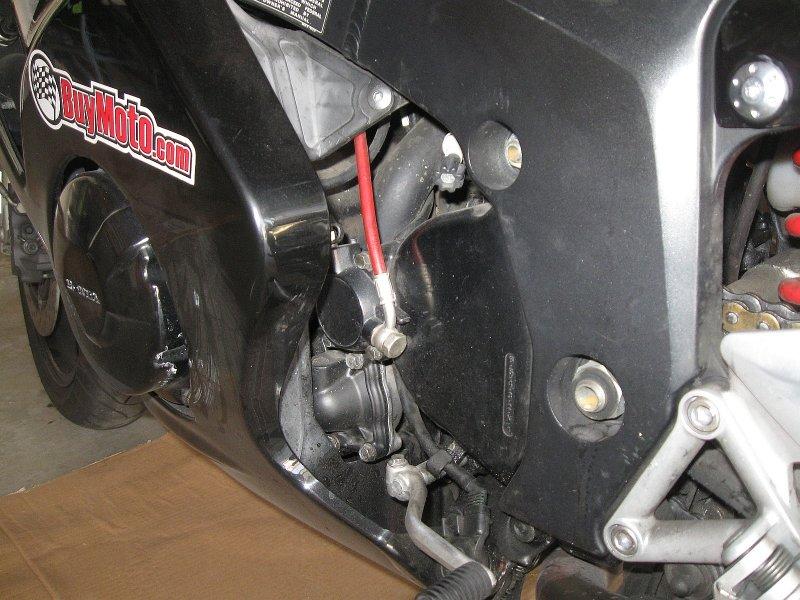
Front sprocket cover
There are only 4 bolts. The bolt #1 is shorter than the bolt #2. Do not remove the 3rd bolt on the clutch slave cylinder as it holds the slave cylinder to the cover. Otherwise, the clutch fluid will spill all over the place and the clutch will have to be bled.
22-JUN-2012
Front sprocket cover
This is how it looks like...
22-JUN-2012
Lots of gunks...
There are lots of gunks accumulated inside the cover due to chain lube and road dirt. Time to clean it up real good. I don't remember who said this: "A job worth doing is worth doing right". So I cleaned it all up with kerosene and WD40. That is the difference between a home mechanic and a professional mechanic. The pro doesn't clean it. I am better.
It's also time to pull out that clutch rod, clean it and put a light coat of synthetic grease on it. Just don't squeeze the clutch at this time while the cover is off, or you can pop out the clutch piston.
22-JUN-2012
Grind the pins
I used an air grinder to grind off the heads of the pins, before I use a chain breaker to push out the pins. If not, the tool will break when trying to push the pins out.
22-JUN-2012
Front sprocket removed
It took a lot of effort to remove the nut that holds the front sprocket. This bolt was tightened with 40 ft-lb of torque, but over time, the bolt got tighter and tighter. It took my 250 ft-lb air impact wrench a while to loosen it, while keeping the rear brake pedal down to hold it in place! Again, lots of gunk in there so I cleaned it up as well.
22-JUN-2012
Sprockets
I ordered a front chromoly steel 18-tooth front sprocket (+ a 45-tooth Drive Systems rear steel sprocket) from sprocketcenter.com. After tax and shipping, they came out to US$88. The OEM front sprocket was 17-tooth but I changed it to 18-tooth. The chain is still 110-link. I use DID ZVM2 110-link chain. The set that I just replaced lasted 30000 miles. I bought the chain from a vendor on cbrxx.com forum for US$130.
22-JUN-2012
Front sprocket installed
After cleaning up all the gunk in there, installed the front sprocket with a torque wrench set to 40 ft-lb.
22-JUN-2012
DID ZVM2 chain - 110 links
22-JUN-2012
Motion Pro chain tool
This is the Motion Pro chain tool that I use. This is the 3rd chain I'm using this tool. It works great and the customer service and technical support are top notch. Last time I had some questions, I emailed them and they replied immediately. Highly recommended. The after sales support and the quality of the tools are truly first class.
22-JUN-2012
Electronic digital caliper
The electronic digital caliper is our friend here! Don't even attempt this without a caliper.
22-JUN-2012
Press the side plate on...
Now this is the hard part. After using the chain grease that came in the box to grease the O-ring, then put the master link to connect the 2 ends of the chain, put another 2 O-ring in front, then put on the side plate. I used the Motion Pro chain tool to press the side plate on and this is very hard and delicate.
I measured the width of the other links with an electronic digital caliper and took note. It was 22.50 mm. I chose mm because it's more precise. This will be the width that I will set when pressing the side plate on and we don't want it to be too tight or too loose. Since I couldn't measure it with the tool on, so I had to press a little, remove the tool, measure, repeat until the measurement came out correct.
Also, I measured the diameter of the pins of the master link before I inserted it, they were 5.31 mm. The shop manual called for spreading the pin to 5.50-5.80 mm, so that the side plate won't come out when riding.
22-JUN-2012
Side plate pressed on...
This picture was taken after the side plate was pressed on and measured correctly, and before the pin heads were spread...
22-JUN-2012
With the pins spread
This picture was taken after the pins were spread to 5.60mm (from the original 5.31mm). The Honda shop manual called for 5.50mm to 5.80mm. Here, we don't want to spread too much or the pin heads can be cracked and then the master link would be ruined.
23-JUN-2012
Read sprocket - old and new
Here is a close-up picture of the old (in front) and the new (back). The old was used for 30000 miles and I'm not sure I can tell the difference?
23-JUN-2012
Michelin Pilot Road 2
I have been using Michelin Pilot Road. My 1st set last 12000 miles, this set last 13000 miles and they don't make Pilot Road anymore so I got a set of Pilot Road 2, dual compound tires. They are supposed to be even better than Pilot Road, with the center treat just like Pilot Road, but the shoulder treads are softer for cornering.
24-JUN-2012
Nomar tire changer
I have a set of Nomar tirechanger with receiver hitch mount and also a Nomar tire balancer.
23-JUN-2012
Nomar tire balancer
I balanced the rim first. Then I mounted the tire and balance again to find the heavy spot. Then I will move the heavy spot on the tire to the lightest spot on the rim, this way, I can minimize the use of lead weight. No, the heaviest spot is not where the valve stem is and the lightest spot of a tire is not necessary where the yellow spot indicated either.
By the way, I only installed one bead onto the rim to find the heavy spot, in case I had to turn the tire around. Otherwise, it would be impossible to rotate the tire in the rim.
Every time I replaced the tires, I also replaces the valve stems.
24-JUN-2012
Rear tire
The last 1/3 is always the hardest part. I had to use 2 additional tire spoons to move the bead over the rim.
After inflating it with an air compressor at 80 psi, hearing the 2 satisfying 'pop-pop when both beads popped into place was just awesome. I sprayed soap water on both beads before inflating it to set the beads so that they can be popped easier.
24-JUN-2012
Front wheel after balance
After perfectly balancing it, the front wheel took 2 pieces of 1/4 oz lead and I consider it excellent.
24-JUN-2012
Read wheel balanced
After balancing the rear wheel, it took only 1 1/2 pieces of 1/4 oz lead and that was excellent.