To install the propeller you'll want to follow these simple steps:
1) Slide the prop onto the shaft, without the key, until it will not move any further.
2) Mark the leading edge of the prop where it meets the shaft with a fine tip Sharpie marker. This is your insert depth mark. When installed with the key, and torqued down, you should no longer see the fine point Sharpie marking.
3) Install the key and slide the prop over it and up the shaft. If you can't get to your mark the key is jamming the prop and needs to be readjusted.
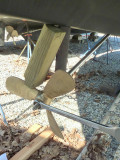
4) Thread on the big nut and insert a block of wood between the hull and prop to lock it.
5) Torque the large nut preferably using the right sized wrench. These nuts are soft and can be rounded easily so a proper fitting wrench is a very good idea. The nuts for a 1" shaft are usually, but not always, 1 1/4".
6) Once the prop has been torqued down remove the large nut and replace it with the thinner nut and torque it down.
7) To properly torque the prop nut you may need a block of wood between the hull & prop. Please use EXTREME caution doing this with folding or feathering props, in fact try NOT to. Even older fixed blade props that have been re-pitched can be too soft for this approach. Always use the wood as close to the hub root as you can get.
The best method for torquing the nut is to use a high quality strap wrench on the shaft instead of a block of wood but you'll want a decent one as the cheap ones tend to slip on small diameter shafts.