


|
|
|
|
|
|
| |
As I said, my first step in processing a digital photo is to create a ‘Levels’ adjustment layer in Photoshop.
This process doesn’t have to be done in Photoshop nor by an adjustment layer. Simply using the Levels or
Histogram function in your image editor of choice should accomplish this, but the advantage of using an
adjustment layer is that it doesn’t directly change the pixels in the original image, by using an adjustment
layer the settings can be easily changed anytime in the future.
In Levels, you are given the option of changing the Red, Green, Blue, and composite RGB channels. It would be
more accurate if the individual channels were labeled Cyan/Red, Magenta/Green, and Yellow/Blue because those
are the colors each channel actually effects, but they aren’t so we have to live with it.
You will see three triangles along the baseline of the histogram, which graphically represents the distribution of
tones in your digital image - black on the left, white on the right, and midtones inbetween. For this exercise
you can ignore everything else but the histogram and its baseline triangles.
On the left is a black triangle. This sets the black point of the image. In the middle is a midtone triangle.
This sets the level of the middle tone, nominally 50%, and you can also ignore it for this exercise.
On the right is a white triangle. This sets the white point of the image.
In an ideal perfectly exposed and balanced image, the peaks and valleys of the histogram graph should begin
to rise above the baseline on the left edge at the black triangle and move across and fall back down to the
baseline on the right edge at the white triangle. However, as with most things in life, ideal is seldom seen,
which is why I shoot in RAW format, because it allows much greater control over the shot than a JPEG file.
When taking a shot, I expose for the highlights, making sure not to blow them out to complete white and then in
the RAW converter I adjust the contrast so the histograms of all channels fall between the black and white points,
knowing I’ll fine tune this adjustment with Levels once the file opens in Photoshop.
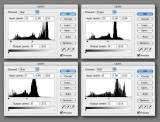
SET THE BLACK AND WHITE POINTS
Once the file moves from the RAW converter and opens in Photoshop itself, the first thing I do is create a Levels
adjustment layer, select the ‘Red’ Channel option, slide the black point triangle to the right to just where the
histogram graph
begins to rise above the baseline, as seen in the image above, and then slide the white point triangle to the
left to where the histogram graph ends.
I then do the same thing for each of the Green and Blue channels.
TWEAK THE POINTS
At this point, you will either have an image that now looks right, without a color cast, or at least looks
much better.
More often than not, this is good for the black points, but usually the white points of the Green and Blue channels
need to be tweaked by sliding them back and forth until the image looks right to you.
Once the individual color channels have been set, the RGB composite histogram should now start to rise above
the baseline at the black point and return to the baseline at the white point.
Click ‘Next’ to see what our test image looks like after these adjustments...
Copyright © Gordon L Wolford - To purchase, click here.