


|
|
|
|
|
|
| |
| 11-MAR-2006 | © Compass Marine Inc. |
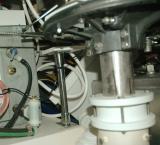
On this particular Catalina there was already a fiberglass shelf for the water heater. The shelf was perfectly level and very close to the steering quadrant. This was good because I the RPS needed to be on the same plane as the quadrant. All I now needed was to come up with was a mounting bracket. The bracket for the RPS only needed to elevate the sensor, and make it level with the quadrant, but unfortunately you can't just buy a pre-made bracket in that size. Fortunately, because of the water heater shelf, the bracket did not need to be of an odd angle defined by the hulls shape as can often be the case.
After considering the numerous options I decided to make a bracket out of one inch stainless steel rail / dodger tubing and two 90 degree stainless steel deck fittings. I measured for the bracket height by laying a flat edge across the quadrant and measuring from the flat edge to the the water heater shelf. I then subtracted, one half inch of total height, for the Starboard base plate the sensor would eventually be bolted to. While these fittings are costly they were a huge labor savor so in the end it was less costly to use more expensive components than to run up labor costs.
To cut the one inch stainless steel pipe I use a Rigid pipe cutter commonly used for cutting copper pipe. Rigid makes blades specifically for stainless but for just a few cuts the standard blace can work just fine.
Next I needed to attach the deck fittings to the pipe. The fittings come with set screws but I did not fully trust them in this situation. To be sure the deck fittings would not twist under a load I tightened the set screws then removed them leaving a mark on the tubing where I needed to drill two very small holes. I drilled the two holes and then re-installed the set screws. The set screws have a pointed tip and the hole was jut big enough to accept 75% of this tip so they would not allow the deck fittings to twist. I used Loctite on the set screws, when re-installing them, just to make sure they would not back themselves out.
© All Images property of Compass Marine Inc.