Denise, just a further thought on this, partly because my own preference runs to a more dramatic cloud
treatment, but mainly to take the opportunity to talk about the PS selection process a bit further.
Selection is the cornerstone of most PS operations, so here are some tricks that go with it, just in case
you haven't encountered them yet. The key to PS selection tools is that you can freely add to or subtract from
an existing selection, switching and/or refining tools along the way:
(a) To add to an existing selection, hold down the Shift key and select the next stage.
(b) To subtract from a selection, hold down the Alt key and select the bit(s) you want excluded.
(c) To build up a Magic Wand selection, make the initial selection with, say, the default tolerance (sensitivity),
then change to a lower tolerance if necessary to gather in (or remove) the extra areas. You can undo the last
addition or subtraction using Ctrl+Z as is common to many programs.
(d) You can save a selection, at any stage, if you're worried about losing all that work, and later reload and, if desired, modify it.
It's at the bottom of the Select menu. (Note that to preserve this over multiple editing sessions you need to save the file in a format
that supports the extra channel(s) involved. That means either PSD or TIFF -- the latter in relatively recent versions of PS only.)
------------------------------------------------------------------------------------------------
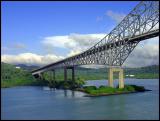
OK, where this is leading relates to what I did to this image, which was as follows, and involved the Levels dialog rather than the Burn tool.
There are many ways of building selections, and this was simply the way I happened to go about it on this occasion.
You should feel free to switch between them to see which is easier/faster for a given task:
(1) I selected the sky, clouds and distant low mountain range, using multiple Magic Wand applications mainly at Tolerance 32.
(2) I then applied Select > Similar to pick up any missing bits of sky/cloud through the bridge etc. Much faster than using the
Magic Wand to add each isolated patch mosaiced by the bridge superstructure.
(3) Changed to the Lasso tool, and used Alt+Drag to remove the unwanted areas that step (2) had picked up.
This required a fair bit of scrolling at high magnification to get the edges right around the bridge and the tops of the foreground hills.
(4) Feathered the selection 1 pixel. Note - If I'd been working on the original full-resolution image, this would have
been extended over 2 or 3 pixels, and I would probably have used Select > Modify > Expand... over a couple of pixels as well.
(5) In the Levels dialog, I changed the Lows/Mids/Highs Input Level settings (by dragging the triangular controls)
to about 20/0.75/250 which added some contast and impact to the clouds and the distant low mountain range.
(6) I then opened the Hue/Saturation dialog and desaturated the selection to -10 (purely my choice, to make the darkened sky less lurid).
I also used the Clone Stamp to reduce the halos (partly from sharpening and partly becuase of the limitations of the above selection process)
in a few places, mainly the top of the unselected middle-distance hills.
Improving the results of mods to backgrounds like this, so as to hide the point at which they meet the unmodified parts of the image,
is most easily done by putting the areas in their own layers. Best to keep that for another day ;-)
------------------------------------------------------------------------------------------------
Mouse/keyboard aids to quick editing and navigation:
� Ctrl+Spacebar+Click = Zoom in by default % increment; Ctrl+Spacebar+Drag = Zoom in to selected rectangle. Ctrl+Alt+Spacebar+Click = Zoom out by default % increment.
� Ctrl++ (Plus sign) zooms in; Ctrl+- (Minus sign) zooms out. Add the Alt key if you want to keep the floating window size constant while doing this.
� Spacebar+Drag = Page Grabber hand -- much quicker for scrolling at high magnifications than the scrollbars or Navigator Palette.
� To change a tool diameter (brush, pencil, clone stamp etc.) tap the left or right square bracket keys (no modifier key required).
� Other one-key tool shortcuts are worth learning as they're great time savers; e.g. S for Stamp, L for Lasso, E for eraser, M for Marquee, etc.
To step through the alternatives that some tools have, hold down the Shift key while doing this.
� When making a marquee selection, hold down the Alt key to drag symmetrically from a centre point rathe than the upper left.
� To reposition a marquee selection while dragging it out initially, hold down (or add) the Spacebar. This is of huge benefit
once you discover it, eliminating much fustrating trial=and-error especially when making tight elliptical selections.
With a bit of practice you can start to switch very quickly and freely between tools, and switch magnification as
needed to get fine control, and it takes a lot of the drudgery out of editing.
------------------------------------------------------------------------------------------------
Link to Current Version http://www.pbase.com/stfchallenge/image/53783200