Step 2. Next make a duplicate layer of the original image, which will automatically line up exactly with the background, (original), layer. For this image I then went to “image” on the top menu, (where it says “File – Edit - Image – Layer – Select – Filter – View – Window – Help”), then down to “Adjustments” (second choice on PS7) and then to “Brightness/Contrast” and clicked on it.
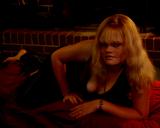
A slide tool-bar will appear giving you the opportunity to change Brightness on the top bar and Contrast on the bottom one. I used the top slider bar and changed the brightness to –55. (Minus 55). This number will vary from image to image depending how dark YOU want the image to look. DO NOT MERGE THE LAYERS AT THIS POINT!
The above image shows how mine looked at this point.