photo sharing and upload picture albums photo forums search pictures popular photos photography help login
Canon DSLR Challenge | all galleries >> Challenge 43: Good Vibrations (hosted by toc) >> Challenge 43: Eligible > Joey Joins the Band *
previous | next
06/04/05 elips

Joey Joins the Band *

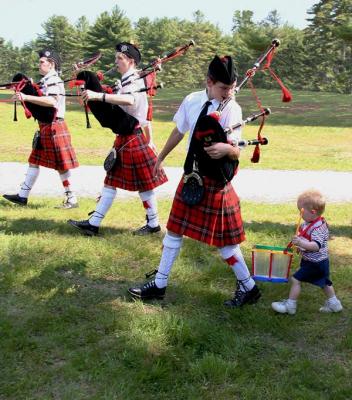
I watched Joey drum along on the edges of the bands practicing while waiting their turn in the Pipe Band competition at the Scottish Festival in Greenfield NH last Saturday. When it came time for this band to compete Joey attempted to march along with them. I got this shot seconds before his father grabbed him, much to Joey's consternation. This small boy loved drumming, keeping it up on his plastic drum for more than an hour.


other sizes: small medium original auto
share
Guest 15-Jun-2005 02:43
Ahh, you did it! Yes, you could have used the brush on the road. You could even pump up the saturation a bit, it being such a festive image. :) ~ Lonnit
Canon DSLR Challenge12-Jun-2005 19:30
Sharon, I guess if it were me, I'd just leave it alone at this point-- it's a *great* story and pretty much stands on its own. --Nancy/odigi
Canon DSLR Challenge12-Jun-2005 19:24
Elips, I'm so glad you were able to capture that moment. What a cute little drummer boy!! -- Jeannie (jburly)
Canon DSLR Challenge10-Jun-2005 14:34
Thanks so much, Lonnit!
Being new to all this I may have not have done it exactly right. The sky looks a lot better but the road, while it is darker, still looks too bright. Should I have tried the paint brush technique with that as well or would that have made it look too artificial? Thanks again for the hands on help!
Sharon
Guest 09-Jun-2005 06:29
Ok, I just gave it a run - on the first layer you copy use darken mode at 100%. For the next layer make another copy and use multiply at around 25%. Then click on the original layer and add a curves adjust ment. In the curves box shift+click on part of the white shirt and that will add a dot to the graph. Click on the dot and drag it downwards to reduce the bright areas. Now click on the line in the graph in the middle of the lower left square. Drag that dot upwards to bring back the shadow detail. After taht go to the top layer and using a deeper sky color, paint over your sky with the brush in darken mode. After that you can use the desaturate brush or the same color brush you just used for the sky, but in lighten mode, and get rid of the fringing on the treetops.

Lonnit
Guest 09-Jun-2005 06:16
Oh, I forgot to say, it's a wonderful story-telling shot. I'd not crop it b/c it'll cut the story short. ~ Lonnit
Guest 09-Jun-2005 06:16
Try adding an extra couple of duplicate layers in multiply mode. It'll get your shadows too dark but you can then recover them with curves or a layer mask. ~ Lonnit
Canon DSLR Challenge09-Jun-2005 01:30
Thanks, Andy,
I knew the blown whites would be an issue but, unfortunately, there is nothing there to work with. I was shooting the other direction into deep shadow when this happened so my settings were all wrong. Perhaps someone knows something that can be done in Photoshop to make them look less white? I am a rank beginner both with my camera and with Photoshop which is also only 4.0. Any advice would be appreciated.
Sharon
ctfchallenge08-Jun-2005 21:29
Elips, this is just a fabulous capture. Is there anything you could do to recover the sky and path detail which have blown out. Otherwise crop out the sky and piper left might work.

Andy