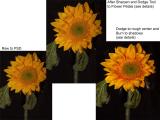
The initial raw file was converted to PS and to 8Bit so I could use Dodge and Burn Tools.
I applied Unsharp Mask 500%/1.7/16
Used Burn Tool on petals set for Highlights/40% with a brush no wider than the highlighted areas on the petals to bring up these areas. I use a Wacom Tablet so my pen is pressure sensitive, but I don't want to be heavy handed as I can always lighten more.
For the Highlights of the Rough inner area of yellow petals I reduced to 25% and used a larger brush tip to just glance around the highlights in circle. Even and smooth not a goal here.
Changed to Burn Tool Shadows/about 30% with a medium sized brush and I stroked the darker areas of the flower.
I used dodge and burn in the leafing for more contrast and dodgin some areas arond the flower can bring up subtle background and anything that comes up looking clutter I eliminate with Clone Tool.
I am not absolutely positive about the percentages but I did go down to 12% at one point. The object is to not be too drastic with them and feel your way around. Look away for a while and look at the picture again to get a clear picture of where you are at. Toni