photo sharing and upload picture albums photo forums search pictures popular photos photography help login
Linda Vich | all galleries >> Nikon 5700 Gallery >> Odds and Ends Gallery > STEP THREE: Hand after final sharpening
previous | next

STEP THREE: Hand after final sharpening

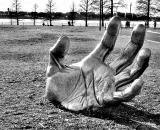
Mark Hemhauser posted an excellent image of a hand statue. He was trying to get better tones out of the image and I made some suggestions. Mark gave me permission to post the step-by-step process that I followed in making some changes.

Check out Mark's original image HERE.

Click next to view the other images in the process.

Process: The last step is to duplicate the layer again and then use Sharpen, Unsharp Mask with the settings Amount 43, Radius 15, and Threshold 0.

This method of dodging, burning and sharpening are modifications of the technique posted by photographer, JEFF ALU. I really like his high contrast, gritty style. It is not for everyone but I think he has some stunning work. Be sure to check out his galleries when you visit his site!


other sizes: small medium original auto
comment | share
brother_mark01-Mar-2004 03:03
Thanks for all this work...or play! I'm having a hard time deciding what I think. You've gotten more detail out of some of the shadow areas of the hand and that looks good. Also better contrast around the base of the hand. The original is much flatter which I'm not thrilled with. This may be a bit too contrasty for me. I can see how this style can work for gritty images--things you want to look "hard." Of course, this is a matter of personal taste. I wonder if it's possible to up the details in the hand, but not necessarily the contrast and then up the contrast between the background and the hand. I think you're right, the hand does pop out more in this style. Thank you for your time on this. We'll see if anyone else follows your link and comments.