Link to Annotated Image
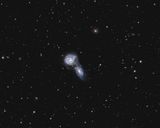
NGC 5426 and NGC 5427 are interacting spiral galaxies of similar sizes in southeastern Virgo. This appears to be the first time they’ve passed close to each other, as the only interaction so far is a faint bridge between the two. A number of sources state that the Arp 271 pair is about 130,000 light years across, so the nuclei are currently separated by about 60,000 light years. The galaxies were discovered on March 5, 1785 by William Herschel. Our galaxy will undergo a similar collision in about five billion years with the neighboring Andromeda galaxy, which is now located about 2.6 million light-years away.
Redshifts place Arp 271 at 125 million light years, but some papers estimate its distance at 90 million light years. Based on redshifts, the other galaxies in the image all appear to be far in the background, except perhaps the low surface-brightness galaxy WISEA J14024 1.85-060346.9 at upper right, for which I found no redshift measurement.
Exposure: Total exposure time about 10.5 hours, 172:32:32:74 x 2 minutes LRGB. All bin 1x1. Data collected in January and February of 2022.
Light pollution: SQM ~18.38 (Bortle 7-8, NELM at zenith about 4.5, Red/white zone border.)
Seeing: FWHM of integrated luminance 2.7 arcsecs
Image scale at capture: 0.59 arcsecs/pixel
Scale of presentation: 0.9 arcsecs/pixel (75% of full scale)
Equipment:
Scope: C11 (standard, not Edge) with Celestron 0.63 reducer
Mount: Paramount MX+, connected via ASCOM Telescope Driver 6.2 for TheSkyX, with MKS 5000 driver 6.0.0.0
Camera: SXVR-H694, connected via SX ASCOM driver 6.2.1.18212 (SX Windows Drivers 15.26.50.450 [i.e., version 1.2.2] also installed)
Filter wheel: Atik EFW2 with 7x1.25 carousel and Artemis 2.4.3.0 driver
Filters: Astrodon Type IIi LRGB
Rotator: Optec Pyxis 2", connected via Andy Galasso's 0.4 driver (Optec Pyxis Rotator AG)
Focuser: Rigel Systems GCUSB nStep motor with driver version 6.0.7 on stock Celestron focuser
OAG: Orion Thin OAG
Guide cam: Lodestar (first generation). 4 second exposures
Automation SW: Sequence Generator Pro 4.2
Guide SW: PHD 2.6.11, connected to guide cam via native SXV driver
ASCOM: ASCOM 6.6 SP1
Platesolving: ASTAP, failover to local Astrometry.net 0.19 server
Collimation: Metaguide 3, using ASI120MM connected via ZWO Direct Show driver 3.0.0.2
Processing Software: Pixinisight, Photoshop CS2
Processing Workflow by Workspace in PixInsight 1.8.9:
1. Processing
RGB Combination for RGB frames
Calibration, weighting, registration and integration with WeightedBatchPreProcessing with flats and bias, using Cosmetic Correction with a master dark
Dynamic Background Extraction on luminance and RGB images
ImageSolve RGB, then run Spectrophotometric Color Calibration, using Average Spiral Galaxy white reference
Determine PSF using the PSFImage script, and enter this into BlurXTerminator
BlurXterminator using Correct First and manual PSF on luminance and RGB
NoiseXterminator on luminance and RGB
Canon Banding Reduction script
2. Luminance/Narrowband Stretching
Histo Trans x 3
Curves Trans
No denoise necessary
3. RGB Stretching
Create a saturation mask: apply ScreenTransferFunction to the stretched luminance, and then to Histo Trans. Clip the mask with Histo Trans and blur slightly with Convolution.
Histo Trans
Curves Trans to boost saturation, using the saturation mask to prevent spurious background colors from being boosted
Histo Trans
Curves Trans to brighten
DBE
TGV Denoise
4. Color Blending
LRGB Combine
5. Background Subtraction (Artificial Flat)
To remove background lumpiness caused by heavy stretching due to my light polluted skies, I create and subtract an artificial flat, which is simply an image of the messy background, with all stars and imaging targets removed.
a. Create an image of the background by removing stars with StarXterminator
b. Clean this image up in Photoshop, removing the leftover galaxies and any leftover stars
c. Blur this background image slightly (otherwise in the next step you’ll remove all the noise, creating an unnatural-looking noiseless image)
d. Back in PI use PixelMath to subtract the background image from the main image (adding a pedestal, to avoid having a pure black background).
6. Final
Final Histogram Transformation
ICC Profile Transform to sRGB
Rescale as desired
ImageSolve
Create annotated images with the AnnotateImage script, using some custom databases to extract quasar redshifts and galaxy clusters
Save final image and annotated image as JPGs