


|
|
|
|
|
|
| |
| 19-Dec-2015 | Joe Petolino |
I've used slide scanners in the past, but it was always a slow, labor-intensive process, and the results were often disappointing. I’ve come up with a quick and easy way to get my old slides into digital form using a camera.
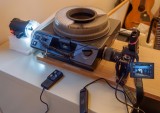
Remove the lamp assembly and lens from a Carousel projector (they both slide right out without tools). Mount a camera with macro lens pointing into the lens opening, mount a strobe pointing into the lamp opening. Now you have an auto-feed slide digitizer! The results are actually much better than I was getting with my old Minolta 5400 slide scanner, and instead of seven minutes per slide, it takes only a few seconds to advance to the next slide, focus, and take the shot. The downside: no automatic dust removal.
Why a strobe instead of the projector lamp? The lamp is very bright, and very hot. If I stop down enough to get a good exposure, the DOF is high enough to see dust on the condenser lenses behind the slide. I was also worried about overheating the camera. I used an underwater strobe with a built-in LED aiming light (mainly because that's what I have). The LED provides enough illumination for the camera to autofocus on the slide before I take the shot. I used a couple of layers of styrofoam sheet between the strobe and the slide as a diffuser - you can see a styrofoam produce tray in the photo between the strobe and the projector.
My camera is an EM5 Mark II with 60mm macro lens, but you can probably get good results with anything that can focus close enough. I shot in RAW at base ISO (200), manual exposure (f/5.6, 1/250 sec), autofocus, flash white balance, IS off. I adjusted the power on the strobe to give a good ETTR histogram on a typical slide, and that worked well for the whole carousel. This particular strobe is triggered through a fiber optic cable by the on-camera flash. To extend battery life, I set the camera to minimum manual flash power (1/64).
I physically rotated all of the slides into landscape orientation before I started, but if you don't want to do that, just move the camera back until a portrait-orientation slide fills the frame vertically.
The resulting images require some post processing:
| comment | |
| Dave Beedon | 05-Jul-2016 03:14 | |