


|
|
|
|
|
|
| |
| 19-SEP-2014 | |
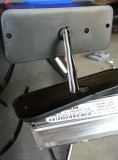
I drilled out the center hole so it can fit all 4 wires through. I also drilled 2 additional holes on the left and right sides to mount the LIN3 LED light. It came with 2 stupid self tapping metal screws that I replaced with 2 stainless steel bolt with lock washers and nuts. I'm a perfectionist. Yes, a job worth doing is worth doing right!
Why 4 wires? 2 are +/-, 1 is SYNC (when connected more than 1 LIN3 together, like a police car or ambulance, they can use the SYNC wire to synchronize the flash with each other), 1 is MODE (touch it to 12V to switch different flashing mode like fast flash, slow flash, strobe etc...).
Keep in mind that as of today, the California vehicle codes require that a flashing brake light has to flash not more than 4 times for the first 4 second. Specifically, 25251.5c: "(c) Any stoplamp or supplemental stoplamp required or permitted by Section 24603 may be equipped so as to flash not more than four times within the first four seconds after actuation by application of the brakes."
I use the MODE wire to set the light to steady mode and then I disabled the SYNC and the MODE wires by sealing up the terminal. I didn't want to cut them off as I may use them again in the future.
©2008-2011 by Minh Lang