


|
|
|
|
|
|
| |
| 18-NOV-2012 | |
I carefully measured the pieced top and the backing, marking the horizontal and vertical centers.
Using those measurements, I marked the backing where the corners of the top would go.
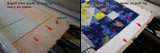
I placed registration marks along the edges of the backing at regular 6 inch intervals, starting at the center marks. I placed corresponding chalk marks on the quilt top.
I basted the top edge of the quilt top to the backing exactly half way from the center of the quilt backing, making sure it lined up with the corner marks that I had determined.
As I worked down the quilt, I made sure that the registration marks on the top and backing were staying aligned. Any deviation would be corrected in small steps so that I would reach the bottom edge of the quilt at the correct position on the backing. In this case, Anna had carefully attached the quilt borders with no fullness "waves", so there was no need to make adjustments as I rolled up the quilt.
I believe that it is important for the topper to make the outer border of the backing pretty wide. This will make any minor mismatch with the top to less noticeable.
As with any backing, several extra inches is needed for attaching to the longarm quilting frame.
© Joseph E. Filer