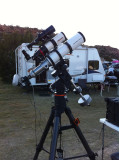
This is a photograph of my imaging setup. This was taken at the Okie-Tex Star Party. The small scope at the top is the guidescope with the guiding camera attached. The bottom two scopes are my TMB 80 APO (widest field scope) on top and my Astro Tech 111 ED (wide but less so) on the bottom. Both are imaging scopes. The DSLR that takes my images is attached to the bottom scope. I usually do not have 2 imaging scopes together on the same mount but was just trying it out on this trip. It made it easier to switch scopes. It is all mounted on my Celestron CGE german equatorial mount. All the wires connect to my computer in the box to the right. My trailer is in the background. It is nice to be comfortable at Star Parties.
Anatomy of an Astrophoto
An Astrophoto produces an image of an object in the sky that shows the object in great detail and in color. If you were to look at the same object in a very large telescope with an eyepiece it would have less detail and no or virtually no color. The images you see in this gallery are the product of a lot of equipment and time. An image of the equipment used is posted above and additional images are posted in my Equipment gallery. Just to give you a flavor of what it takes to produce these I have outlined the basic procedure. There are many different ways to achieve the same results but this is an example of one fairly common way to do this (at least this is how I do this):
1. To take a photograph of an object in the sky you need to take the image through a telescope mounted on a special mount that tracks the movement of the object. The object does not move appreciably from our vantage point but it is the movement of the earth that causes the motion. The special mount (a German Equatorial mount) moves the telescope at exactly the same speed as the earth rotates so the object appears to stay motionless.
2. The tracking of even the best German Equatorial mount will rarely track a celestial object well enough for a long exposure time (1-20 minutes) so an additional method of ensuring no movement during a photograph is to use a guidescope and a separate guiding camera. This separate scope and camera are piggybacked on top of the telescope that is used for the astrophoto. The guidescope and camera are pointed at a star near the object that is to be photographed. Special guiding software allows the computer to give commands to the mount to make sure any movement away from the star is corrected so that the mount does not move at all (this does not always work as well as it should in theory). You will notice that some of the stars are slightly elongated. This is a result of the guiding not going as well as planned.
3. The camera that will actually take the astrophoto is mounted on a telescope of the correct size to frame the object according to the object’s size. An object such as the Andromeda Galaxy, which is posted in my gallery, is very large and requires a shorter, smaller telescope that will cover a very large area of sky. An object such as the Helix Nebula or NGC 891 is very small so a telescope with a longer focal length must be used and even then the photographer may crop out only the middle part of the image. I use three different telescopes to cover the different situations. The camera is controlled by special software on the computer that allows the photographer to set up a sequence of let’s say 20 exposures of 10 minutes each without having to touch anything else while in progress. Different objects require different exposure times from as short as 1/250th of a second for the moon to 20 minutes each or more. I have listed the amount of exposures and exposure time for each image in all of my astrophotos.
4. After all the images are taken and stored on the computer two other types of photographs have to be taken to create the image you see. The images taken above are called “light” frames. As to the other two types of images the first type is call a “dark” frame and the second is called a “flat” frame. The dark frames are necessary to subtract the inherent digital noise produced by the camera’s image sensor. A series of frames are taken at the same exposure time as the images. For Digital SLRs such as the Canon Rebel I use these darks have to be at the same temperature and the same ISO as the lights. I typically take about 10 darks for every 5 degrees and every set of ISO speeds and exposure times to keep a library of darks ready to use. For example, I would have darks for ISO 800 – 60 degrees – 10 minutes; ISO 800 – 55 degrees – 10 minutes, etc. The second type of additional image, the flat, is a short exposure image taken through a light placed on the end of the telescope to show any problems with the optics of the scope and to show all the dust and dirt in the optical train. I shoot about 10 of these after every group of images. The darks and flats are actually subtracted from the light images by special software.
5. The above set of processes will take from 2 to 10 hours depending on the photographer and the brightness of the object being photographed. The more separate images and time you can get the better color, brightness and detail the final product will have.
6. The next step happens at home after you have gathered all of these lights, darks and flats. Special software stacks the multiple exposures into one image and subtracts out the noise from the darks and the optical problems and dirt from the flats. You end up with one image.
7. This image does not look anything like the final product. It is very dark and you may not even see the object at all. The next step is to process the image and many people do this in Photoshop. Some of the many processes that may be done to the image include stretching, color balance, hue, saturation, noise elimination, sharpening and separately adjusting parts of the image differently than other parts. Astro imagers may spend between 1 to 10 hours performing these tasks to make the final image you see.
8. If you look at the entire procedure from start to finish the minimum time would be maybe 3-4 hours and could be up to 20 hours – just for one image!
9. A summary of the steps would be as follows:
a. Set up the mount and polar align the mount (1-4 hours)
b. Find the object to be photographed (1 minute – 1 hour)
c. Frame the object and focus the camera (10 minutes to 1 hour)
d. Set up the guidescope and guiding camera and start the guiding software (20 minutes)
e. Take the sequence of images desired (30 minutes – 10 hours)
f. Take the darks (the same 10 minutes – 10 hours as above but you can have a library set up over time to avoid this)
g. Take the flats (10 minutes)
h. Process and stack the lights, flats and darks (30 minutes – 1 hour)
i. Post process the image in Photoshop (30 minutes to 10 hours)
AND YOU JUST THOUGHT SOMEONE SNAPPED A QUICK PHOTO……