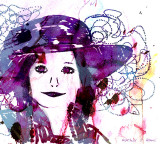
Photoshop Elements 6 - Loosely followed a tutorial in this months Photoshop Creative magazine.
The colour is generated from scans of watercolor on paper and by using various blending modes.
Added extra brushwork.. and quite a few other tweaks.
~ Basic Workflow ~
Change image to B/W. Increase contrast to bring out the white.
Duplicate this layer. Add a new blank layer and trace or block with black over the parts of the image where you want the colour to show through. Delete the background layer.
Using a small brush paint in the swirly bits and any other embellishments you want to add. When happy, merge your layers.
Open your texture image (I used what was supplied on the magazine CD). Position it over the tracing however you want it.
Play with the Blend Modes to blend the texture with the tracing image. Repeat this with another copy of the texture and blend again. Colour Burn is a good one!
With the Eraser tool erase out parts of the texture to bring out the tracing. Create a new layer and add more embellishments if you wish too.
My Crab image was done more or less the same way as this but I created my own texture.