Click on the original image again. Click on {Select - Deselect} (to deselect that small box in the
original image).
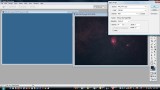
Select {Image - Apply image} to apply the image of the light pollution - effectively you're
subtracting that from the initial image. "Source" is the light pollution image, "Layer" is
Background, "Channel" is RGB, "Blending" is Subract, "Opacity" is 100%, "Scale" 1, "Offset" 0.
Again, play with Opacity, Scale and Offset to taste (mainly opacity and offset). You should see a
dramatic reduction in light pollution.
***************************************
Both methods
MOST digital camera images benefit from judicious sharpening. Select {Filter - unsharp mask} and
play with it, see if you like the effect.
This is NOT a REAL unsharp mask, more of an edge enhancement. There is a VERY effective unsharp
mask technique for Photoshop which can have an enourmous effect on images - particularly nebulae -
which emulates the real unsharp mask method used with film and glass plates. Go to
http://www.astropix.com/HTML/J_DIGIT/USM.HTM
for a good description. While you're at that site, I recommend considering either or both of
Jerry Lodriguss' books on DSLR Astrophotography.
Enjoy your image. In the days of film, you might get one or two shots like that from a roll of film.