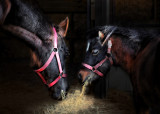
The purpose of this photo was to show the old mare Foxy peacefully sharing hay with the young gelding mini. You see, any of you who have or know horses know that they generally will not share ANYTHING with another horse…be it hay, grain, treats, space or even attention from their “people mommy”. But these two have really taken to each other, so I feed them together, separated from my other two big horses.
This edit was a “paint with light” technique done in Photoshop. However, since learning this technique, I found a totally different “paint with light” technique tutorial on the Internet, which I did try and did not like.
The first thing I did was give it a dose of Topaz Adjust to really bring out the colors and light and shadows. Topaz Adjust sometimes makes things too blue, so I then took out the blue with the various PS color adjustments.
I next made the color palette with black on top and white underneath. I made a “fill layer” which was solid black. I set the opacity of that layer to about 65%, so I could see the picture thru the black. With black still on top, I took a soft brush with about a 9% opacity (but not more than 13%), and started painting black on the horses. By painting black on the black fill layer, you are actually painting the black off of the picture. I will start painting on areas that I especially want highlighted, using the largest brush that I can, without spilling over. After highlighting, I will then continue “painting black” onto the picture. Occasionally, change the opacity on the layer back to 100% to see how it is looking. Once I get it looking OK, I will again put the opacity of the layer back up. But for this shot, I did not put it back up to 100%. If you find that you eliminated too much black in a particular area, put the white on top with black on bottom, and paint with the white on the areas you wish to darken back up.
I next used the contrast adjust, moving both the contrast and brightness until I got what I wanted. In this case, I did not want the background to be totally black, because I wanted the hay showing and some background hay showing. Flatten, and then make a duplicate layer.
I then used the render light effect to slightly increase the illumination of their faces and the pile of hay right in front of them. The hay was too white, so I had to color it slightly to get a more golden color. When I get what I want, I will flatten or merge, then make a duplicate layer.
Next, I gave it a dose of Topaz Simplifier, the Buzz Simplifier. If you actually have the old Buzz Simplifier itself (which I finally was able to get a hold of) you can use that. But I have now been using the Topaz Simplifier for so long, I find it easier to control. The default is I think 33%, but I will usually use between 9 to 13%. I did not like the effect on the hay, however, so I erased it from the hay. I flattened then made another layer.
On this last layer, I did some Unsharp Mask, mainly for the sake of the hay but ended up liking what it did for the rest. I then flattened all layers.
Copyrighted Image. DO NOT DOWNLOAD, copy, reproduce, or use in any way without written permission from this artist.