I don't believe I figured out how to do this without an action and actually finished the thing! I was inspired by the Triptych (not sure that's spelled correctly) action posted by Mike on the RetouchPro site. Here's how to do it. (I originally did the inner shadows on each photo separately...much easier to do them all at once. Please try these instructions and tell me if they make sense and you wind up with something usable!)
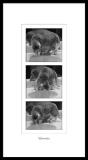
1) Crop three b/w pictures to the proper width. Length doesn't
matter. You will note the three pictures are different sizes.
2) Make a new blank document the same width as the original three
images, but longer than that to allow for spaces between the images.
3) Go back to each separate image, copy and paste it into the
new long blank, Make sure grid is on with 1/8" spacing, (View/Show/Grid)
leaving a space between them (You set this in preferences for the
program...in this case PS CS...but you have this option in Elements
and PSP as well.
4) Next create a new blank layer and hold down the alt key while you go
to the Layers palette and click Merge Visible.
5) Click on the Magic Wand and select the white spaces between
the images (You either have to choose the additive icon for the Magic
Wand in the top Options bar, or hold down the shift key as you click
in the second white space)
6) Invert the selection. (Select/Inverse)
7) Go to Edit/Copy and then Edit/Paste. This step is necessary in
order to create the inner shadow with Layer Styles. I
don't know how to do this with PSP, but I'm sure one of our PSP gurus
will pop in here with a workaround.) Click on Layer/Styles and chose
Inner Shadow. Played with the sliders to get the effect you want.
8. Go to Image/Canvas and with white as the background color
increase the canvas size to allow a large white border around the
three images. Size isn't critical. You can crop it as your picture
develops.
9. Went to View/New Guide and added horizontal and vertical guides (you
have to drag them into position and make sure your rulers are on)and
mark where you want the outer mat to go.
10. Take the rectangular tool and following your guides draw a
rectangle outside of the 3 pictures.
11. Go to Edit/Copy - Edit/Paste, so you can use Layer Styles to make
another Inner Shadow and do that.
12. We're almost finished! Crop the image to the proportions you
want allowing for the thickness of frame you want.
13. Select/All - Edit/Stroke - 20 pixels???? - Inside - OK
14. Select the color of your stroked frame with the Magic Wand and
then invert the selection. Edit/Copy/Paste - Layer Styles - Inner Shadow
That's all folks!