


|
|
|
|
|
|
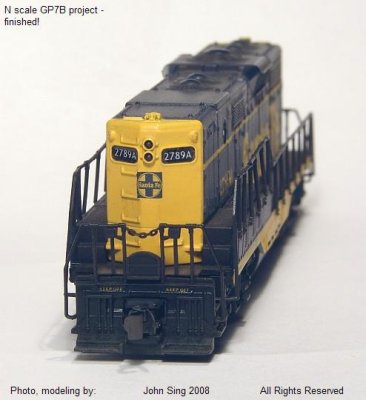
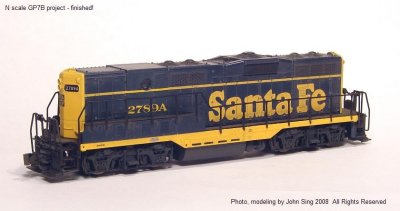
| ATSF_Arizona John Sing | profile | all galleries >> Galleries >> Constructing a N scale GP7B in Santa Fe | tree view | thumbnails | slideshow |
| previous page | pages 1 2 3 4 5 6 7 8 9 10 ALL | next page |
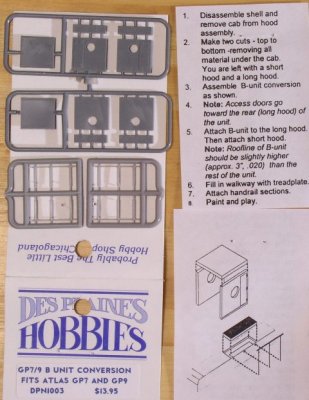 GP-9B_kit_1.jpg |
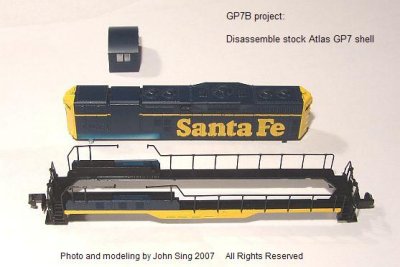 GP7B aaa dissassemble.jpg |
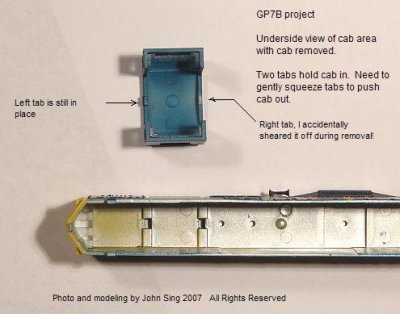 GP7B aac cab removal two tabs.jpg |
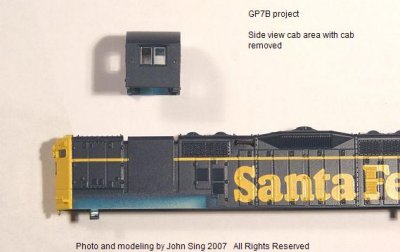 GP7B aae cab closeup.jpg |
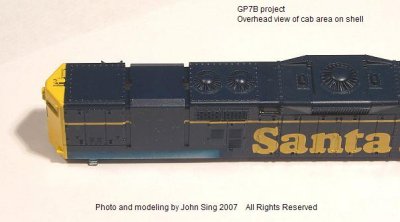 GP7B aag cab closeup overhead.jpg |
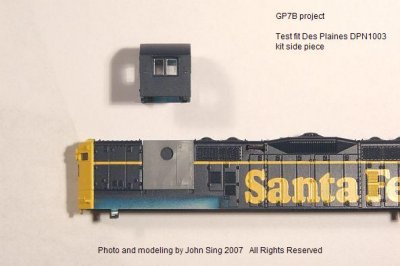 GP7B aai test fit replacement piece.jpg |
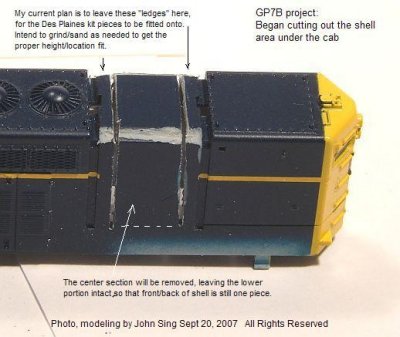 GP7B abb cutting out cab area.jpg |
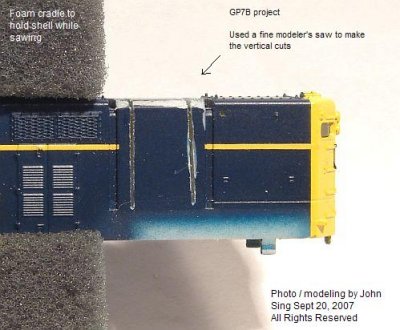 GP7B abc cutting out cab area.jpg |
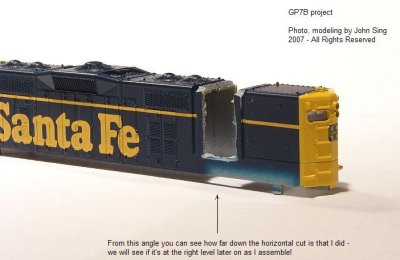
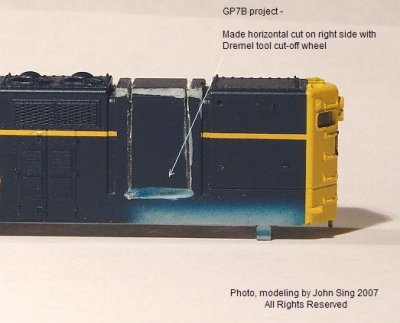 GP7B abe Make horizontal cut right side.jpg |
 GP7B abf Make horizontal cut left side.jpg |
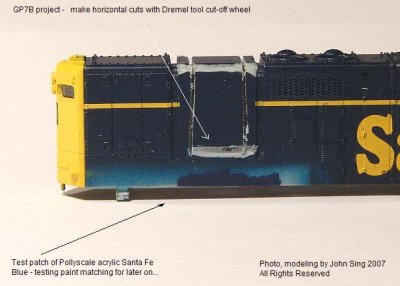
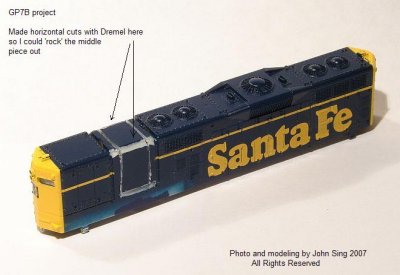 GP7B aca Horizontal cut with cutoff wheel.jpg |
 GP7B acb Flex and remove cab piece.jpg |
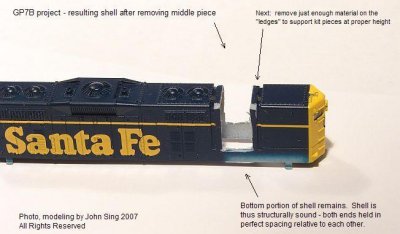 GP7B acd Resulting shell side right.jpg |
 GP7B acj Resulting Shell 3-4 right front level view.jpg |
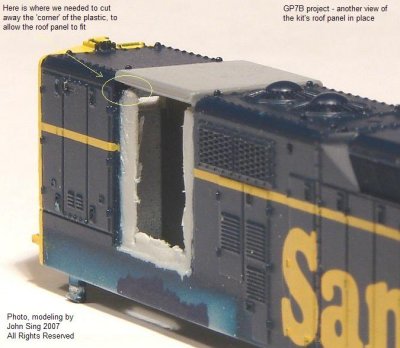
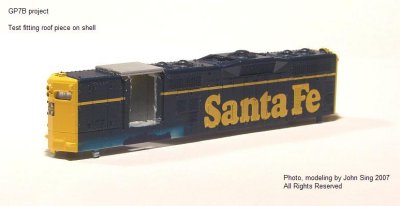 GP7B adc Test fitting roof on shell.jpg |
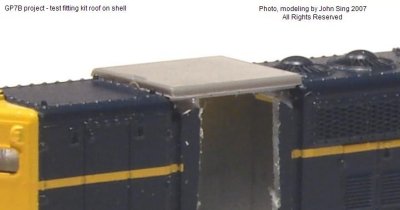 GP7B add Test fitting roof on shell.jpg |
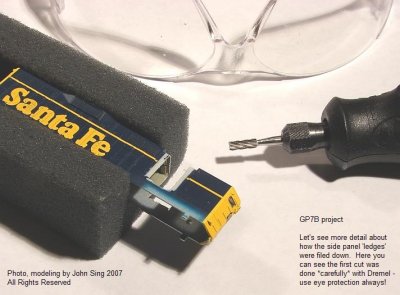
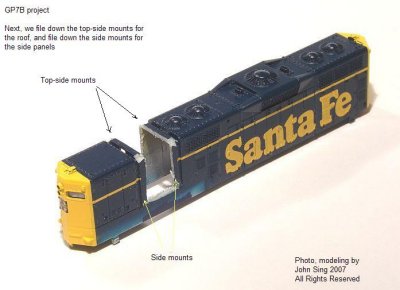 GP7B aea Next we lower the mounts for the roof and side.jpg |
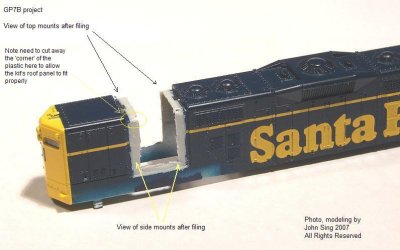 GP7B aeb File down the mounting pads on roof and side.jpg |
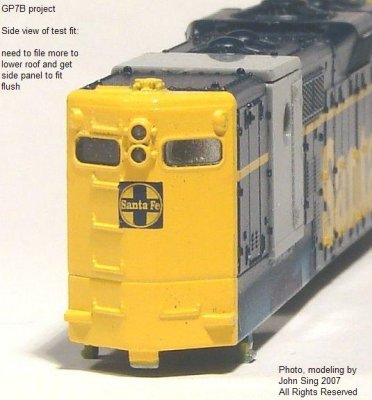
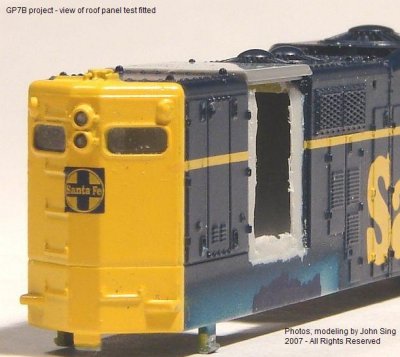 GP7B aec Test fit roof - file carefully down correct amount.jpg |
 GP7B aed Another view - roof lowered correct amount.jpg |
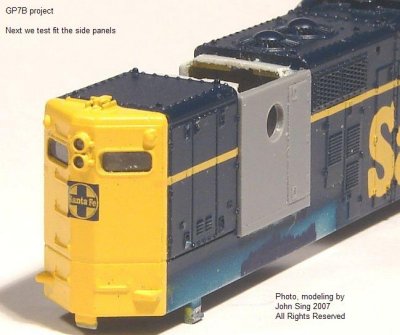 GP7B aef Now test fit side panel on the filed sides.jpg |
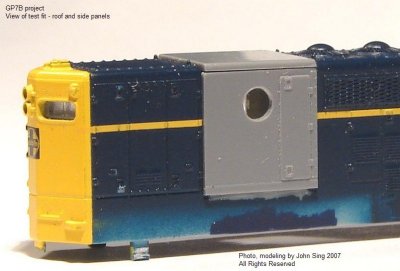 GP7B aeg Test fit roof and side panel.jpg |
 GP7B aeh Test fit roof and side panel.jpg |
 GP7B afd1 Lets do right side to see how we did it - use Dremel CAREFULLY.jpg |
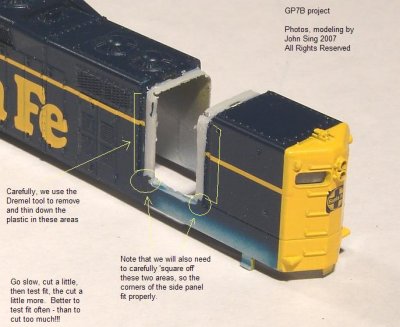 GP7B afd2 this is where we will use Dremel.jpg |
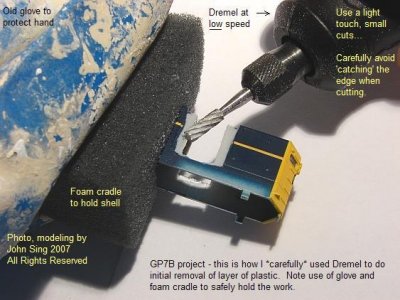 GP7B afd3 How I CAREFULLY used Dremel.jpg |
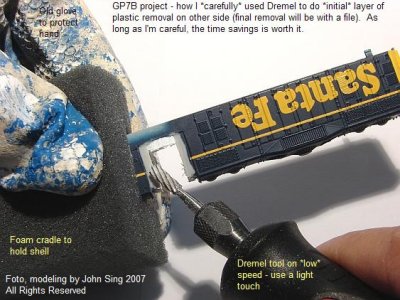 GP7B afd4 How I CAREFULLY used Dremel.jpg |
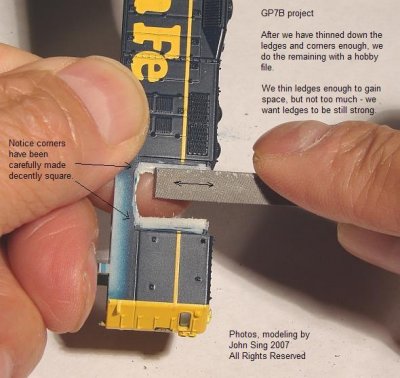 GP7B afe Then used file to do the fine adjustments.jpg |
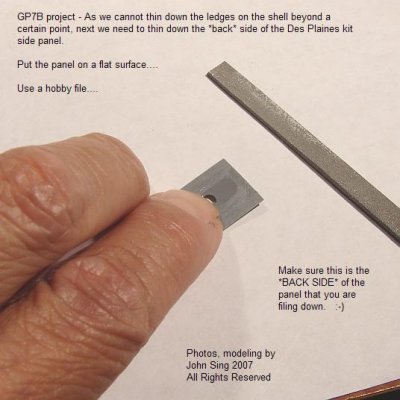 GP7B aff also needed to file the panel - cannot just do the ledge on shell.jpg |
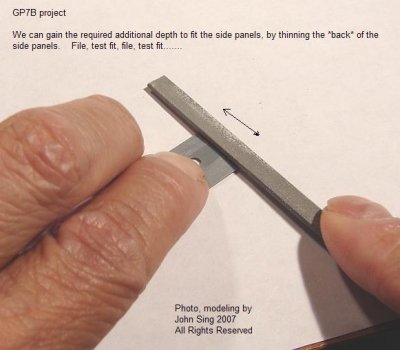 GP7B afg put panel on flat surface and file.jpg |
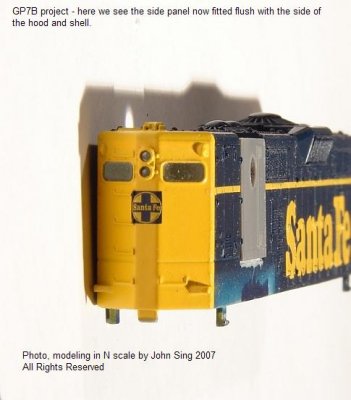 GP7B afh After filing ledges and panel - here is result.jpg |
 GP7B aga My very funky painting platform.jpg |
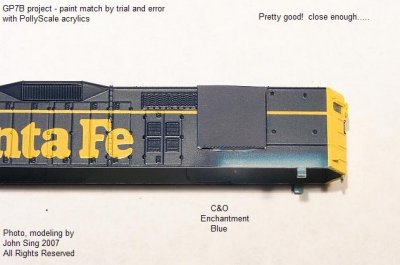
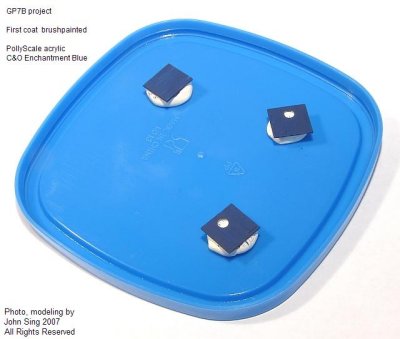 GP7B agb first coat brush painted Polly Scale acrylic CO Enchantment Blue.jpg |
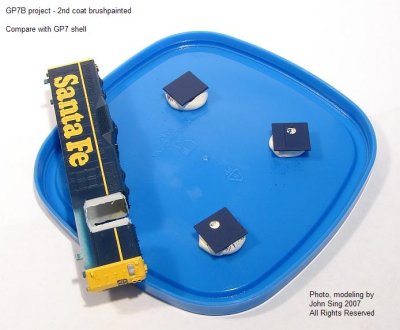 GP7B agc second coat brushpainted - compare with GP7 shell.jpg |
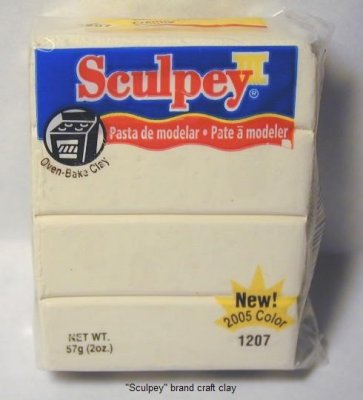 GP7B agd Sculpey brand clay - any crafts store.jpg |
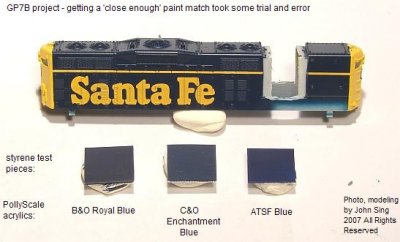 GP7B aha Paint matching BO-CO-ATSF DSC02504.JPG |
 GP7B ahb BO Royal Blue PollyScale acrylic DSC02506.jpg |
 GP7B ahc CO Enchantment Blue PollyScale acrylic DSC02505.jpg |
 GP7B ahd ATSF Blue PollyScale acrylic DSC02507.jpg |
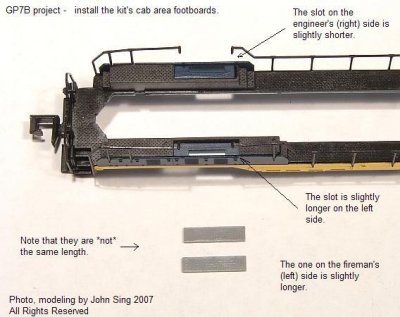 GP7B aia Cab Boards DSC02516.JPG |
 GP7B aib Closeup Crop Cab Boards DSC02516.JPG |
 GP7B aic Closeup of bevel edge DSC02515.JPG |
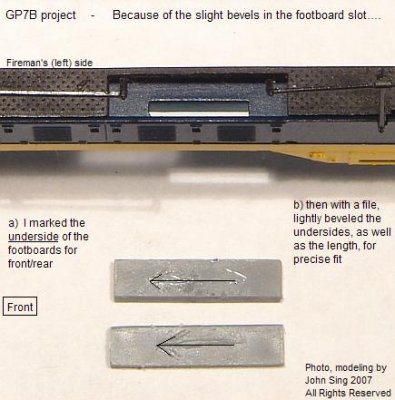 GP7B aid Suggest you label orientation DSC02515.JPG |
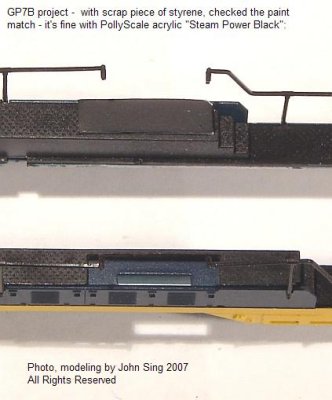 GP7B aie Cab Board paint check Pollyscale Steam Black.jpg |
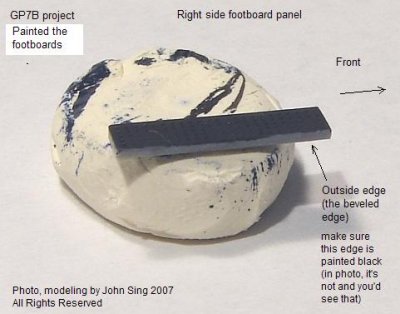 GP7B aif make sure beveled edges are painted black - here you can see which edge DSC02688.JPG |
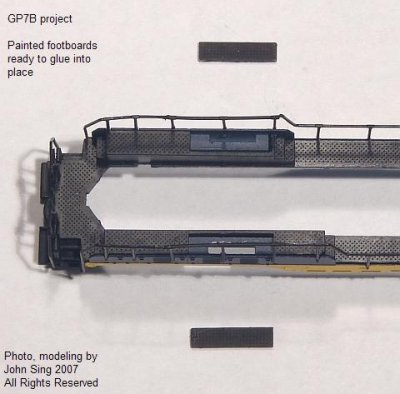 GP7B aih Footboards ready to glue.jpg |
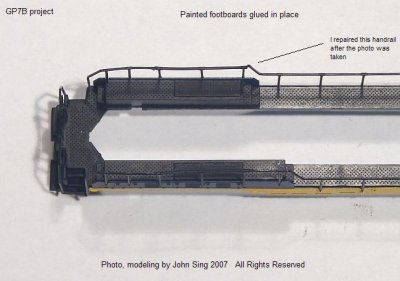 GP7B aij Footboards in place.jpg |
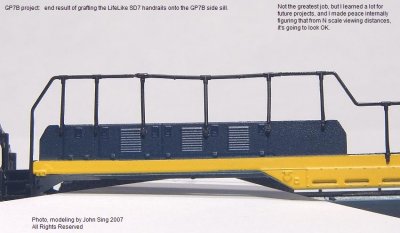
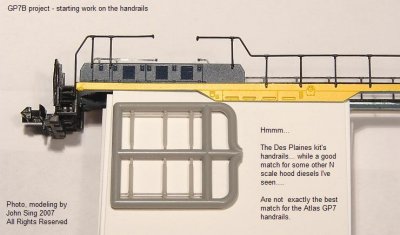 GP7B aja Kit handrails too big not good match.jpg |
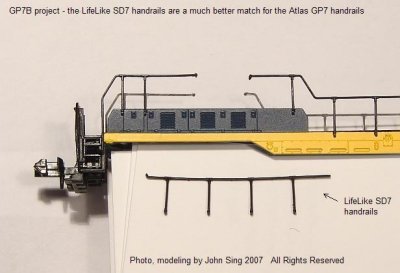
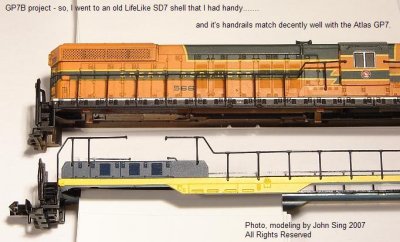 GP7B ajc Lifelike SD7 handrails comparison.jpg |
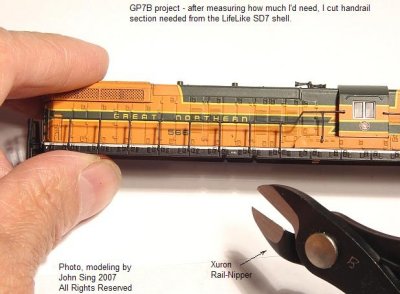 GP7B ajd Lifelike SD7 handrails cut.jpg |
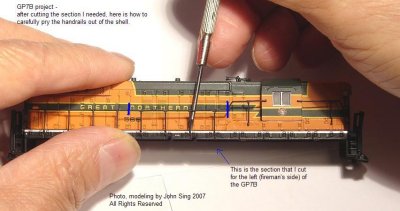 GP7B aje Lifelike SD7 handrails pry out.jpg |
 GP7B ajg Lifelike SD7 handrails will be used instead.jpg |
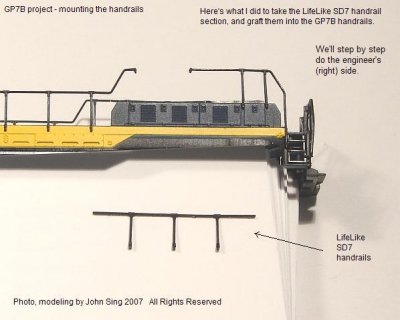 GP7B ajm step by step handrail installation on right side.jpg |
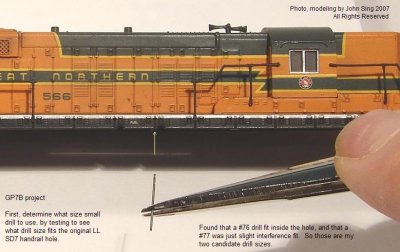 GP7B ajo closeup find correct drill size.jpg |
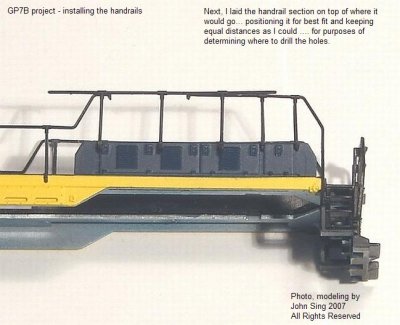 GP7B ajp1 Lay handrails in desired position - mark where to drill holes.jpg |
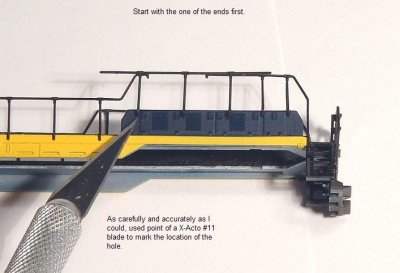 GP7B ajp3 starting with one end - not middle - use sharp X-Acto blade to mark where to drill.jpg |
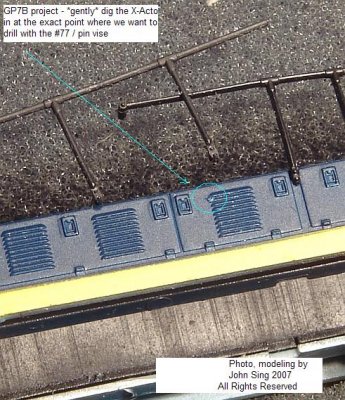
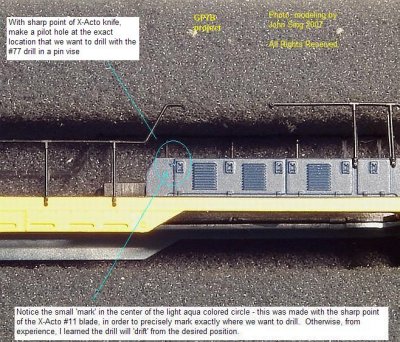 GP7B ajp5 use point of X-Acto to make starter hole to position drill.jpg |
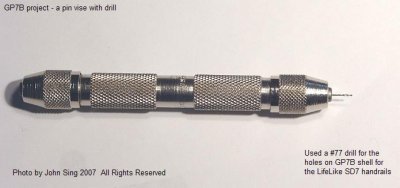 GP7B ajp7 here is what pin drill with a 77 drill looks like.jpg |
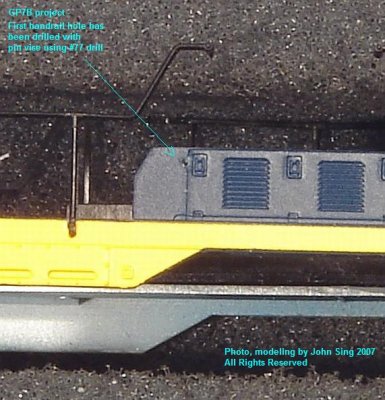 GP7B ajp9 hole has been drilled in position.jpg |
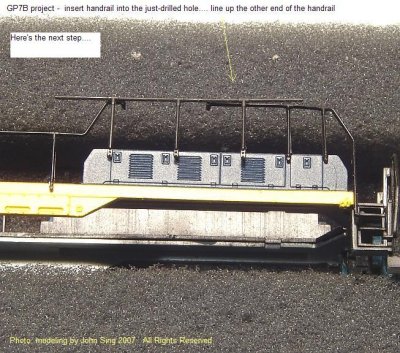 GP7B ajp9 j1 insert handrail in drilled hole - line up hole at other end DSC02675.JPG |
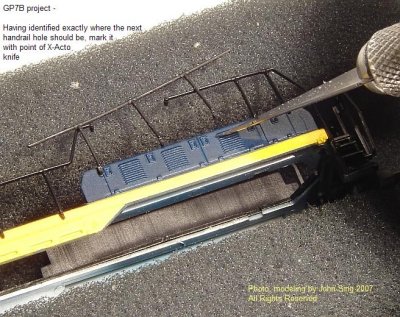 GP7B ajp9 j2 mark carefully with XActo knife where hole for other end DSC02676.JPG |
 GP7B ajp9 j3 mark made with XActo knife for other end DSC02677.JPG |
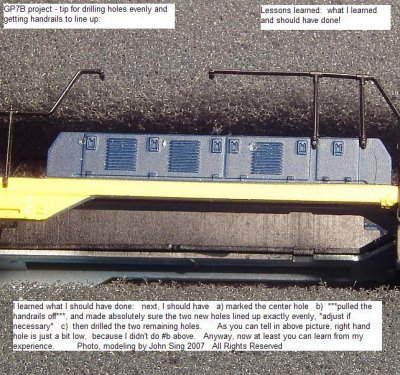 GP7B ajp9 j5 Pull off handrails and check to make sure holes spaced properly - then drill DSC02679.JPG |
 GP7B ajp9 j7 insert handrails - then carefully with Xuron cutter - nip off both handrails DSC02680.JPG |
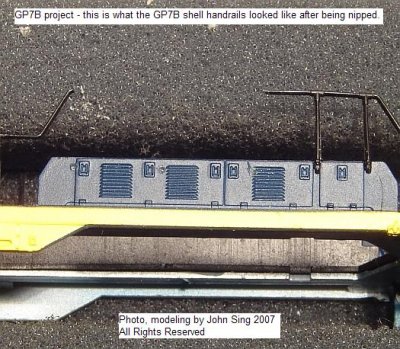 GP7B ajp9 j8 here is end result of handrails DSC02681.JPG |
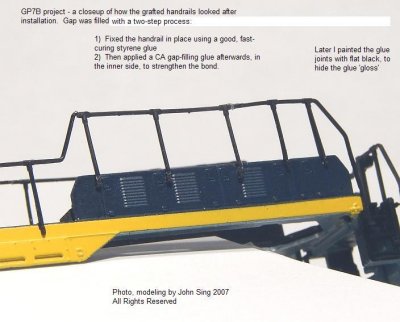 GP7B ajp9 k1 place handrails in place glue with CA DSC02682.JPG |
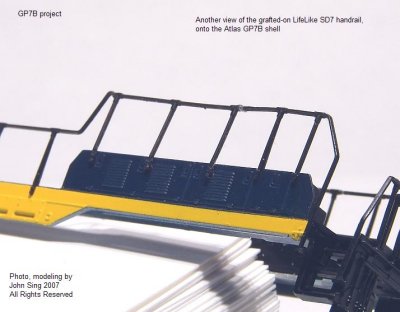 GP7B ajp9 k2 another view of right side handarils DSC02686.JPG |
 GP7B ajp9 k5 other side handrails side view DSC02683.JPG |
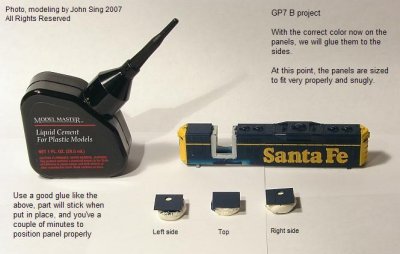 GP7B aka Use good fast-setting plastic glue.jpg |
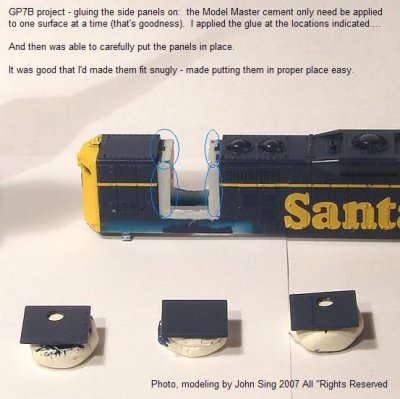 GP7B akb Apply glue here.jpg |
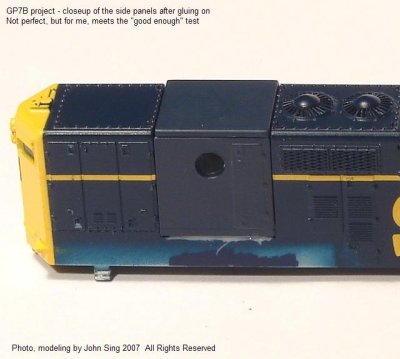
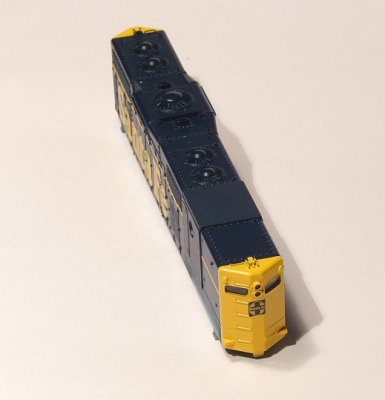 GP7B akc Overview Shell with panels attached.jpg |
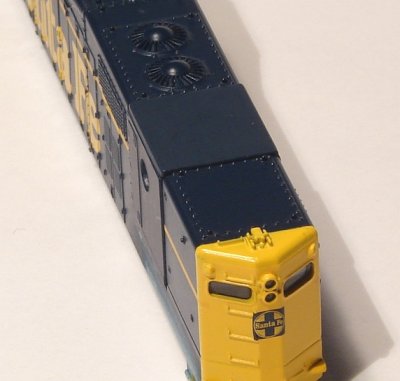 GP7B akd1 Closeup Shell with panels attached.jpg |
 GP7B akd2.jpg |
 GP7B akd3.jpg |
 GP7B akf2.jpg |
 GP7B akf3 closeup.jpg |
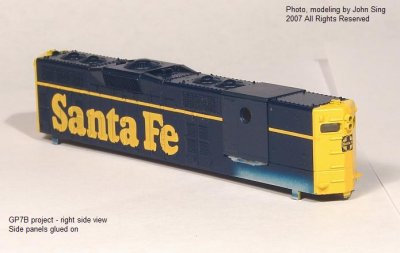
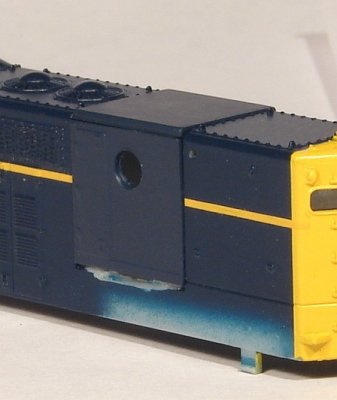
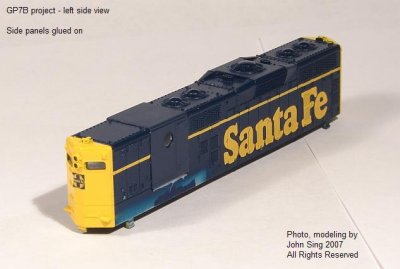
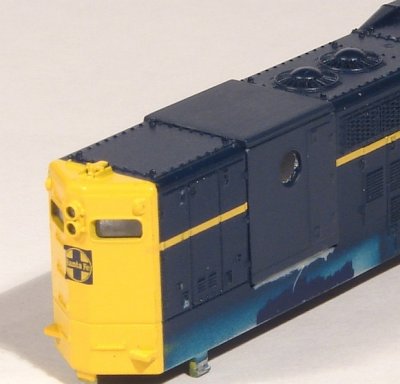
 GP7B akg side view with panels attached.jpg |
 GP7B akh closeup side view with panels attached.jpg |
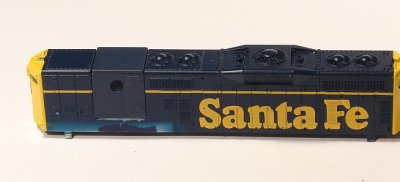
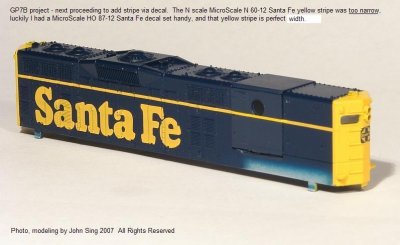 GP7B alc added HO yellow stripe MicroScale 87-12 DSC02636.JPG |
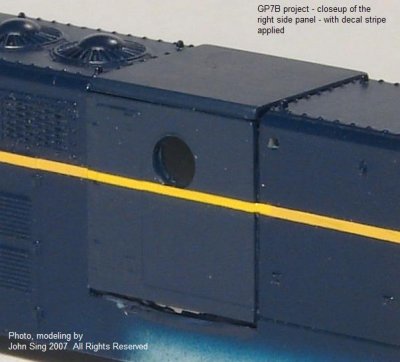 GP7B ald closeup added HO yellow stripe MicroScale 87-12 DSC02633.JPG |
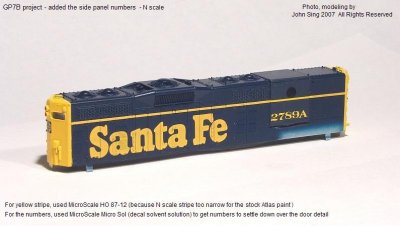
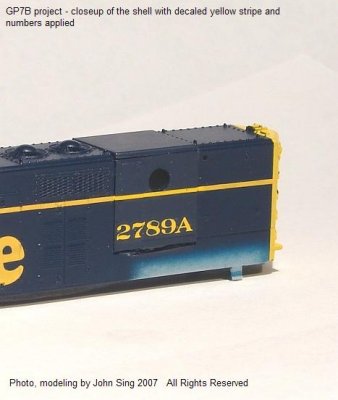
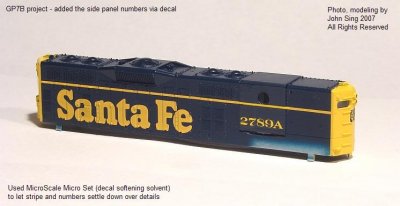 GP7B alg numbers added 3-4 view DSC02637.JPG |
 GP7B alh closeup numbers added 3-4 view DSC02637.JPG |
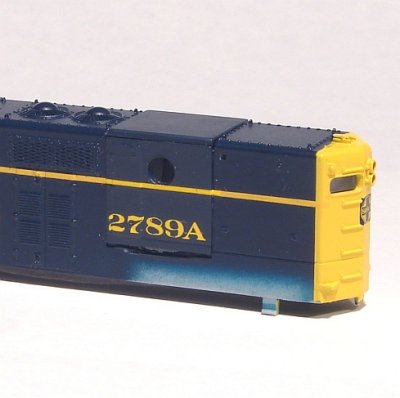
 GP7B alj numbers added rear 3-4 view DSC02641.JPG |
 GP7B alk closeup numbers added rear 3-4 view DSC02641.JPG |
GP7B alk ea apply detail decals.jpg |
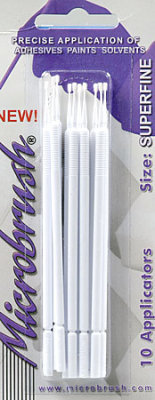 GP7B alk ec apply detail decals with microbrush_superfine.jpg |
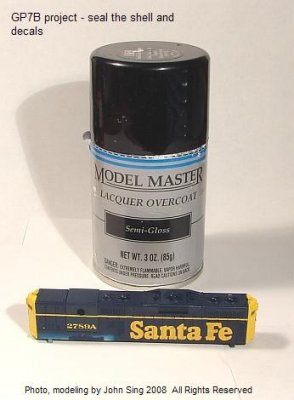 GP7B alk give it overcoat to seal the decals Model Master semi-gloss.jpg |
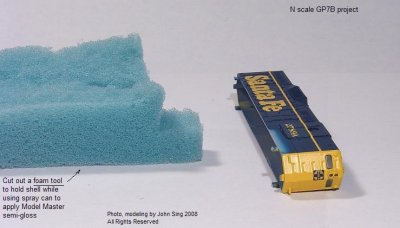 GP7B alk j tool to hold shell while spraying semi-gloss.jpg |
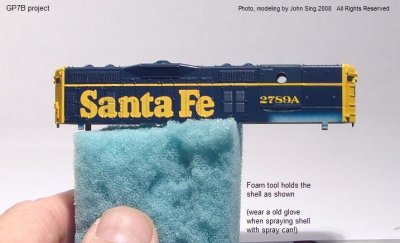 GP7B alk k tool to hold shell while spraying semi-gloss.jpg |
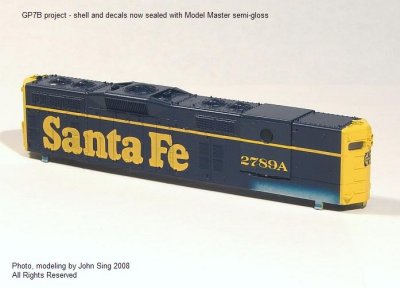 GP7B alm shell with decals sealed Model Master semi-gloss.jpg |
 GP7B aln shell with decals sealed Model Master semi-gloss.jpg |
 GP7B alo shell with decals sealed Model Master semi-gloss.jpg |
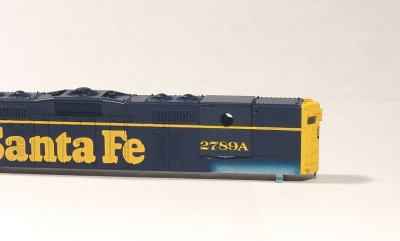
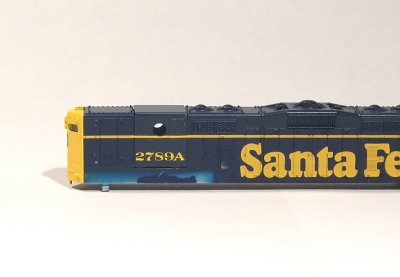
 GP7B alp side view shell sealed Master semi-gloss.jpg |
 GP7B alq side view shell sealed Master semi-gloss.jpg |
 GP7B amm shell and handrails assembled DSC02940.JPG |
 GP7B amn shell and handrails assembled DSC02941.JPG |
 GP7B amo shell and handrails assembled DSC02943.JPG |
 GP7B amq shell and handrails assembled DSC02945.JPG |
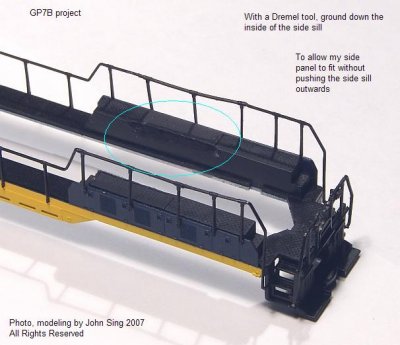
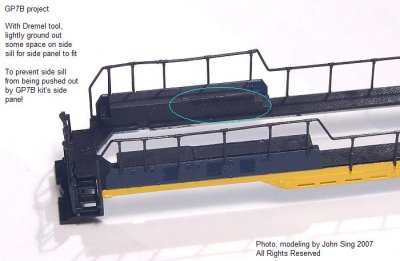
 GP7B ana before slimming down side sill DSC02946.JPG |
 GP7B anc before slimming down side sill DSC02947.JPG |
 GP7B ane after slimming down side sill fireman side DSC02951.JPG |
 GP7B ang after slimming down side sill engineer side DSC02950.JPG |
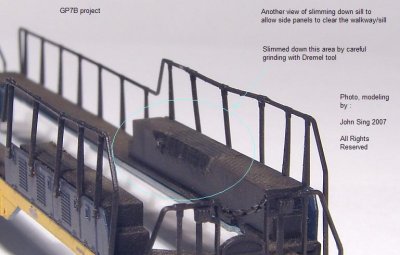 GP7B anm after slimming down fireman side sill DSC02972.JPG |
 GP7B ann engineer side sill also slimmed down DSC02973.JPG |
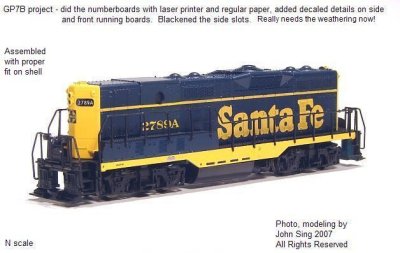
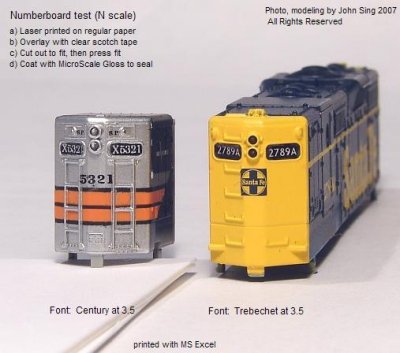 GP7B anz Numberboards 2007 12 25 small caption.JPG |
 GP7B aoa assembled ready for weathering.jpg |
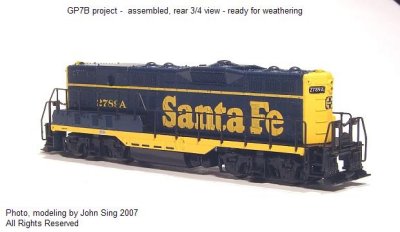 GP7B aoc assembled ready for weathering.jpg |
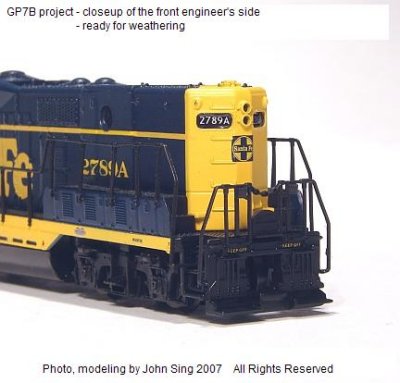 GP7B aoe assembled closeup engineers side.jpg |
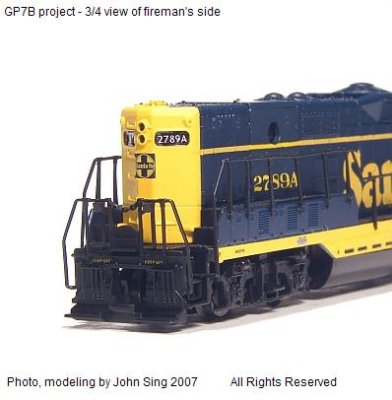 GP7B aof assembled closeup firemens side DSC02957.JPG |
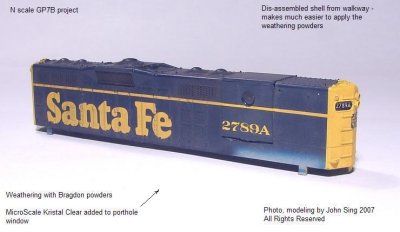 GP7B apa Microscale Kristal Clear window DSC02968.JPG |
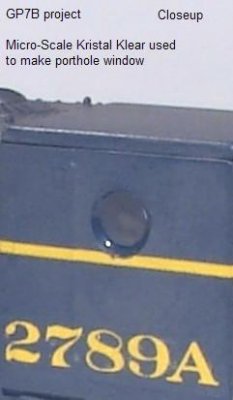 GP7B apb closeup Microscale Kristal Clear window DSC02968.JPG |
 GP7B apd footboards dry-brushed DSC02971.JPG |
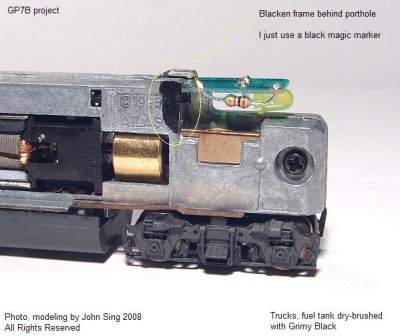 GP7B apk blacken frame behind porthole DSC02975.JPG |
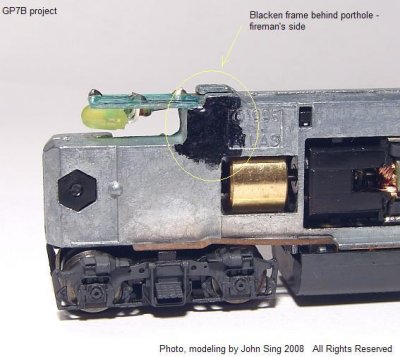 GP7B apl blacken frame behind porthole DSC02976.JPG |
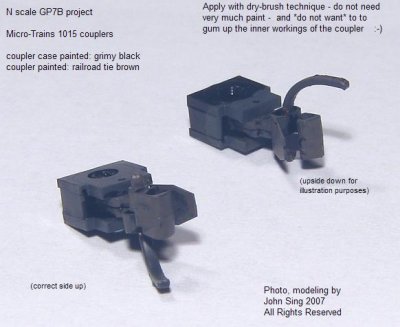 GP7B apm MT 1015 couplers painted.jpg |
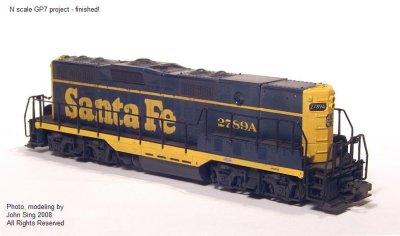 GP7B finished DSC02979.JPG |
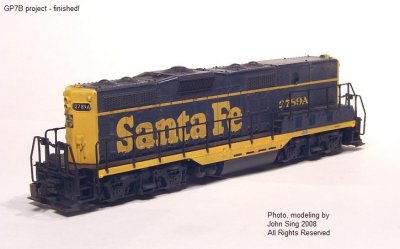 GP7B finished DSC02981.JPG |
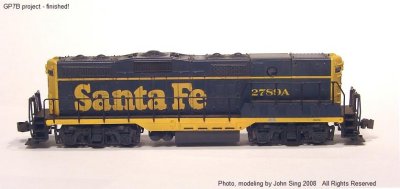 GP7B finished DSC02982.JPG |
 GP7B finished DSC02984a 88.JPG |
 GP7B finished DSC02986.JPG |
| previous page | pages 1 2 3 4 5 6 7 8 9 10 ALL | next page |
| comment | share |