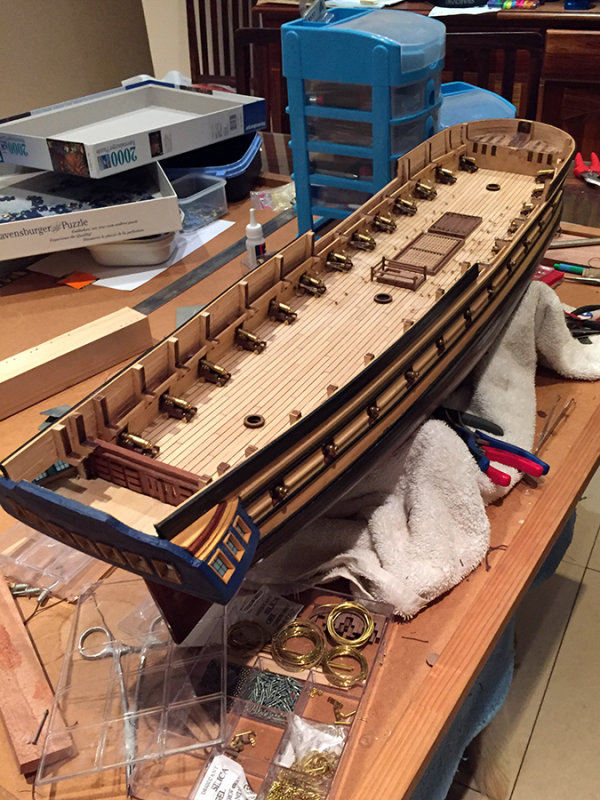
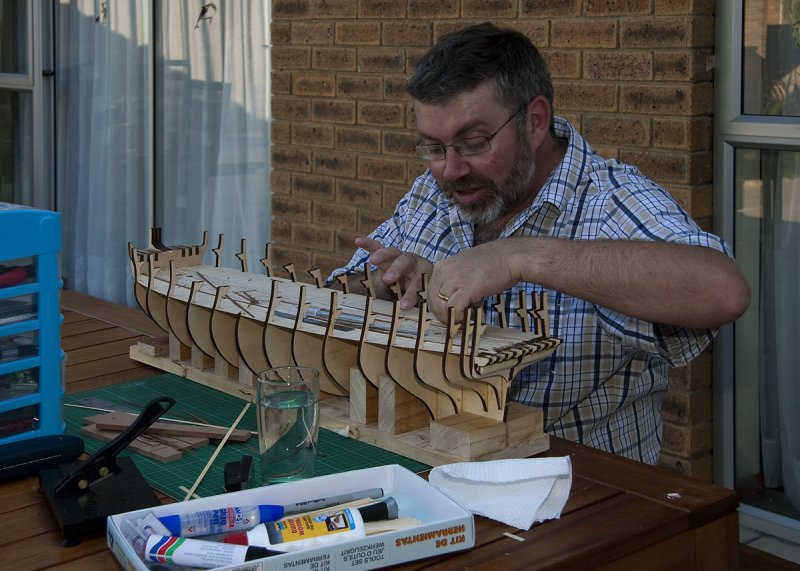
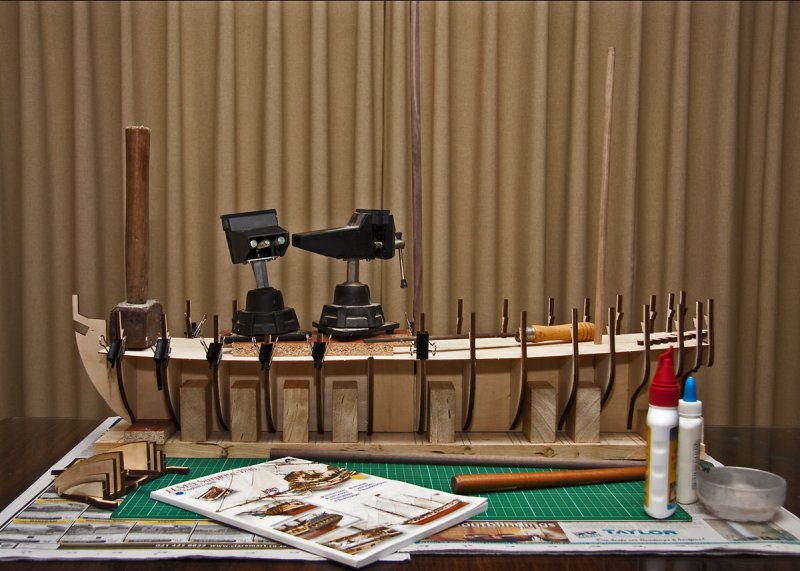
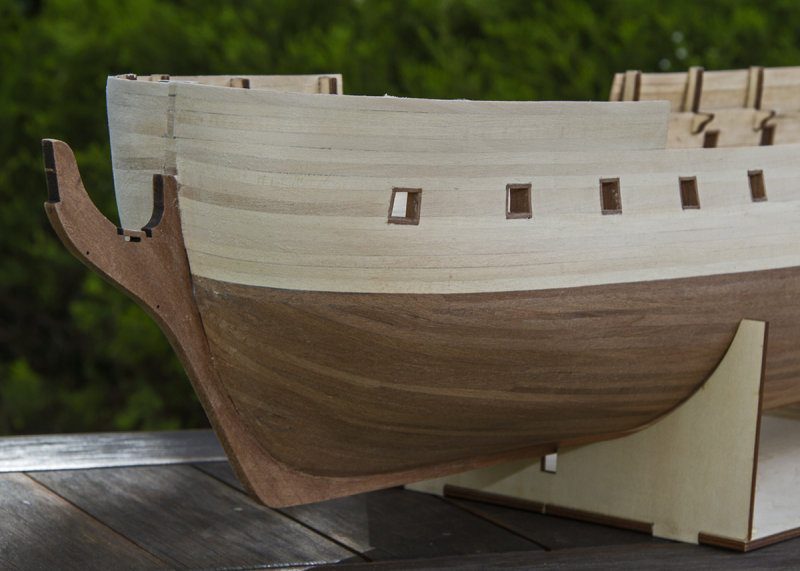
:: Fitting the guns to the gundeck (29 Nov 2015) ::
A pictorial log of the construction and fitting of the guns on the lower gun deck. My pbase build log is out of date. Will bring up to date so decided to put this in its own folder for now. The last picture in this sub album is the current state. Its been more than a year since I worked on it. This week decided to get going again and built the guns and completed all fittings of the gun deck (lower deck)
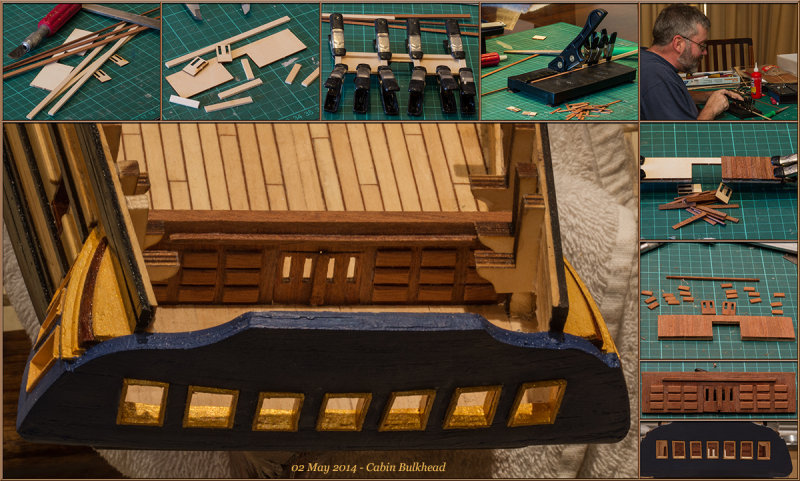
02-MAY-2014
Cabin Bulkhead
Worked on Cabin Bulkhead today. Something not quite right. Even though bulkhead made as per instruction (esp trimming to size) it is not 'high enough' when compared to the example in instructions' image. Fitted additional beam across on top and kept doors closed.
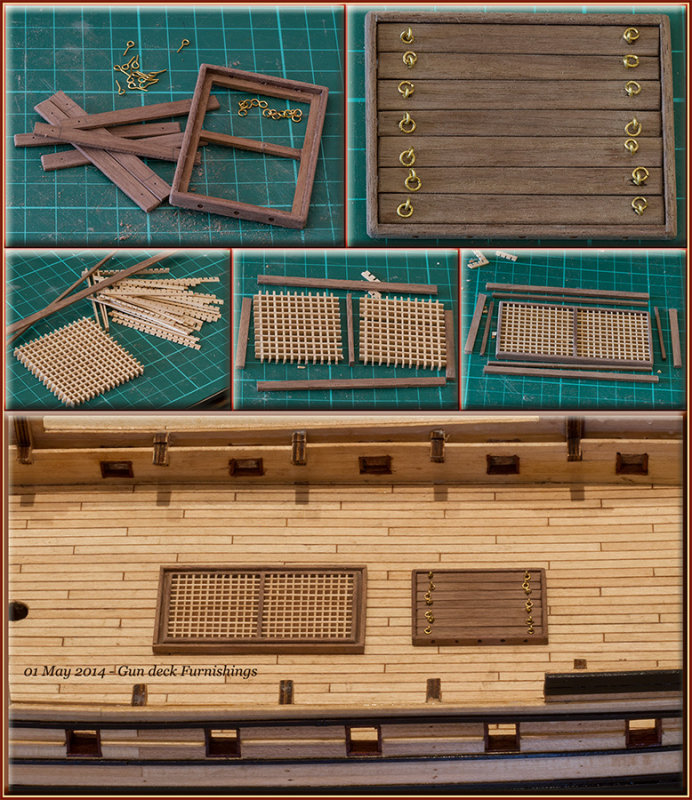
01-MAY-2014
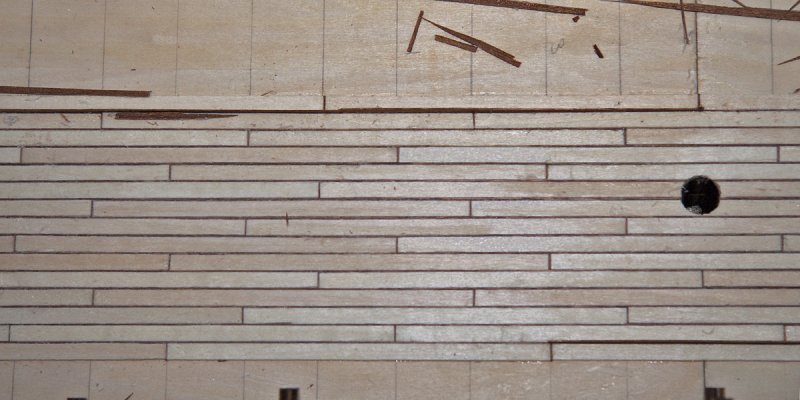
Gun deck furnishings - 01
Worked on gun deck 'furnishings' today. Took almost 7 hr I think for these two pieces - didn't feel like it though. They must still be final sanded and varnished and then fitted. Just lying loose on deck on bottom picture
28-APR-2014
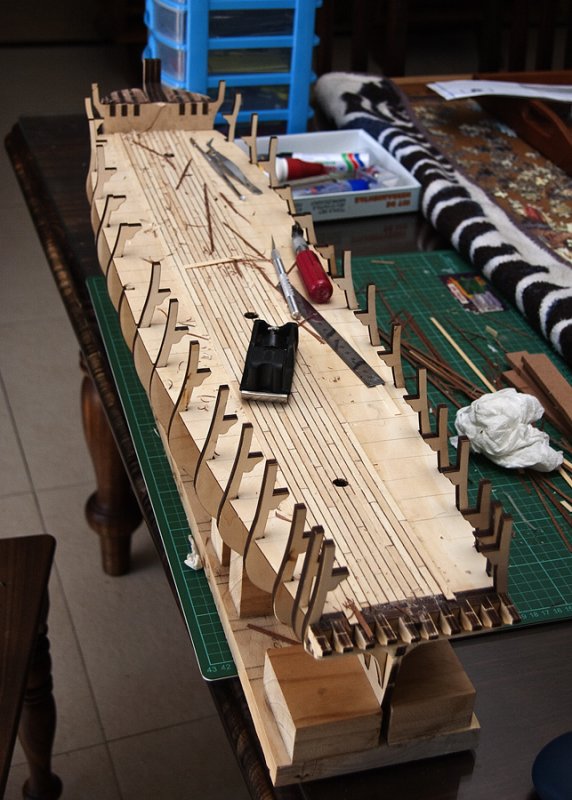
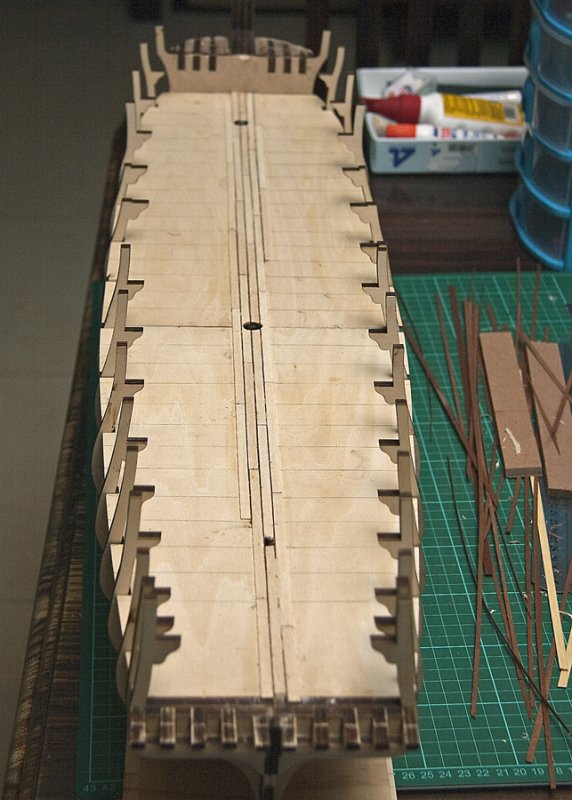
False deck dry fitted (2776)
I am planning to deviate from the plans and plank the main deck using more realistic scaled lengths of plank (as I did the lower gun deck). This requires fitting a false deck on top of which I can do the planking.
I still need to figure out how the deck planks would have been fitted around the various openings and also whether the 'king plank' was the central plank or fitted on either side of one of the openings on this generation ship. My understanding is that the 'king plank' was a thicker, wider plank used in deck construction to provide structural strength. I am also going to attempt to 'joggle' the deck planks into the edge plank as opposed to just running off the edge beneath the inner hull planks.
On the lower gun deck I used 0.6mm veneer strips between planks to simulate the caulking. I read somewhere this morning that someone used dark wood filler successfully - I want to experiment with that as it would definitely be quicker that way - need to figure out whether it would not dry out over time.
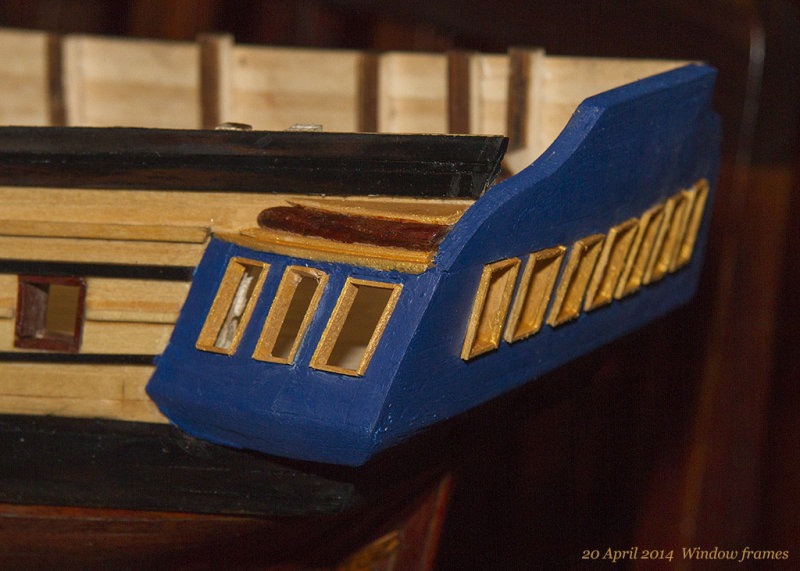
20-APR-2014
Window frames
A close up of the gold painted window frames completed today. The very thick 'fudged' (padded) sterncastle can be clearly seen in this picture. The sterncastle is only supposed to be 1.5mm thick (the thicnkness of the ply), but I had to pad it out to almost 5mm to get all to fit and look reasonable because I cut the upper hull planks too short towards the stern. It does now require that all the frames and capping (still to come) needs to be made wider as well.
What is the old saying - measure twice, cut once. will remind myself (if there is a) next time.
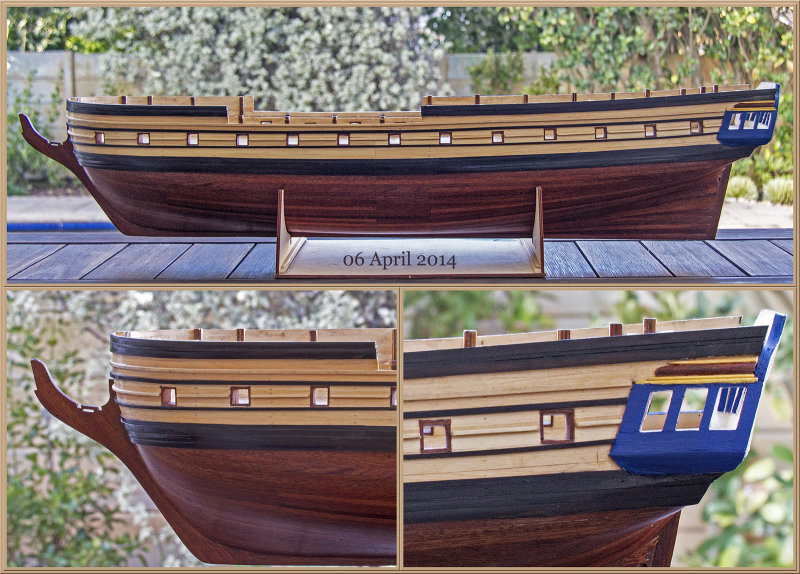
06-APR-2014
Hull work done
Most of the hull work done. Its been a while to get here, but that's OK. The stern castle still needs gold window frames and decoration which will break the blue that is currently so dominant. Some of the strakes in the bow could have fitted better but reasonably happy. There will be a lot of rope and anchors here when finished to 'distract' and 'hide' the imperfections of the rubbing strakes in the bow. (Well that is what I tell myself)
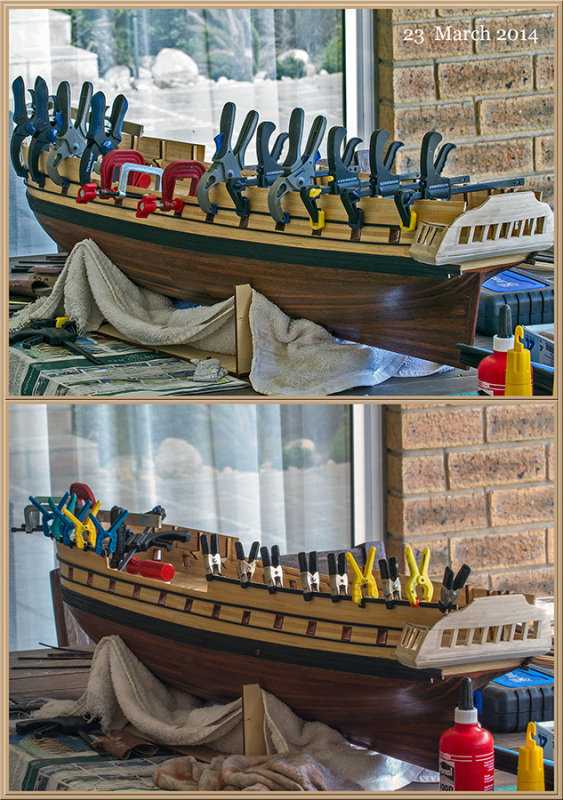
23-MAR-2014
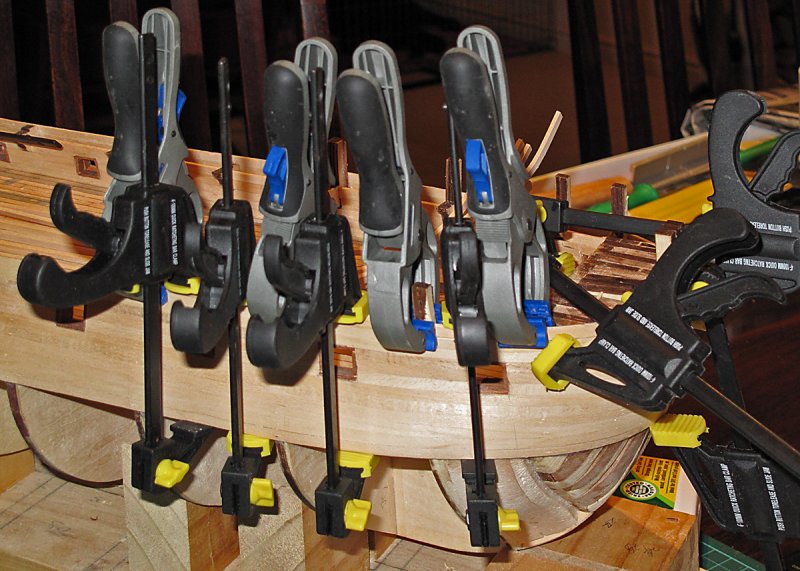
Clamps are your friends
Fitting the upper rubbing strakes in these 2 images.
These last sets were reasonably easy to fit because they can be clamped. The rubbing strakes along the waterline was a real challenge and took some trial and error (and lots of patience). Ended up sanding the hull to bare wood again to fit those to make the gluing easier. That was heartbreaking. On these picture it has been varnished again after fitting the rubbing strakes.
The rubbing strakes also turned out a little darker than intended. The wood is mahogany which I stained using an 'ebony wood stain' in clear sanding sealer. Ended up adding to much pigment and it came out (pitch) black. Gives a nice contrast though and I have seen models that the rubbing strakes are black which looked OK to me. Preference would have been to see the wood detail come out a little more, but not to be on this model.
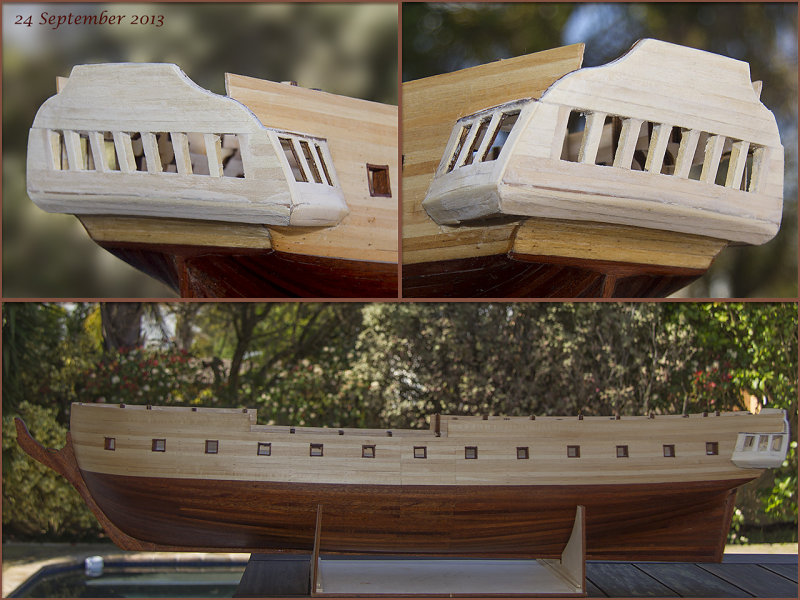
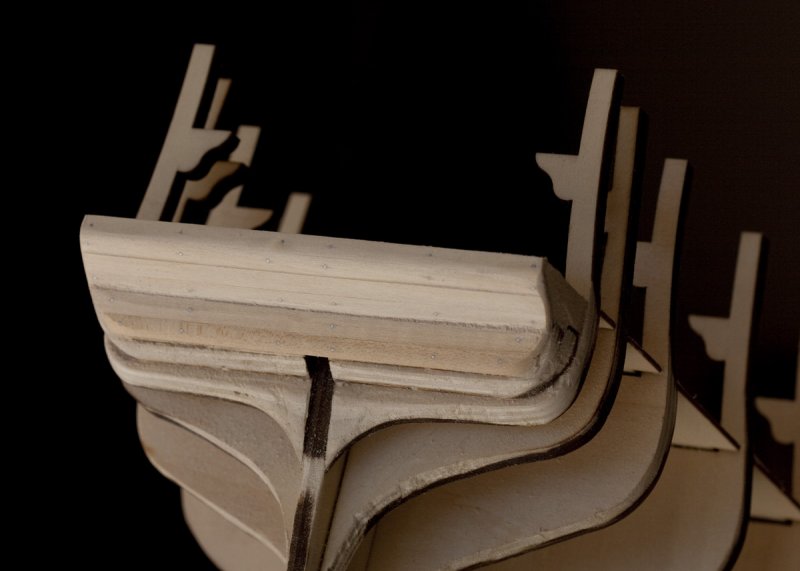
24-SEP-2013
Stern Castle
Somewhere something went wrong here and had to be 'creative'. This is not what the model maker intended. Those familiar with the model will notice that the sides (particularly the back) is a lot thicker than the single plywood shape intended by the instructions. I had to pad it with balsa wood and then had to frame the inside of the windows with 0.6mm veneer to clean up. Also then used 1mm planking strips then on top of the balsa to plank the sterncastle (which was also not intended by the plans). All this because I cut the upper hull planks to short and at the wrong slope.
The sterncastle will be painted which is why I used wood filler here which really looks ugly on these pictures. It was (is?) worrying times - concerned that I messed up a reasonable model at this stage. Still some concern - but hope to be able to save the look - the window frames will be out of scale - but there will be many other items to focus on on the completed model
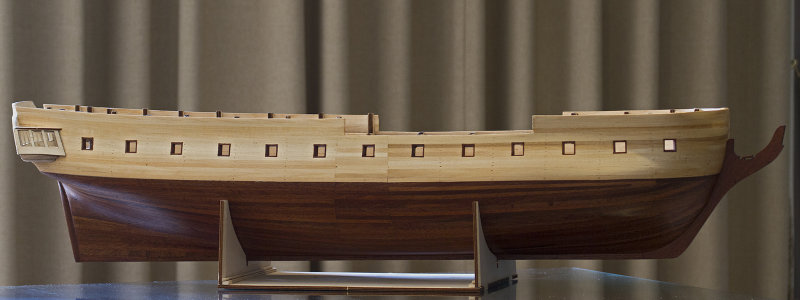
01-SEP-2013
Protective varnish & Polish (0262 cd)
Side on view - Varnished and polished for hull protection. Started on Sterncastle. Went wrong somewhere in the beginning at the stern. Lots of fiddling and adjusting to get to this point on the sterncastle.
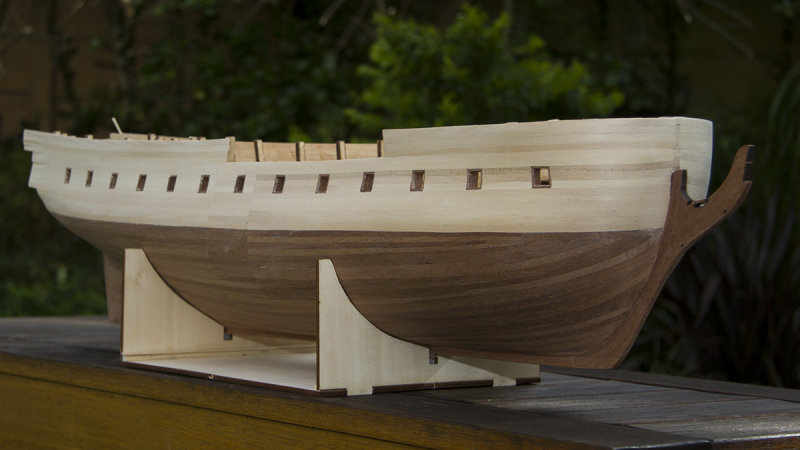
11-AUG-2013
Starboard Side view
Milestone reached with hull planking done and sanded.
32 months elapsed since start, but only ~210hr spent building according to build log. one more light sanding next time out of cupboard followed by clear varnish and then on to sterncastle; cannons and deck furnishings...
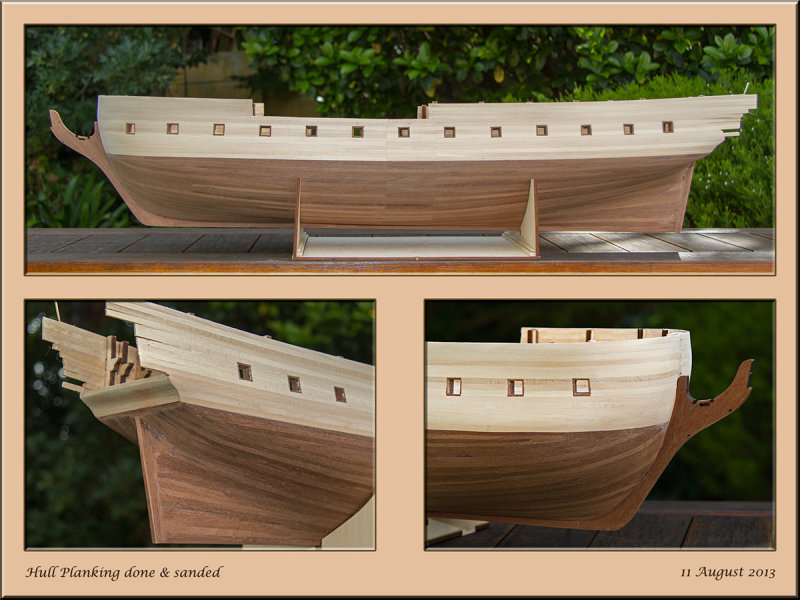
11-AUG-2013
Planking done & sanded
Hull planking done, stern fixed up, keel and bowsprit support fitted.
Picture shows the patchwork needed in the stern (next to rudder post). Upper part (light wood) will be trimmed back when sterncastle is built so not an issue there.
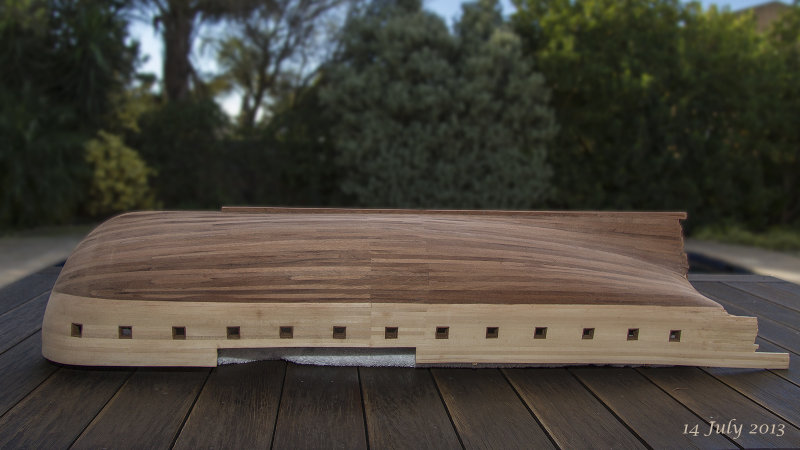
14-JUL-2013
Almost done with the hull planking
Hull planking almost done. The stern still need some attention (Lots of it).
Rough sanded the hull only.
After fixing the stern, the rest of the keel needs to be fitted, followed by a couple of hrs sanding and then finished off with some protective varnish. Then the work on the stern castle can start...
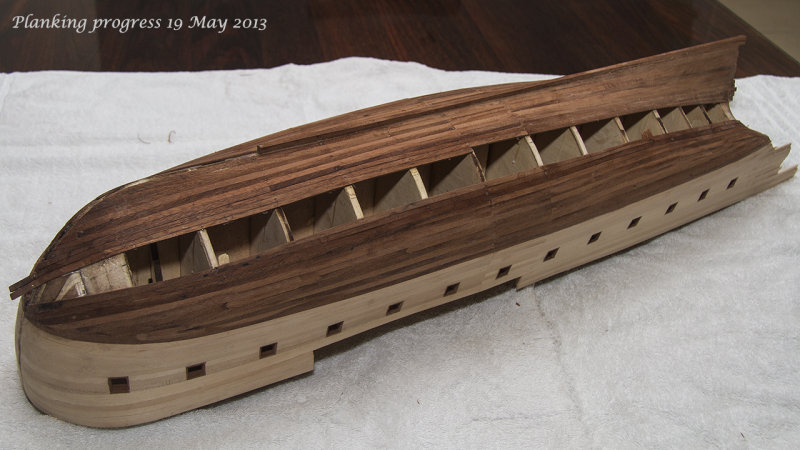
19-MAY-2013
Planking Continues
Continued planking. No sanding done yet on new planks.
Getting a little concerned how the two halves will meet with respect to the "run of the planks".
Maybe I should have followed the manuals proposed sequence...
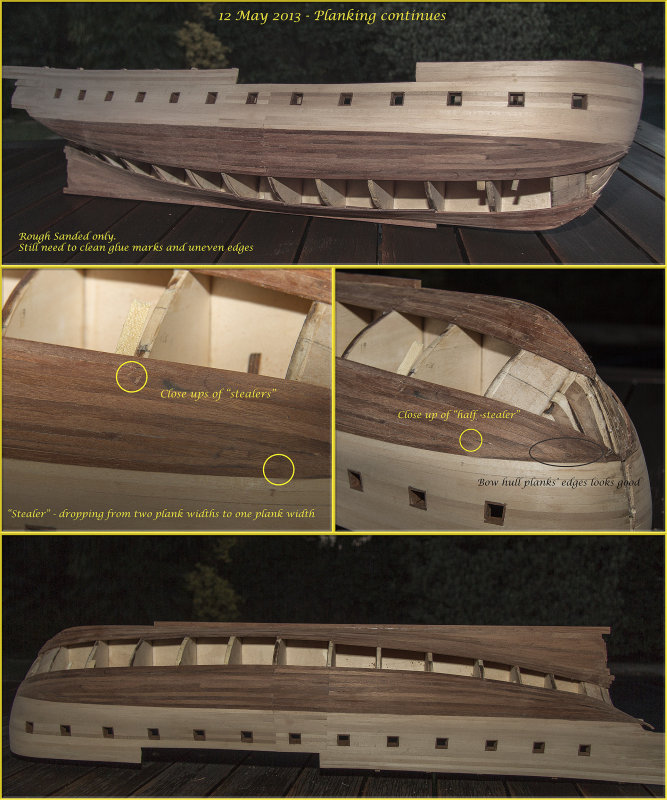
12-MAY-2013
Planking Continues
Managed to do another 3 or 4 widths.
Also decided to do a first pass sanding - even if only to convince myself it would 'clean up OK' - Glad to say it does clean up quite nicely with sanding.
I do find it difficult to keep glue stains off the outside of the wood - especially now with the clamping of planks between the bulkheads very awkward at this stage using the clamps I used to date.
The stealers and half stealers highlighted here turned out OK. Pity not all of them look like this. Also the edges of the bow planking as it terminates against the freeboard planks looks very nice.
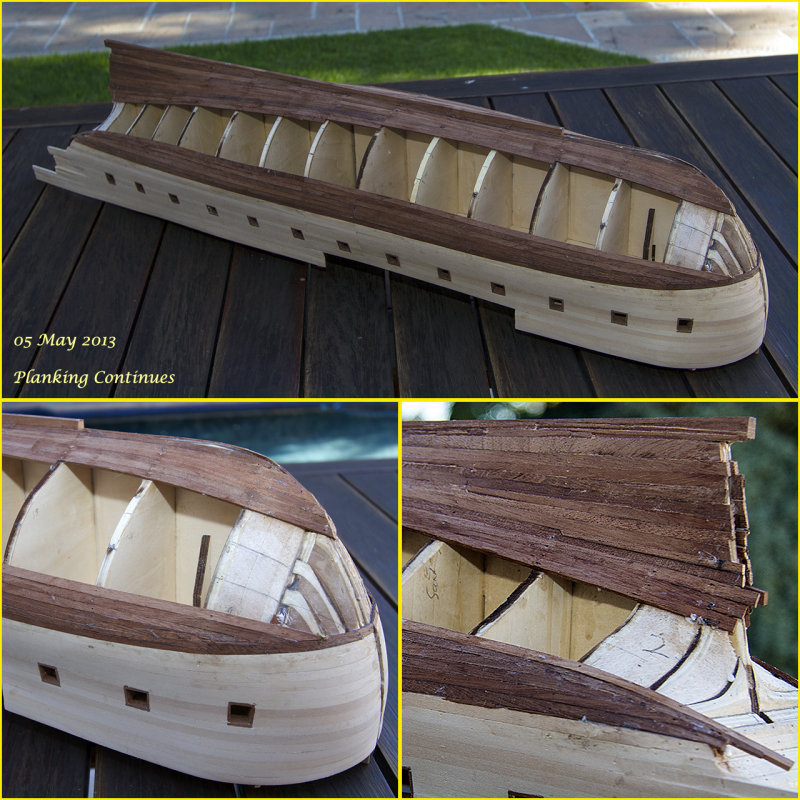
05-MAY-2013
Planking continues
Started planking again. Made some good progress over the last 2 weekends. Not sure whether my fitting of the planks with half stealers to compensate for the curvature of the hull and to prevent planks curving upwards is correct but will see how it ends up.
Reasonably satisfied to date. There is a lot of cleaning up to do (especially in the stern area) and some sanding in the future but the fit of planks looks reasonable.
I should have cleaned up the glue stains at least before taking the pictures I guess...
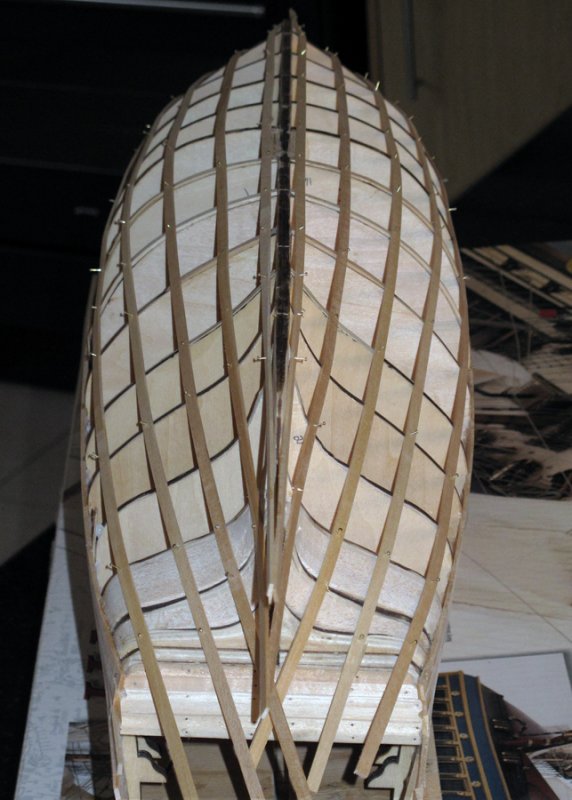
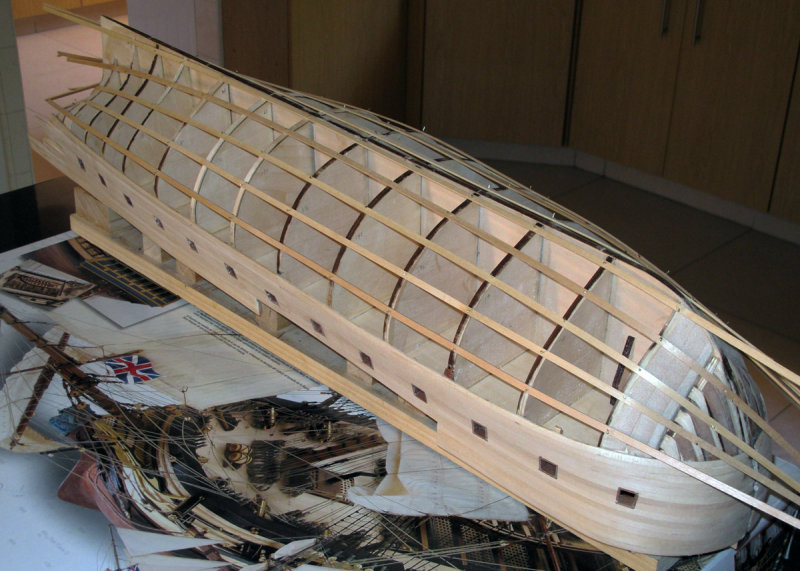
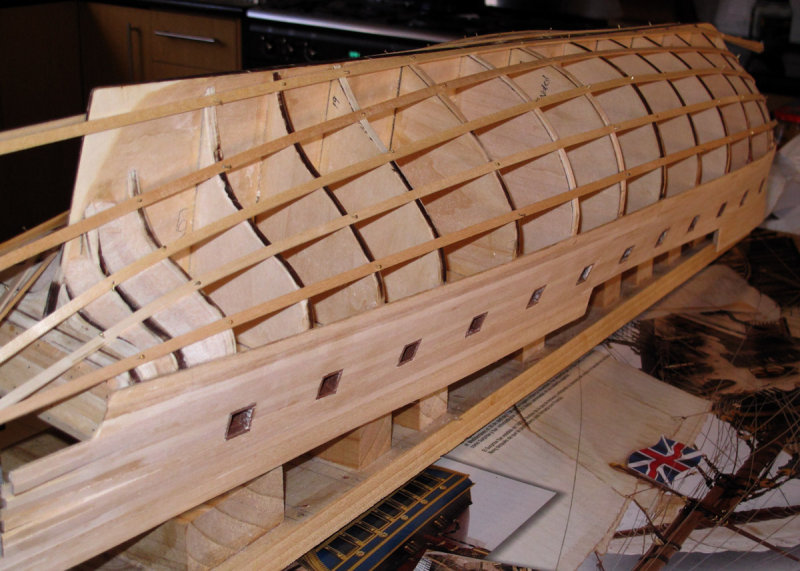
24-SEP-2012
First planking bands done (1631)
The result of about 16hrs work on the hull planking. No cleaning or sanding done yet. Next planking band tackled will be the one below the freeboard working towards the keel
25-SEP-2012
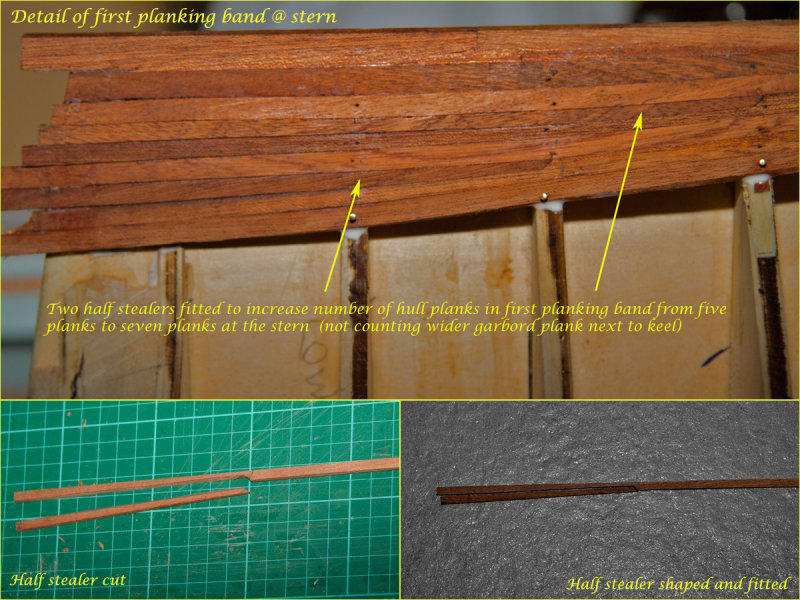
Stern & Half Stealers detail
This came out reasonable well in the end. Made use of half stealers to increase the number of hull planks from 5 to 7 towards the stern in the planking band next to the garboard planks. After realising I can use my floor mounted sander in my garage to shape the half stealer it went much faster with the 2nd, 3rd and 4th ones... (There are two half stealers ports side and two stealers starboard side in the first planking bamd)
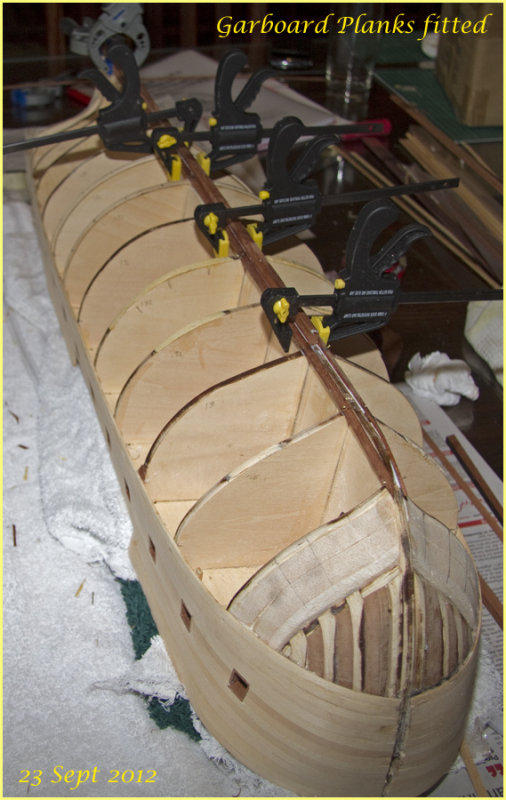
23-SEP-2012
Garboard Planks Fitted (1619)
Garboard planks fitted, both port and starboard after a lot of agonising, trimming and re-trimming (and breaking strips of wood.) The model nearly went back into the cupboard but fortunately it came together after 'one more attempt'.
If I do get to a next model, I will approach this a bit differently. One mistake I made was fitting part of the false keel (to use as an edge) before cutting a rabbit (kerf) in the bottom to fit the garboard planks in. The garboard is now a butt-edge joint which will need some filling with shims to shape it as it rotates through to 'vertical'. Will deal with this when cleaning up/sanding the hull.
22-SEP-2012
Marking Garboard Template (1615)
Finally back to the model after a 5 month break.
I removed the battens used to mark out the 5 planking bands after marking the edges on the bulkheads and struggled for a good couple of hrs to get the garboard plank shape sorted out. The garboard plank is the one next to the keel and can be an odd shape (ito width profile) as it twists through a full 90 degrees along its length. It is fitted adjacent to the false keel and if the profile is correct it will provide a natural curving edge for the plank next to it allowing a smooth fit.
In the end I stretched a piece of masking tape between the bulkheads, replaced the batten used to determine the planking bands closest to the keel making sure it never is more than 8mm away from the false keel. I then traced the edge on the masking tape and transefreed the masking tape to an 8mm Sapele strip. I bought the 8mm wide sapele wood strips specially for the garboard plank as the kit only supplied 5mm wide strips used for the rest of the hull planking.
24-MAR-2012
Planking bands - reasonable symmetry
Symmetry looks OK. I did notice some highs & low spots across some of the bulkheads and adjusted these with 0.6mm veneer shims for the lows after these pictures were taken.
Next step is marking the planking bands on the bulkheads - removing the temporary battens and then tapering & fitting each individual plank going forward - starting with the garboard plank next to the keel.
24-MAR-2012
Temporary planking bands fitted - view from Bow
It is going to be interesting to shape the Sapele hull planks across the bow shape.
24-MAR-2012
Temporary planking bands fitted - view from Stern
Laying out planking bands to plan tapers and to minimise any lateral bending against grain of planking strips.
After this set of pictures some more 'shims' were inserted at some of the bulkheads to counter some 'low spots'
26-FEB-2012
Yet another view of the model after completing the Freeboard Planking
(It is a milestone so three pictures at this stage is probably OK :) )
26-FEB-2012
Freeboard Planking complete
Another view down the side of the ship of the completed Freeboard planking.
Have meanwhile been doing some research on planking and studying other web based build logs and am going to do the lower hull planking different to that proposed by the building instructions. (Although saying their are guidelines for planking in the instructions is somewhat of a stretch - it effectively says "Plank the lower hull" with some pictures).
I am going to follow the techniques outlined in "Simple Hull Planking Techniques for Beginners" compiled by Dirk Bakker, Greg Booker & Dave Rogers. I downloaded it from the web ("Model Ship Forum" ?)
26-FEB-2012
Shapely Curves
Freeboard planking (finally) done. I'm satisfied with the way it looks after sanding. A couple of places where the planks were forced across its width and the resultant clinker appearance sanded down - but it turned out OK.
25-FEB-2012
One can never have too many clamps
19-FEB-2012
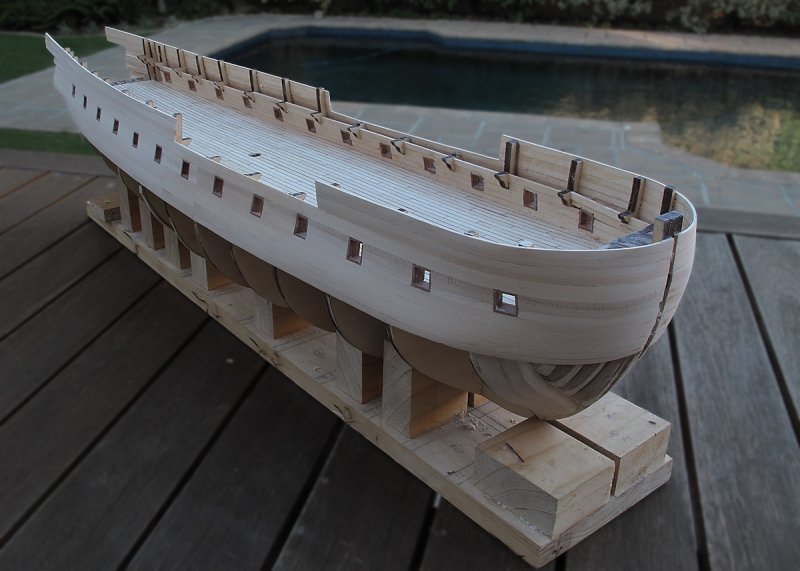
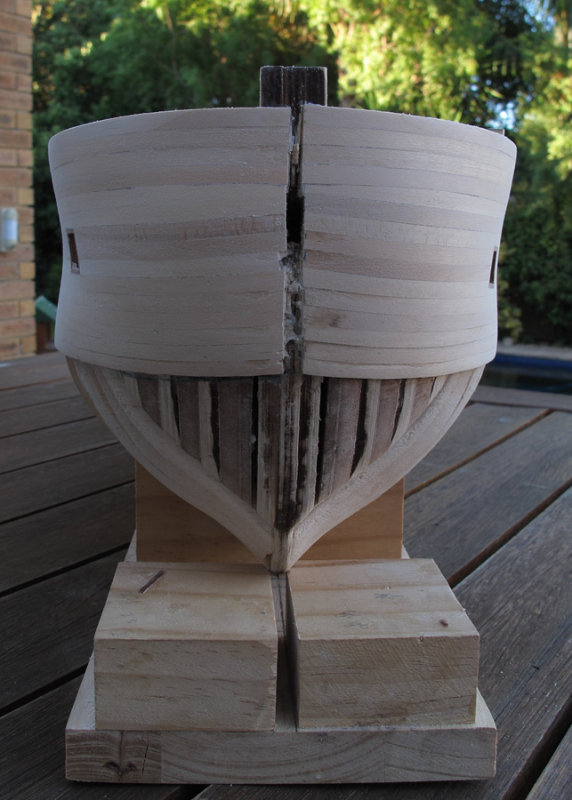
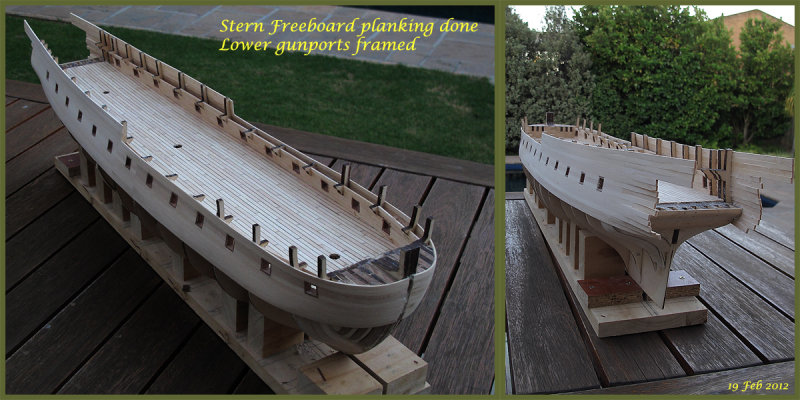
Gunports framed - Stern freedoard planking done
The Surprise moved into dry-dock again over the weekend after more than 6 month hiatus. I completed framing the gun ports and completed the stern upper planking. Bow upper planking still to follow and then planking the hull...
16-JUN-2011
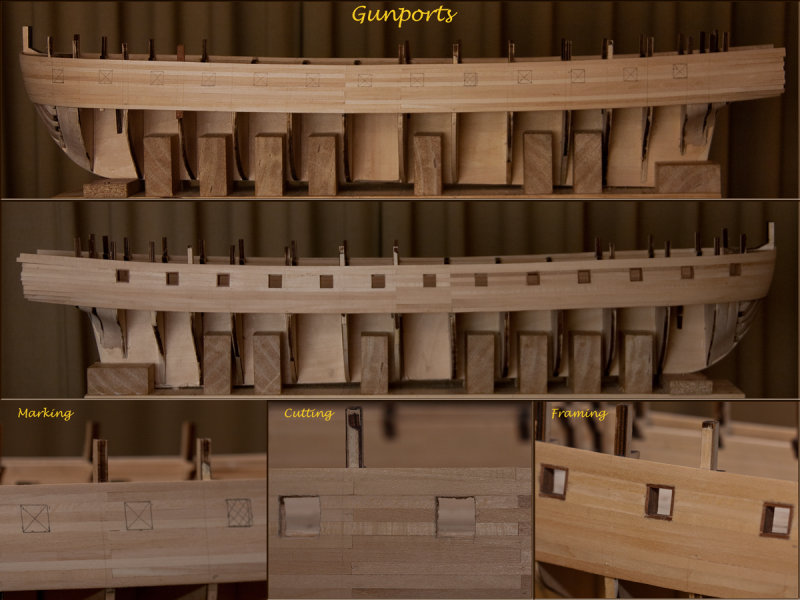
Gunports in Progress
Composite of cutting and framing the gunports.
Much 'psyching up' needed before taking a hobby knife to the planking that is so nicely shaped.
Inching forward we are... :)
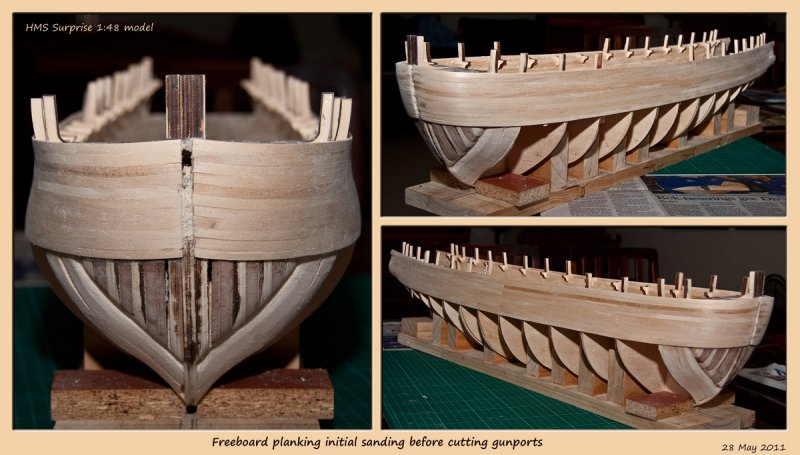
28-MAY-2011
Initial Sanding done
Now I need to take a knife to the model and cut the gunports...
give me strength... :)
22-MAY-2011
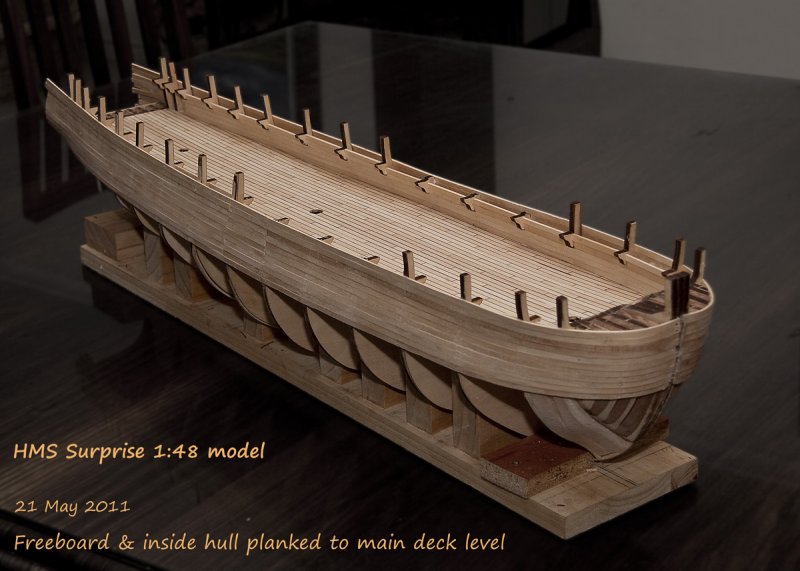
Freeboard planking up to main deck level done...
Pleased with progress. Sanding required now, gun ports to be cut into hull next...
21-MAY-2011
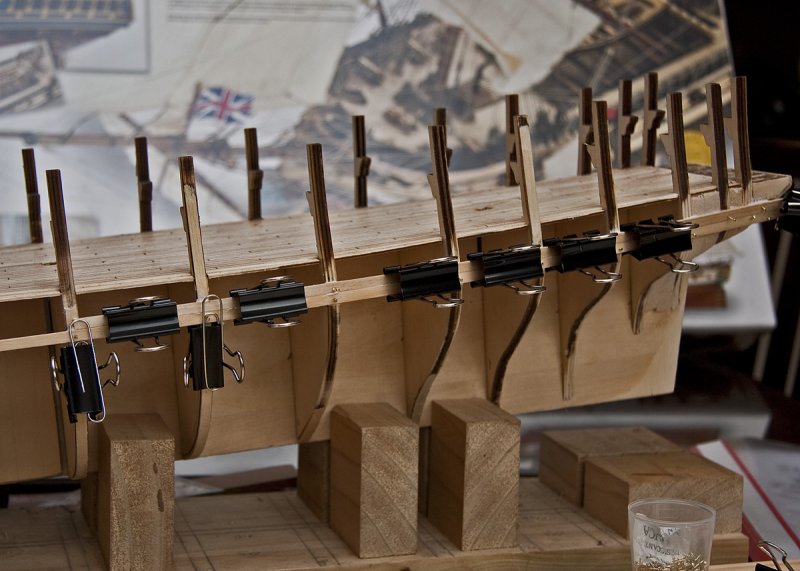
One can never have enough clamps...
The first image shows the 3rd attempt at getting those first two strakes down such that it is symmetrical with the port side...
Total time spent on freeboard and inner planking up to main deck level is estimated to be ~18hr.
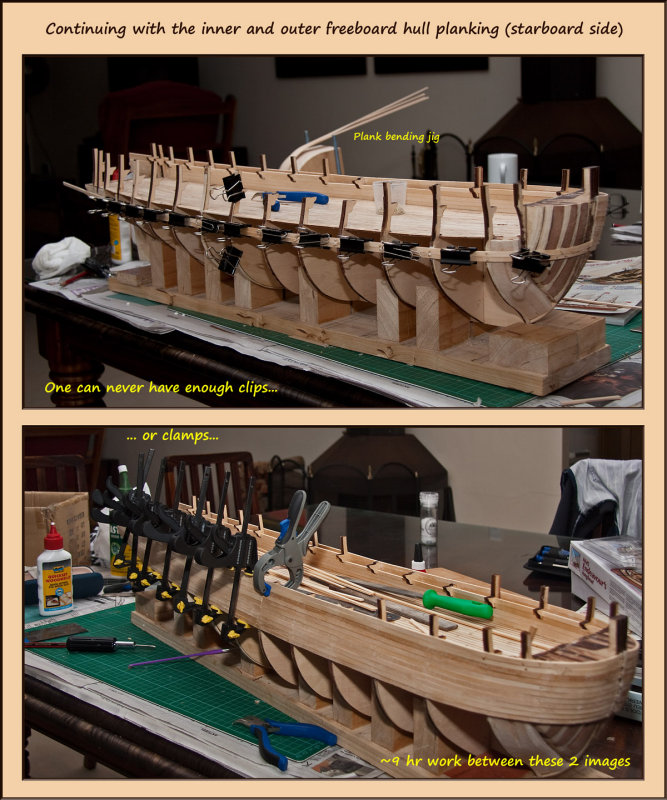
18-MAY-2011
Done with the one side, starting starboard...
Decided to do full length inner hull planking. Will probably regret that when it comes to cutting the gunports.
15-MAY-2011
Closer view of port planking
15-MAY-2011
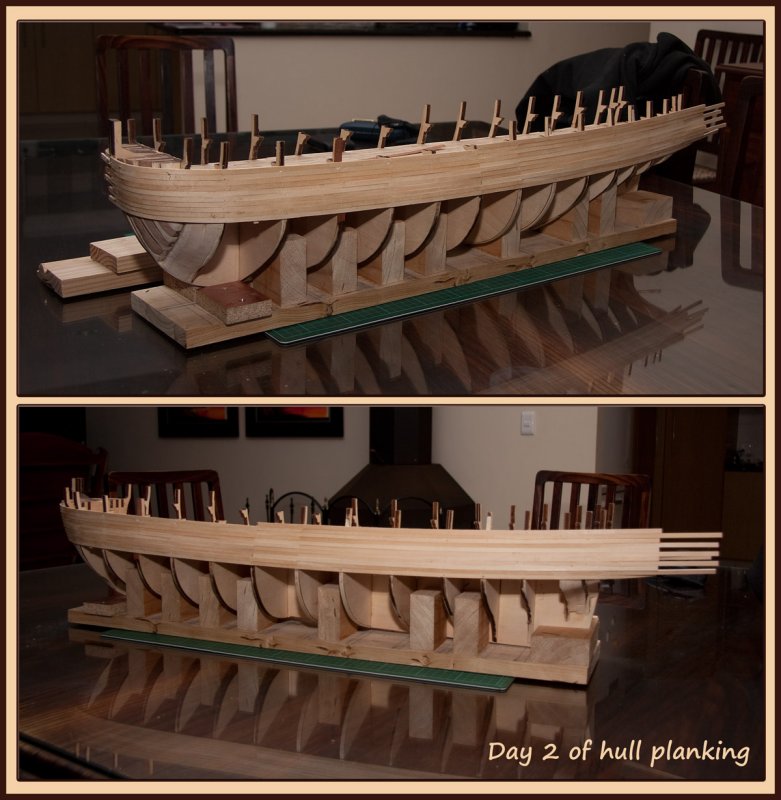
Day 2 - hull planking
I estimate it took about 7hr of hull planking to get to this point. The planking pattern in the bow is not too authentic and I'm (just ever so slightly) forcing the strakes to stay down across the bow to prevent a steep upward curve. This is forcing small stepped joints over the bow which I will be sanding down some weeks down the line.
14-MAY-2011
And off we go...
It took me a couple of hours (no exaggeration)to glue the first plank.
The instructions are not very clear other than saying start 25mm below deck on bulkhead nr 15. Dry fitted it with pins a couple of times - trying to figure out how to position it such that the planks (strakes) can follow 'natural' lines and at the same time fit and position the first plank such that I do not have to trim/taper the planks above this one too much...
time will tell...
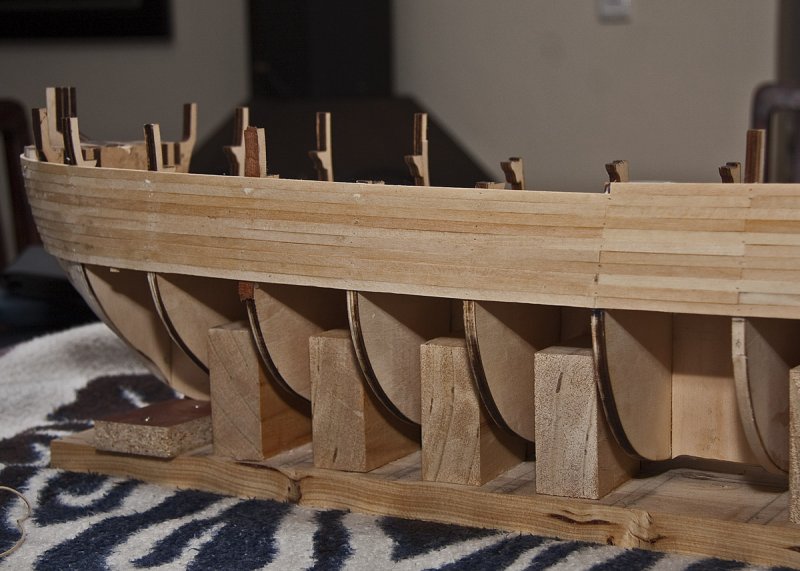
On this image one can also see the filler blocks that I added (balsa wood) between the stern bulkheads. They wont to much for this part of the hull planking but I think the filler blocks will assist with the lower part of the keel.
Also visible is some of the padding I had to do on the bulkheads to allow the hull strakes to follow natural lines. The idea of using the bulldog clips and paper clips to hold planks (that are not under tension) in place came from someone else's build log that I looked at some weeks ago. (as soon as I find it again I'll add the reference :) )
14-MAY-2011
Plank Bending setup
Made this plank bending jig from a photo in a book. Hope it was worth the time spent...:)
22-APR-2011
Any journey starts with one small step...:)
After taking a break for 4 months or so, moved the model back into the dockyard. Spending a lot of time trying to understand how best to plank the hull by studying tutorials and other build logs. This model is a single plank on hull - not double plank on hull as the first model I built.
I've planked the bottom part of the stern castle (?) - not sure I'm going to use the pins going forward. Might redo or overplank this part. Time will tell.
It appears to me that the proposed hull planking geometries used in the manual of the HMS Surprise kit is not that authentic. I do not know that for certain - but this concluded from comments and methods proposed by so many others...
All I know is that I will not follow the instructions to the letter - I am planning to fit 'garboard plank' next to the keel and make use of stealers and drop planks to maintain the natural flow and curvature of the hull.
For the garboard plank I need a wider strip of wood than has been supplied with the kit. I have placed an order for some wider strips today to fit a 'garboard' plank at the keel. (maybe this is just a stalling tactic) :)
Deep breath... I can do this...:)
30-DEC-2010
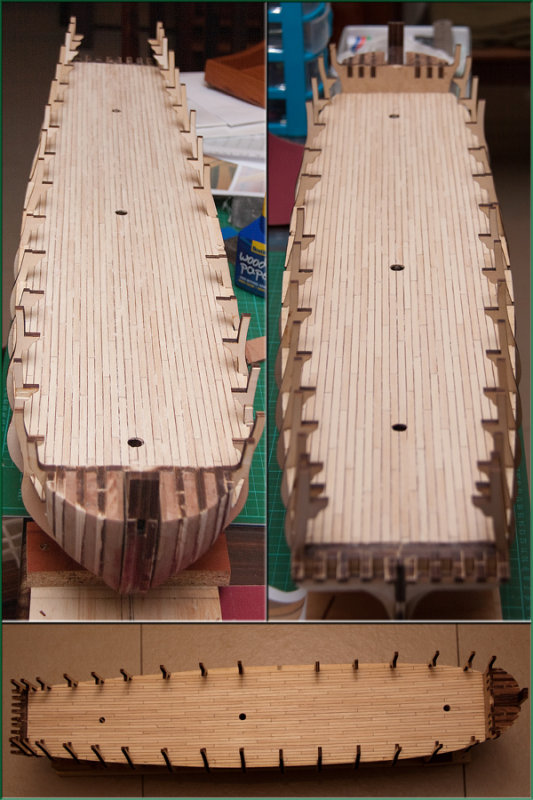
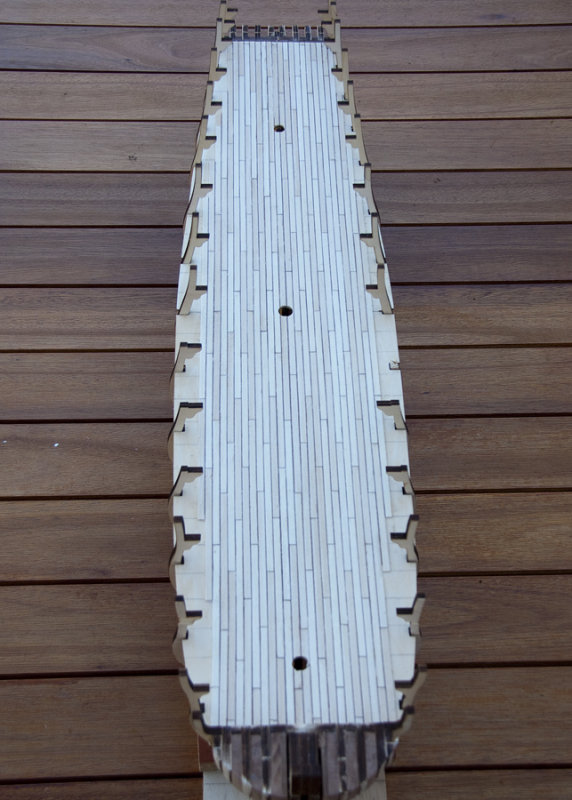
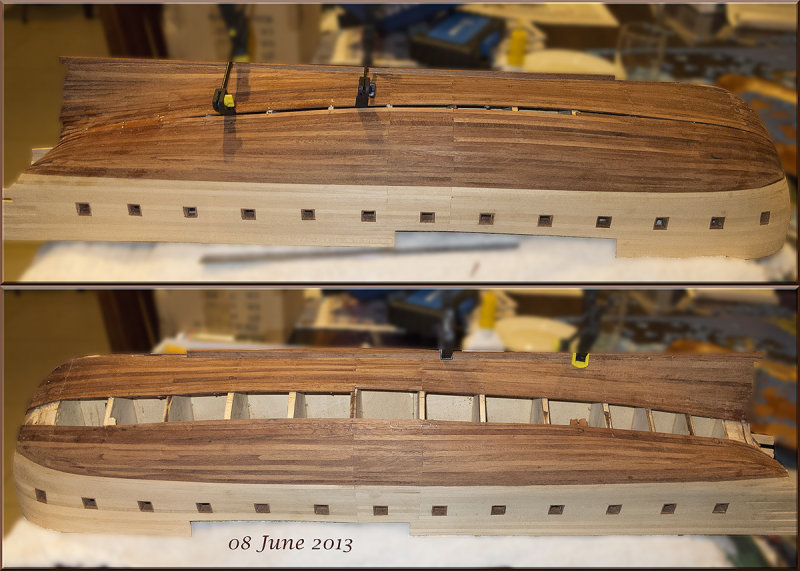
Gun deck planking done
I have decided to take the easy way out for the gundeck... Ran planks straight off and trimmed where necessary. None of the edges of this gundeck will be directly visible on the completed model.
On the top deck I will put down a margin plank and 'joggle' the deck planks into this... (Wonderful hobby - learning new words every day... :) )
Composite image showing completed gun deck - started scraping the deck - still need to sand and seal. darker verneers ('caulking') will stand out more at that stage. Total time logged on model to date - 47 hr of which 33 hr spent on deck planking and using the walnut veneer as caulking.
24-DEC-2010
And more rows down...
And on we go... all full length rows down. Now having to decide how to treat the edge planking...
21-DEC-2010
Shipwright at work
It was very hot today, on the longest day of the year...
I moved the dock yard to the patio in the early evening and continued with the planking...
21-DEC-2010
An on we soldier...
15 rows of deck plank down...
17-DEC-2010
Twelve strips down...
And twelve strips down.
One learns as you go along - I am now not using a single long strip of veneer down the length of the planks as in the beginning, but veneer pieces that is approximately the same length as the deck planks. These are spaced with some offset from the plank joints, allowing the last plank laid down to act as a "support" for the next veneer whilst gluing down the next plank...
The problem with the long veneer strips and the gentle curvature of the deck can be seen at the joint between two of the planks just behind the rear mast hole in this image - when trimming the veneer to the deck level - the whole strip pulled out as it was "suspended" just below the top of the planks rather than all the way to the bottom - so some "surgery" will be needed here. Also means that the lines of the planks will not be 100% straight in this part of the deck and some adjustments will have to be made with the next rows to straighten it out.
So we learn.. fortunatley this will not be too visible on the completed model and serves as a good 'training ground'
13-DEC-2010
Detail of veneer 'caulking' (9787)
Cropped image of deck planks with veneer 'caulking'. This is with little sanding with too coarse a grit of paper. I expect (hope? :) ) it will look better when all completed and sanded down with fine cabinet grade sanding paper and varnished with a varnish that will darken it ever so lightly...
13-DEC-2010
Gun Deck Planking - Day 2 (9786)
This is going to take some time. I trimmed down and rough sanded the 'veneer caulking' to get an idea what it would finally look like. Took me about 6 hr to get to this stage of the deck planking - this takes into account cutting the individual planks (about 200), as well as the veneer strips seen to the right of the picture.
The longer strips are glued length wise and then the individual planks layed next to the strip with short veneer strips positioned between the plank ends. This row has to dry completely so that the end bits can be trimme down to the plank widths before the next long run of veneer can be placed.
I am sure it will speed up as my fingers learn to contol tweezers, (not too much) glue and planks at the same time...
Even though much of this deck will be covered by the upper deck, one will be able to look down through skylights and open sections on to this deck. Anyway - still remain good practise for the top deck to be planked probably 1 year down the line...
10-DEC-2010
Gun deck planking (the start ) (9785)
Another view of the first line of planks. Also seen in this picture the "saw base/guide" I made for cutting the 120mm length planks.
The steel rule also clearly shows the size of this model. The gundeck is nearly 800mm long.
10-DEC-2010
Gun deck planking (the start 2) (9784)
Laying down the first gun deck planks against a clamped down steel rule.
After a couple of experiments, I decided to complicate life by using 24 scale feet individual planks rather than the longer length planks as called for by the instructions.
Life further complicated by deciding to use 0.6mm walnut veneer between individual planks to simulate the caulking, rather than marking with a pen.
The picture also shows the filler pieces of 'supawood' I formed and fitted in the bow. Hopefully this will help when the hull planking start.
27-NOV-2010
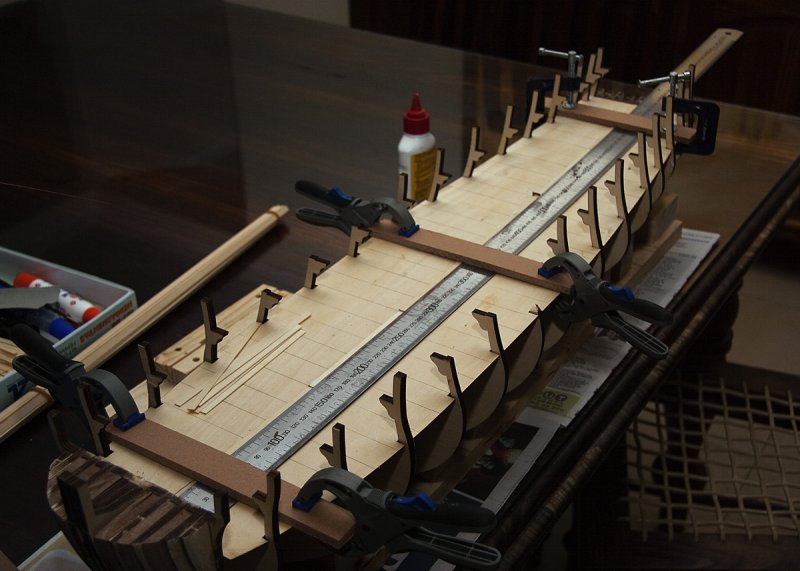
Different views of frame & Bulkhead
Composite of different views of the frame & bulkhead to date.
I notice from the front on view there is still a slight twist. Should be able to fix that when I fit the shaped bow bulkhead.
27-NOV-2010
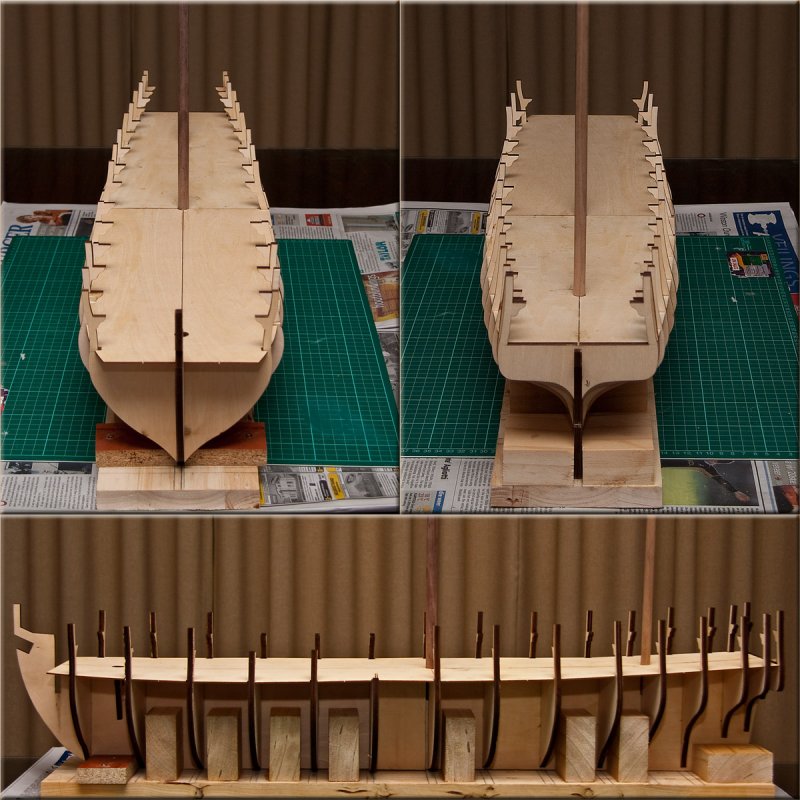
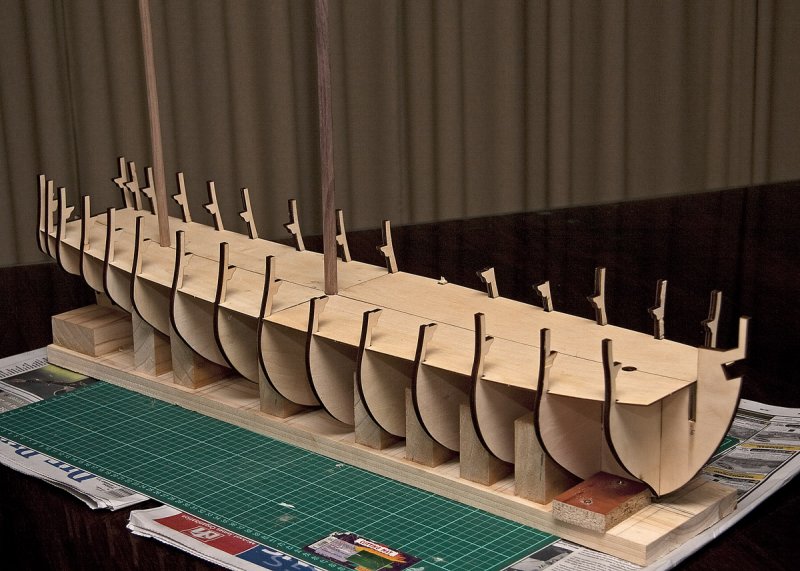
Frame & Bulkhead (nearly) done (9757)
Deviated from builiding instructions. Bow and sterncastle bulkheads to be fitted still. Want to put filler blocks in and shape whilst off the model.
The keel warped after joining two (very) flat pieces. Must have happened during the clamping of the strengthening pieces. I noticed this only when I started fitting the false decks. The aft frame/bulkhead was OK so I completed that part first.
I only then built the keel frame and decided to do it almost full length to be able to straighten the frame. Front false decks lines up. Small mismmatch in foremast position hole through false deck into frame. Nothing major (he says with confidence :) )
27-NOV-2010
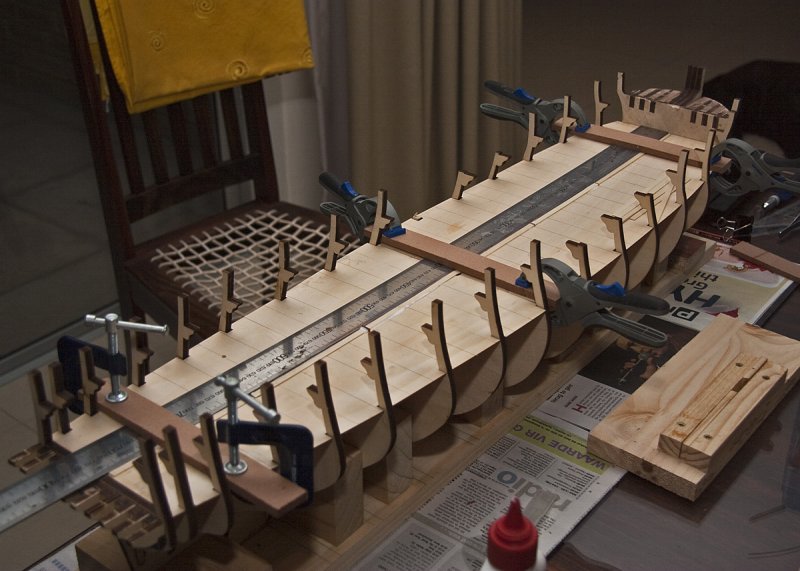
Keel frame (9746)
Who says 4lb hammers aren't modelling tools?
21-NOV-2010
How It All Starts
I expect it will ake me 2 years or so to build...
This is going to be fun :)
20-NOV-2010
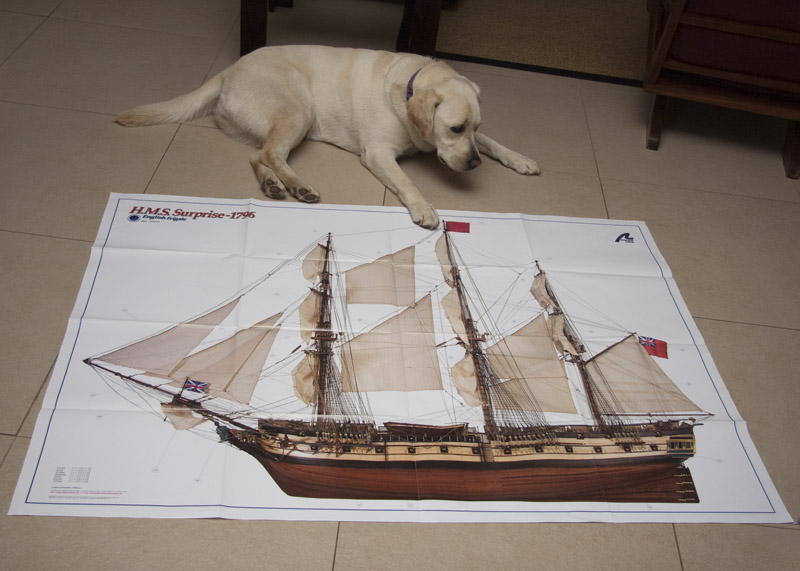
This is a big model
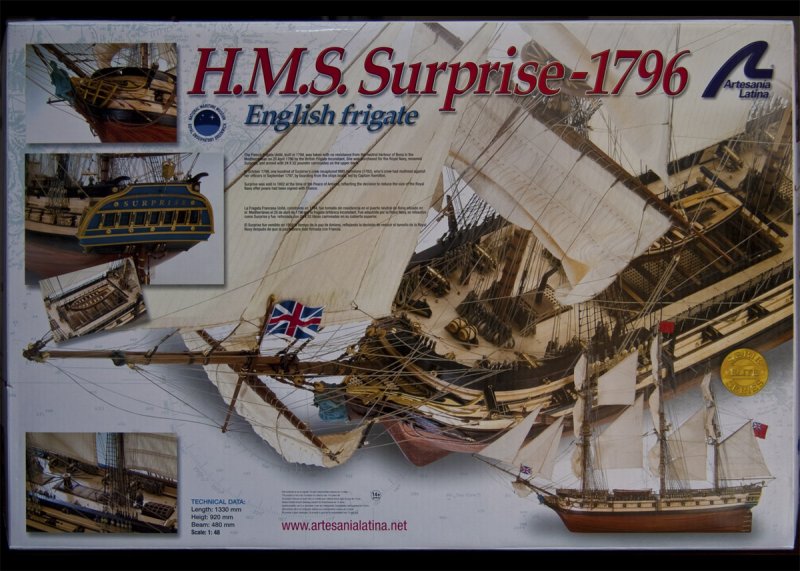
This is a big model. when done 1.3m long, nearly 1m tall and nearly 1/2 m wide. Included in the box is a 1:1 (full scale) poster of a completed model.
This is it - with our Labrador, Daisy used as scale reference. :)
20-NOV-2010
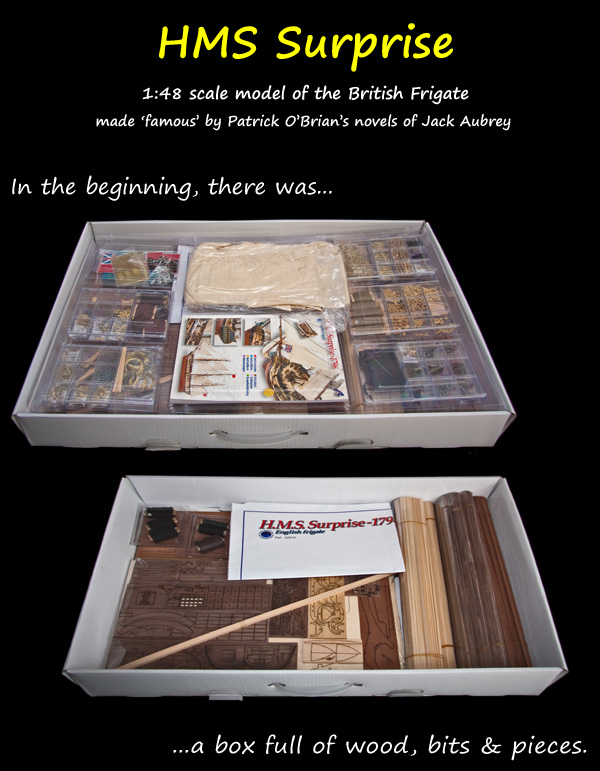
Box Cover
Finally, 11 weeks after placing the order, I received my next project.
Artesania Latina's model of the HMS Surprise.