Testors Model Master Light Sea Gray Euro 1 Dark Gray
Apple Barrel 20225 Bright Blue 20663E Real Red
Deco Art Burnt Sienna
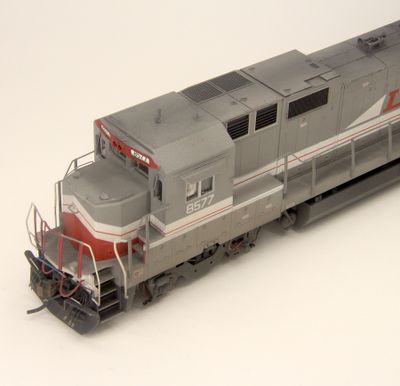
1. Prep - Remove the windshield wipers, snowplow, long hood handrails, antennas, beacon, air horn, exhaust stack, fuel tank, air tanks, air filters, inboard sanding lines and left snubber (shock absorber) on each truck sideframe (the one underneath the brake cylinder). Save wipers, handrails, air tanks and sanding lines. I use a liquid mask on the rounded cab windows, then use small squares of tape over headlight lenses and tape on cab side windows.
2. Modify - Using spot putty, fill the holes left by the antennas, and on the rear of the long hood, the recesses for the class lights and the sandfiller. Once the putty is dry sand those areas smooth. I also chose to replace the molded numberboards, which are not the correct size – so also sanded those down as well. I removed a couple of grab irons to make the sanding easier.
3. Sand front class lights down so they are almost even with the numberboard surface. Paint Real Red.
4. For the metal area that the fuel tank attaches to remove metal from the rear hole back. I used a razor saw to make a vertical cut to the underframe, and because I had a plastic shell that refused to come off I had to find a way to make a horizontal cut from the rear of the metal area forward to meet the vertical cut. I found a hacksaw I could slip between the area and the rear truck and was able to complete the process.
5. Apply grab irons to the top of the snow plow. Once dry airbrush it, spare knuckles and fuel tank black. I also hand painted the area on the bottom of frame that is now bare metal flat black – you do not have to paint most of the metal area the fuel tank attaches to – just a little bit of the joint between it and the horizontal frame. While you have the black paint out turn the shell over and paint black all areas that need it – inside of pilots and step wells, bottom of jacking pads, bottom of brakewheel chain guide, etc.
6. Rear pilot – attach spare knuckles even with outside edge of pilot with bottom just overlapping onto the bottom plate. Paint air hose knuckles aluminum. Paint grab irons above MU hoses white. Paint MU cable Real Red. Paint knuckles your favorite rust color. Paint all but the loops on the lift bar black – paint loops white. 8577 still had the pipes used to connect to fuel tenders so I added that with .022” brass wire and painted it a medium blue color with silver end – do the same on the front pilot.
7. Front pilot – using .030” styrene make an angled piece between bottom of anticlimber and pilot – it is 18” wide, length is probably 24” but I trimmed it by eye to fit -- remember to angle the ends that will attach to the model. I used white styrene and did not paint it later since it would be weathered. Paint air hose knuckles aluminum. Paint MU cable Real Red. Paint all but the loops on the lift bar black.
8. Trucks and Fuel Tank – drill out the left journal and remove the two vertical braces below that that held the snubber. Insert the replacement DW bearings and paint them black. On the conductor’s side front truck paint the speed recorder cable Real Red. While you have the red out paint the fuel fillers, fuel gauges, and the four stanchions (plus breakaways) on the handrails that will install above the front pilot. Tip on the fuel gauges – paint the whole gauge red, and then use a Fine Sharpie to draw around the gauge … this will put a little bit of black on the face of the gauge to make the red not so wide and give you a straight edge on it doing so. I then installed the fuel tank – the rear is even with the cut your made. I used a thick, water based glue to attach the tank to the bottom of the metal fuel tank insert. I then attached the air tanks to the frame adjacent to the fuel tank, then the inboard sanding lines (with some super glue). Then I installed the Atlas air filters and DA bell in the appropriate positions just ahead of the fuel tank, with the large air filter from the DW 139 set ahead of them.
9. Items that will need to be painted LMX gray are the antennas on the cab roof, air horn, class light blanks for rear of the long hood, DA sandfiller and DA 1029 Flashers. Note that I painted the antennas after they were mounted on the roof to help them blend in. I created LMX gray from Model Master Light Sea Gray and Euro 1 Dark Gray.
10. Roof – I installed a .015” brass wire EOT antenna and ScaleTrains Firecracker on the cab roof, Leslie air horn on the engine hood and after painting it silver, the exhaust stack. Also add the Atlas cab sunshades.
11. Rear Long Hood – I used small square pieces of .005” styrene to represent blanked class lights over the areas that were filled with putty. Add the DA sandfiller at the top just to the rear of the radiator – note that the hinge goes to the right as you face the rear.
12. Mount the DA 1029 Flashers above the pilot on the deck inside of the outer stanchions.
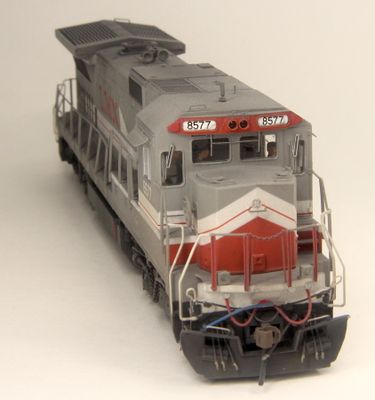
13. Now begin weathering – I first masked the grills on the sides of the hood and painted them Pollyscale Black. Then I masked the top of the radiator and used the same color there. Reinstall the handrails. I next sprayed a layer of the same black over the entire top of the locomotive – quickly wiping it off of the gray areas using Windex as a cleaning agent. This left black in the recesses/crevices and around other details. Then I sprayed black again as if it was the exhaust from the stack as it settles around the locomotive.
14. Walkways were next with weathering powders – I used a mix of black and dark gray from AIM Products and included the steps as well. I sealed the powders with a light coat of dulling spray.
15. Next up, I started at the sideframes and fuel tank with Model Master Acrylic Grimy Black, then on the frame sill, stepwells and pilots. That was followed with a lighter spray of their Roof Brown. Then the whole unit received a coat of Alclad II Lacquer Flat.
16. Note, I did weather the wheels, but the out edges rub against the sideframes (on all my B40-8s) and remove most of it.
17. I used Microscale Krystal Kleer to the DA flashers to create lenses (I lost the ones from DA). Then reinstall the windshield wipers.