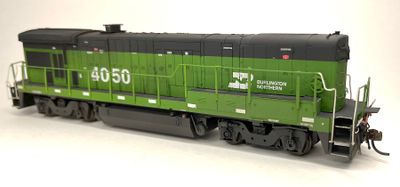
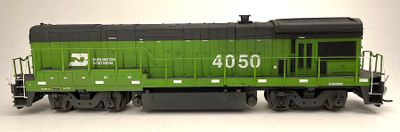
Starting point is an undecorated HO Atlas High Hood B23-7 Ph I.
Detail Parts: Archer Transfers - AR 88047 GE Treadplate
Detail Associates - 1509 Modern MU Receptacles - GE B-unit kit
Detail West - 117 Pyle Headlight - 220 MU Cable s/ Two Plugs, Receptacle
Hi-Tech Details - 6001 HO Dash-7 Thru Dash-8 GE Exhaust Stack Kadee #158 couplers
Shapeways he6agon - N&W/NS C36-7, BN B30-7A1B Radiator Microscale 87-527 GE & EMD Late 1980’s Locomotive Data & Builders Plates 87-549 Burlington Northern Diesels (1989-1996)-Diesel
Rail Power Products - C32-8 Numberboards
Scalecoat 1 BN Green
Smokebox Graphics DL6387 Locomotive Data 2010+
Tichy 3015 18” Drop Type Grab Irons
Underframe: - No modifications to the Atlas build other than deepening the holes cast in the FB-2 sideframes (all three in each sideframe). Don’t forget to add the chain guide at the right front.
Frame: - Cut front weight screw receptacle off
Sill: - Cut the seat holders off then filled the slots that help hold the cab in place with strip styrene. Use putty to fill any holes and smooth the work. In this process I removed any treadplate in the raised area in front of and behind where the cab would be. - Gloss coated the raised area. - Applied Archer treadplate to the raised area that was cut to fit prior to application. When dried gloss coated over it to seal it. - Installed Atlas details: drop steps, MU hoses, train lines, cut levers (opened up hole at outside base of levers to #75 and glued end in). Note for the cut levers I drilled new holes for the two center pins about 1/32” below the Atlas ones (which I filled with putty) to provide clearance for the MU receptacles. Added DW 220 – this only has one MU receptacle/cover so I glued the other plug to the pilot and added a cover from DA 1509. For the grab irons just above the MU hoses I used Tichy grab irons.
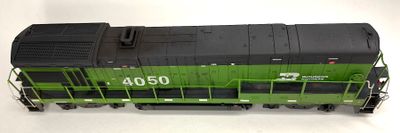
Shell: - On the end of the Atlas long hood I removed the headlight casting and the ridges around the numberboards. Those were replaced – DW headlight casting and RPP numberboards which I sanded down to reduce the thickness on the back and of the ridges around the boards. - Cut out a portion of the Shapeways radiator grills and mounted them in holes cut in the shell. - Drilled through the Atlas exhaust tray and enlarged the area to accept the Hi-Tech part. While working with the Hi-Tech part I went ahead and worked on the exhaust stack. It is a kitbash of the Atlas large exhaust stack – remove the base of the stack that would fit in the Atlas hole for it, then remove the lip at the top. Do not file the lip down, I used a chisel blade to trim if from the side (the idea is to keep the height). After sanding the sides flush I added the Hi-Tech lip to the top. Set this part aside until later. - Cut the area of the shell off ahead of the long hood. And added a DA GE B-unit kit – this does not have the same contours as the Atlas shell so I filed/sanded down the Atlas shell at the area where the hood curves from the roof to the hood side. This kit was short by .028” from reaching the walkway so added sheet styrene to fit. - Drilled #78 holes for grab irons in the DA part (don’t forget the one on the roof for a straight grab), then redrilled the ones on the Atlas hood and cut off the molded grab on top of the radiator and replaced it with a wire one. You’ll need to drill additional holes in the end of the Atlas long hood for grab irons on the engineer’s side – one beneath the number board and one equivalent to the bottom one on the left. - Added the Atlas sand filler to the Atlas hood. - On the DA end the numberboards are holes – I filled them with pieces of Evergreen styrene.
Handrails: - I used two modified Atlas stanchions (per side) cut out of a C30-7 set with .015" brass wire superglued together. I used prototype photos to locate and drill the holes for the news stanchion mounting pins. These two delicate sections will remain separate through the painting and final install process with the regular handrails being added last, with all glued together at that point. - I drilled #70 holes for the new stanchions and redrilled the holes for the rest to accommodate paint.
Paint: - I washed the sill, hood and handrails – the handrails were sprayed with Duplicolor plastic prep spray to help adhesion of paint to these delicate parts. - These components were then sprayed with Badger Stynylrez white primer. I sprayed the underframe, fuel tank, and sideframes with a lightened black mix. Wheel sides received a brown paint at this time. - Scalecoat I BN Green was applied to the handrails, sill and to the hood sides. - The green areas were masked off and a slightly lightened acrylic black was airbrushed on. For the walkways and top of hood I mixed acrylic flat black with a dark gray 50/50 since these areas are weathered to this color by my era. - The sides and of the long hood were glosscoated. Once dry the Microscale decals were applied and after that process the sill and hood were coated with Testors Gloss Cote from an airbrush. This was followed by a flat coat as the units were well worn during my period of modeling. - The grills were masked off and received a “radiator black” mix I use – this is a slightly lightened black with just a touch of brown. - I mated the sill and handrails and did a round of flat spray on the handrails. Then used black, dark gray and dark brown acrylic paints to paint small patches of weathered areas on the walkways. I then mounted the shell on the sill and then everything went onto the underframe and put the Kadees on – the couplers had been sprayed with a rusty color, with trip pin painted lightened black. - Detail painting consisted of using Apple Barrel Real Red on the fuel filler caps. White on the ends of the handrails and the graib irons above the MU hoses.
Weathering: - Exhaust stack receives a spray of flat black – I then move in quick “streaks” away from the stack – this is tough to weather since it is black on black. I added AIM black weathering powder to the top of the stack and the area around it – that helped it stand out. - I then used what was left on the brush for the black powder down the sides of the hood, primarily in the area under the stack, and then tapering application towards the ends. - Pictures of the walkways show that they were grimy black on many units after years of use. I used AIM medium and dark gray powders, and black, to simulate this coloration on the walkways and into the stepwells. - I then used a light coat of flat spray to seal the powders in place. - On the sideframes and fuel tank I used Model Master Dark Skin Tone, then on the frame sill, stepwells and pilots.