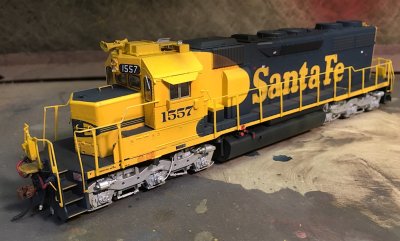
Started out as an as delivered warbonnet with beacon up top. Removed the beacon and filled the hole, then removed the class lights on the nose. Then repainted both areas with Model Master Insignia Yellow, which was almost a perfect match for the Athearn yellow. I also repainted the two grab irons on the front of the nose from blue to yellow. I use liquid mask on cab windows and small pieces of drafting tape to protect the headlight bulbs.
Next I added the eye bolts to the long hood roof and painted them with Floquil ATSF Blue – which is a shade too dark, but I wasn’t worried as weathering would blend them in.
Since this would become a SD39u which would have a different number I removed the numbers from the cab side and above the rear headlight by soaking the factory lettering with Solvaset on paper towels which I would keep reapplying the Solvaset to until the numbers were soft enough to wipe off. In both areas I sprayed Insignia Yellow as there was leftoever bluish tint.
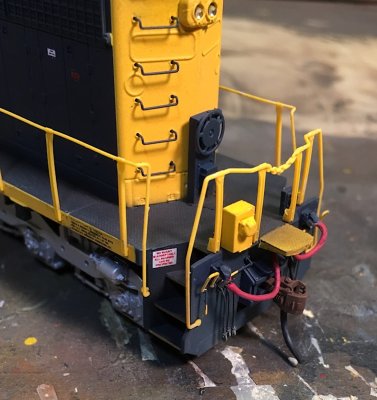
I took a new step with this model and used Archer Treadplate Decals – the bonus of Cannon is that they are precut for the model. The bonus of Archer is that they are much easier to install end deck stanchions through. I carefully measured the walkways and cut the decals to fit the walkways and then the end decks. I then carefully cut two pieces that would go on top of the battery boxes in front of the cab, leaving the latches exposed. Also added treadplate to the Athearn drop steps – I found I had to scuff the Athearn piece in order to get the treadplace to stay in place. I did not redo the steps. When all the Archer decals were in place I painted them with the Floquil blue, except for the drop steps which I kept off the model and painted yellow. Note, I removed the brakewheel stand on the rear end to make decal application easier and glued it back in place.
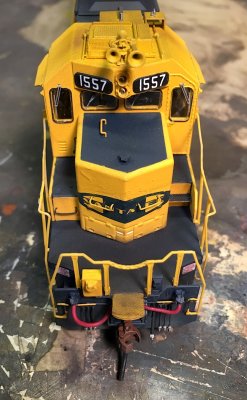
Now the true detailing process began with the cab roof AC, horn on a stand, and two ground plane antennas with conduit. All, except the conduit were painted yellow separately and then carefully applied to the model. The conduit, and its eye bolts, were added after the other cab details were in place to ensure proper length and spacing. Once the conduits – one per ground plane antenna – were in place I airbrushed them with the MM yellow. On the pilot ends I added dummy MU plugs and used solder as the cable between them. The cable adds reinforcement to the drop steps to help prevent them from getting knocked off. Kadee 158s were used and were painted Model Master Leather then dry brushed with a dark brown, and the metal drop down piece painted black.
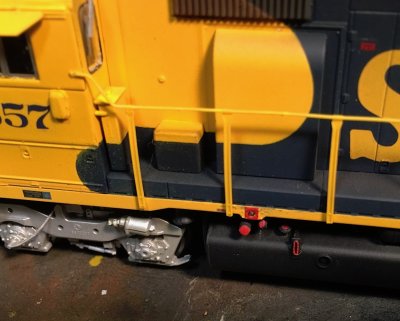
The fuel tank received a .060” retention tank on the rear, an additional fuel filler and dial sight glass on each side, then a piece of solder was added to the front end of fuel tank on the conductor’s side. Everything was painted black then Signal Red for the ends of the fuel fillers and sight glasses.
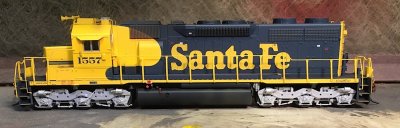
Spare knuckles were added to the sideframes on the engineer’s side as were air filters on both sides of the unit – the large air filter behind the fuel tank on the conductor’s side required me to add some Evergreen H-beam to the top of it so it would have something to mount to. All were painted silver, with the knuckles receiving Leather.
Two unique features of the SD39u are the Slug MU Stand on either end, and what I assume is a box for additional electronics between the blower bulge and the cab. Thanks to excellent photos from Eric Goodman I was able to scratch these components from Evergreen styrene and DW MU Plugs, also prepainting them before applying them to the model.
After adding the handrails back on I glosscoated the model and used Microscale decals from a few different sets to add the numbers on the cab side, numberboards (after painting the boards gloss black) and above the rear headlight; safety slogans in the step wells and various safety decals on the hood sides. After the decals had dried I applied another coat of gloss. Then after that dried, the Model Master version of Dullcoat (I have sworn off Testor’s Dullcoat).
I made sure all the little details were painted and then started weathering – applying weathering powders to the fuel tank, cab roof and walkways. Then some acrylic paint was drawn down below the battery boxes to represent rust. Next up I airbrushed Floquil Mud on the fuel tank ends, pilots and a general mist of the underframe area. The pictures I have of the 1557 show the trucks and underframe to be surprisingly clean in 1994.
Final touches were to paint the mirrors by the side cab windows silver, remove the masking from the cab windows and headlights and then add windshield wipers.