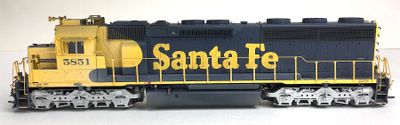
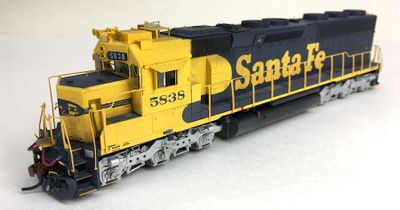
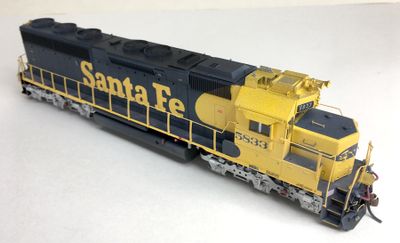
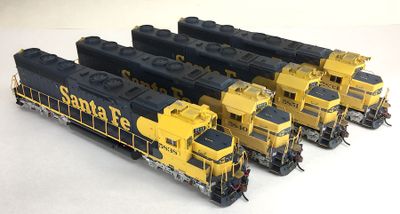
Four units are involved, 5833, 5838, 5840, 5851 – unless specified the steps apply to all of them. Blue used is a lightened Scalecoat II Santa Fe blue, yellow is Model Master Insignia Yellow acrylic. Testors Silver and Model Master CreateFX Aluminum. Note that I use white as a primer to get the brightest yellow.
1. I removed the couplers and screws either side of the fuel tank that hold the shell to the frame and installed a 21-pin non-sound decoder. Couplers remain separate for now and are replaced with Kadee #158s airbrushed with darkened Model Master Leather. Trip pin is painted black.
2. I drilled 11 #78 holes for eyebolts in each roof, then two more on either side, rear, under the radiators. Then took off the rotary beacon and platform. While on the roof, check your fan grills – a few of mine were either loose or mismounted, so I fixed those. I also removed the spare knuckles from the engineer’s side sideframes. I removed the rotary beacon and stand, then filled the hole with bondo. When dry I sanded the bondo to match the contours of the roof.
3. I removed the classification lights by using a sanding stick to slowly, gently sand them down to make the nose and rear smooth in those areas. Note that on the rear I removed the grab irons above and below the class light on the conductor’s side to make class light removal easier. I did not remove the number board gasket (prototype does not have it).
4. There are no modifications to the fuel tank and only addition to the sideframes was installation of DW 196 Spare Knuckles (airbrushed aluminum before installation, then the knuckle is painted your favorite rust color), which I feel gives a much better representation of the part than the Athearn one.
5. I removed the sideframes and painted the wheel faces Floquil Rail Brown, then reinstalled the sideframes.
6. Drill #62 holes in the pilots (front and back) for DW 236 MU Plugs and cable up front and two receptacles in the rear. Spacing for the holes varies unit to unit so check photos of the unit/s you are modeling. For those where the spacing is towards the outer two stanchions I replaced the DW “cables” with solder so that I had enough to reach the “plugs” and it could be shaped properly. Leave the DW parts separate until they are painted blue and Testors silver, you can paint the cable part after installation.
7. Built a single beacon platform out of .010 sheet styrene based on dimensions of scale 16” X 16” for the top piece. But I did not mount it until after priming and painting yellow. This was mounted on 5838.
8. Airbrush them aluminum then install the DW Salem Air Filter set (one large behind the fuel tank on conductor’s side, two small in front of fuel tank on engineer’s side).
9. Install lift rings (I used a set from KV Models).
10. The Athearn window frames are loose so I used ___ to fix them in place. Then painted the middle frames Testors silver. I put liquid mask or drafting tape on all glass before proceeding further – don’t forget the water sight glass on the long hood.
11. Install grab irons on the snowplow, these get painted yellow. And install new grabs on the rear of the long hood to replace the two removed, these get painted blue, along with the other grabs on the rear that Athearn forgot to paint blue.
12. Some of the nose heralds were damaged by my class light removal so I glossed those areas plus the top of the stepwells and applied Microscale decals to fix the heralds and to install the square safety decals in the stepwells. Once dry I oversprayed gloss to seal them.
13. I went back over each unit and touched up any paintwork that needed fixing, then sprayed a flat coat to seal the units before weathering.
14. Weathering started by fading the paint on three of the units with Model Master Light Grey, with particular attention painted to the yellow areas.
15. Next is a spray of 12:1 black/dark brown around the exhaust stack and then lightly around the rest of the roof. I then back off and spray it from a 45 degree downward angle very lightly around the unit quickly just to give a quick/light coat.
16. After that I move to the walkways and steps, where I coat them with AIM medium and dark gray weathering powders, which I then seal with a light spray of Dullcoat. Then I move to unit unique weathering – like rust streaking under the battery boxes. I sprayed a black/brown mix on the radiator grills next, and then used the same mixture as a wash on the inertial air intakes. Then I moved to using Floquil Grime and then Mud from the airbrush on the underframe and pilots, with a light spray from the side all the way around the unit of each color. Last I took some Dark Brown acrylic paint and dry brushed it to the snow plow and rear pilot.
17. Glass masking is removed and the final step is the painting of the silver on the mirrors cab.