Detail Associates 1509 MU Receptacles Set - Modern 3001 Sandfiller Cover, EMD Late Type
Details West 196 Spare Knuckles 226 Salem Air Dryers Filters
KV Models KV-147H EMD GP/SD/SW Handrail Stanchion Set A KV-1023H Lift Rings
Tichy 3015 18” Drop Type Grab Irons
The SD45-2 chassis will need a little bit of modification to enable the shell to fit. Remove the raised metal areas underneath what would be the cab area of the original shell since the areas for the B’s walkways need to be flat. Next I removed the sideframes and painted the wheel faces a darkish brown. Add DW -196 spare knuckles to the sideframes on the engineer’s side. I prepainted them silver before installation, then added a rust color to the knuckle after install. Remove the speed recorder from the front sideframe on the conductor’s side and paint the area it covered silver.
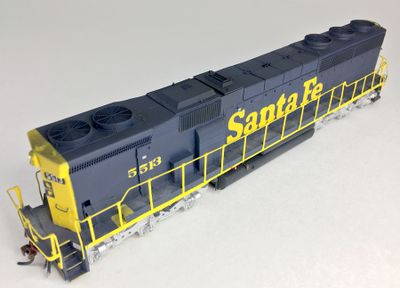
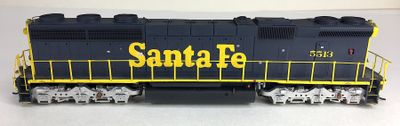
Before we begin actual construction, here’s a review of changes that will happen to the Big Dawg shell: - pilots/steps replaced with the respective Athearn parts - hood ends replaced by Cannon part 1154 - turbo hatch replaced by Cannon part 1952 - addition of a .010” styrene radiator fan hatch - dynamic brake & radiator fans replaced by Cannon parts 1853 & 1705 respectively - jacking pads & chain tensioner replaced by Cannon parts 2153 & 2152 respectively - center/hinge line scribed in top of engine hood; add hinges to the engine hood access doors - rear area of dynamic brake grid angles reconstructed - scribe access doors at the front of the shell right above the walkway – both sides - create an emergency brake handle access port on the engineer’s side - create a cabinet on the conductor’s side - reuse Athearn curved grab iron from Athearn onto BigDawg shell rear
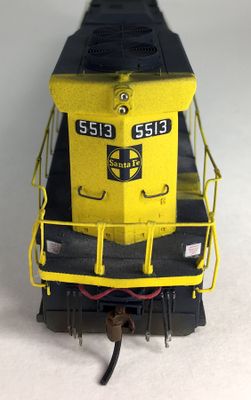
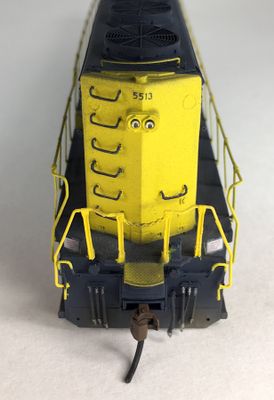
Take the Athearn SD45-2 shell and separate the walkway from the rest of the shell. I then used a razor saw to remove the pilots and steps for use on the “B” shell – I made the cut a few scale inches inwards from the steps where there is a slight bump in the Athearn shell. On the end piece with the anticlimber, carefully remove it and its supports without damaging the other detail on the piece. Also remove the air tanks from under the walkways – those will also be used. Moving to the Big Dawg shell, I washed it before I began work. Then used a razor saw to remove the same area of pilots and steps so that they can be replaced. From one of the pieces just removed I used the razor saw to remove the anticlimber and its support – this will be reinstalled on the front Athearn pilot. Next, I removed the four jacking pads and the chain tensioner. Use a long file or sandpaper on a sheet of glass to smooth the wider/deeper sections of the side sill so that they are all level. I then removed the long hood end from the rear end – this will be replaced by a Cannon & Co part. Next, I cleaned out the water sight glass area. Note, I did not remove the front hood end because this would have weakened the shell too much at this point – safer to wait to do so until after the Cannon part was installed at the rear. Moving to the roof, I sanded down the pre-installed fans to create a level roofline. Then shaved off the turbo stack and sanded down that hatch in preparation for the installation of the Cannon part. The BigDawg shell has uneven heights for the four “hatches” above the engine compartment – with the two outer ones being higher than the ones in the middle, and all angle towards the middle. I carefully sanded the tops of those hatches to make the height more even and level, then re-rounded the edges towards the sides. Then cut a centerline, thing “trough” to create eight hatches. I moved to the front of the unit and sanded the headlight mount down to the proper length. I moved to the hood sides and sanded out some scratches/imperfections, and in other areas I used bondo to fill some small imperfections than cleaned those areas up. I used SD45-2B drawings from the February 2015 RMC as a template to cut a radiator roof hatch from .010” styrene. I also used the drawing to mark fan centerlines and drill points for the eye bolts and curved grab iron. I glued the styrene in place and then began creating the holes for the radiator fans, I started at the center line with a #60 drill bit, then used progressively larger drill bits until I got to a hole size large enough to accept the end of my reamer. I then used the reamer to create proper sized holes for the three radiator fans. I moved to the dynamic brake fans holes next, resizing the original BigDawg holes. Before installation I prepped the Cannon hood ends. The one for the front end needs to be shortened as the dynamic brake “Hammerhead” projects out into some of the front area. I shortened it to just above hole for the headlight – note that the Hammerhead is at a slight angle such that the engineer’s side is lower than the other side by a little bit, so adjust the top of your newly shortened hood end accordingly – I used a razor saw to remove most of the top part of the end and then a metal file to make final adjustments. Fill the headlight mounting hole on the front hood end and remove all detail except the grab iron dimples that are side by side on both sides of the piece and the sander door latch holder below those sets of dimples. Then drill holes for grab irons, install the sander doors and the headlight mount/headlight on the long hood end. Once dry sand the filled headlight hole to match the front hood end angles. Add a headlight to the BigDawg front headlight mount after reduced it’s depth by half. Moving to the pilots – at the rear, the Athearn drop step, MU stand, air line and mu hoses remain in place. I added a DA 2211 coupler lift bar and two DA 1509 modern MU receptacles as “dummy plugs”. Note that for the one below the MU stand I sliced a slot into the small anticlimber for the dummy plug to hang from. At the front pilot, the Athearn air line, mu hoses and coupler lift bar remain in place. I used .010” styrene to create a pilot plate. I then added the large anticlimber that I cut from one of the Big Dawg pilots. On the right side of the hood I added a .005” piece of styrene towards the front sized scale 4.25’ X 2.25’. Above that is the cut out in the hood for an emergency brake handle scale 1’ X 1’ square, backed by .010” styrene. On the left side of the hood I built a .005” piece of styrene between the handbrake and blower walkway sized just shy of scale 2.75’ X 2.5’. Just ahead of the blower bulge is a box – I fashioned it from styrene to scale 3’ wide X 2.9’ tall. Width is .120” deep in order for a .015X.125” piece of styrene strip a scale 3.15’ wide to have a bit of a lip over the box. I waited to install until after I added additional treadplate. On the roof, and areas associated with it, I cut away the rear dynamic brake bulge and replace it with pieces of .015” styrene and bondo to represent the angled features of the prototype. For the engine room roof, I added short pieces of .020” styrene rod to represent hinges – for a total of 16. Eyebolts on the roof were next, plus the two at the rear beneath the radiators. I left the two eyebolts off the mount at the front of the dynamic brake hatch off to make masking paint lines easier. Add the front sandfiller hatch (DA 3001). Moving to the sills I added the Cannon jacking pads and chain tensioner. And then drilled holes for the KV stanchions. I used .015” brass wire to bend the handrails – with the exception of those above the rear pilot, for which the Athearn Genesis part was used (bonus: it was already Santa Fe yellow). I used super glue to attach the stanchions to the handrail wire. Once all were complete I taped them to a piece of cardboard to be painted. So set aside to receive yellow paint are the handrails, two eyebolts and the curved grab iron that goes to the rear of the radiator fans. Set aside and receiving blue is a MU receptacles and cable set and grab irons. Set aside and receiving silver is a DW 226 Salem Air Filter set. I primered the shell, handrails and set aside parts white. Then painted the respective shell areas and parts Scalecoat II Santa Fe Yellow. Once dry I moved on to masking the shell to receive blue – then airbrushed SC II Santa Fe Blue on it and the respective parts. The air filter set was then sprayed silver. Once the paint was dry decals from two Microscale Santa Fe sets 87-29 & -619, one EMD & GE Data set (for the front numberboards) and Smokebox Graphics DL6387 Locomotive Data 2010+ (for electrical warning labels) were added. I also added all of the previously separate parts and handrails. Then everything received a light coat of glosscoat. I went back over each unit and touched up any paintwork that needed fixing, then sprayed a flat coat to seal the units before weathering. Weathering started with a spray of 12:1 black/dark brown around the exhaust stack and then lightly around the rest of the roof. I then back off and spray it from a 45 degree downward angle very lightly around the unit quickly just to give a quick/light coat. After that I move to the walkways and steps, where I coat them with AIM medium and dark gray weathering powders, which I then seal with a light spray of Dullcoat. Then I move to unit unique weathering – like rust streaking under the battery boxes. I sprayed a black/brown mix on the radiator grills next, and then used the same mixture as a wash on the inertial air intakes. Then I moved to using Floquil Grime and then Mud from the airbrush on the underframe and pilots, with a light spray from the side all the way around the unit of each color. Last I took some Dark Brown acrylic paint and dry brushed it to pilots. Last steps are to add light bulbs and then I used Microscale Kristal Klear to fill in the water sight glass recess.